Introduction to 3D Bathroom Floors
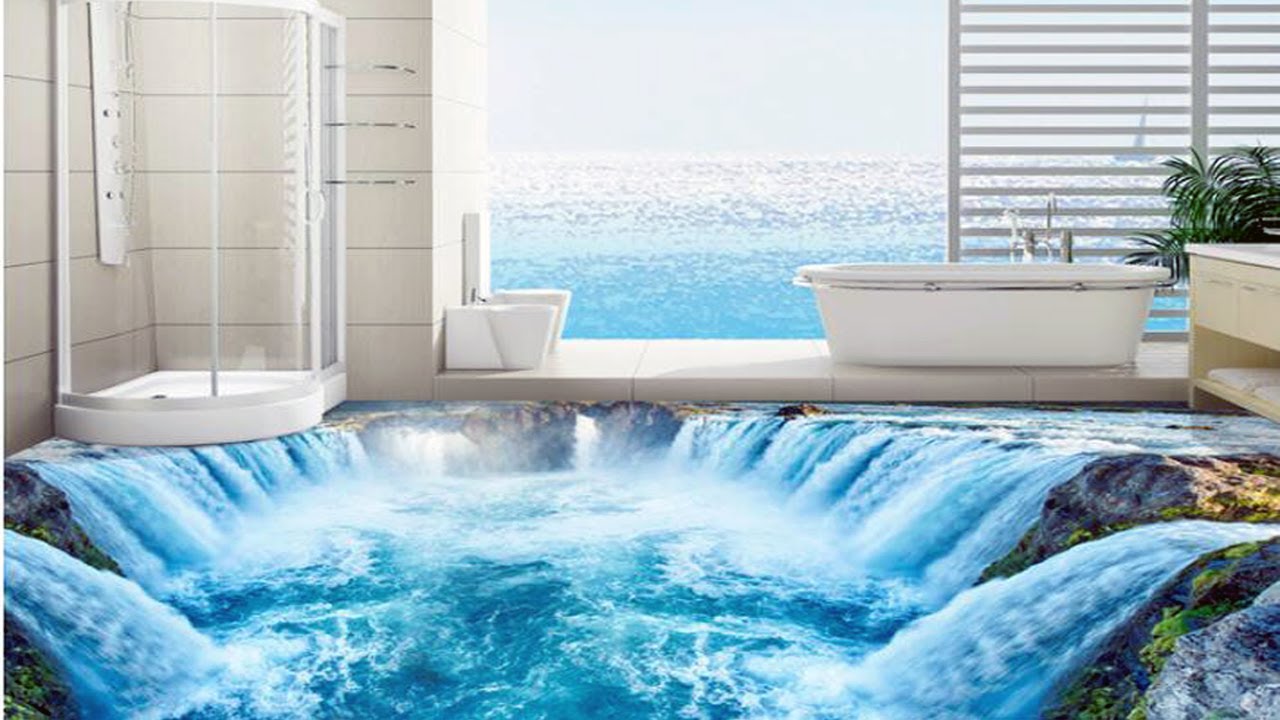
3D bathroom floors are a revolutionary concept transforming ordinary bathrooms into extraordinary spaces. These floors use high-definition images, often encapsulated in resin, to create an optical illusion of depth and realism. Imagine walking into your bathroom and stepping onto a sandy beach, a vibrant coral reef, or a serene forest floor. This visual effect can make your bathroom a stunning and unique place to start your day.
The technology behind 3D floors involves combining printed images, transparent layers, and special coatings. High-quality images are printed on a durable substrate and then covered with layers of transparent epoxy resin. This creates a depth effect that makes the image appear three-dimensional. The result is a floor that looks incredible, is highly durable and is easy to maintain.
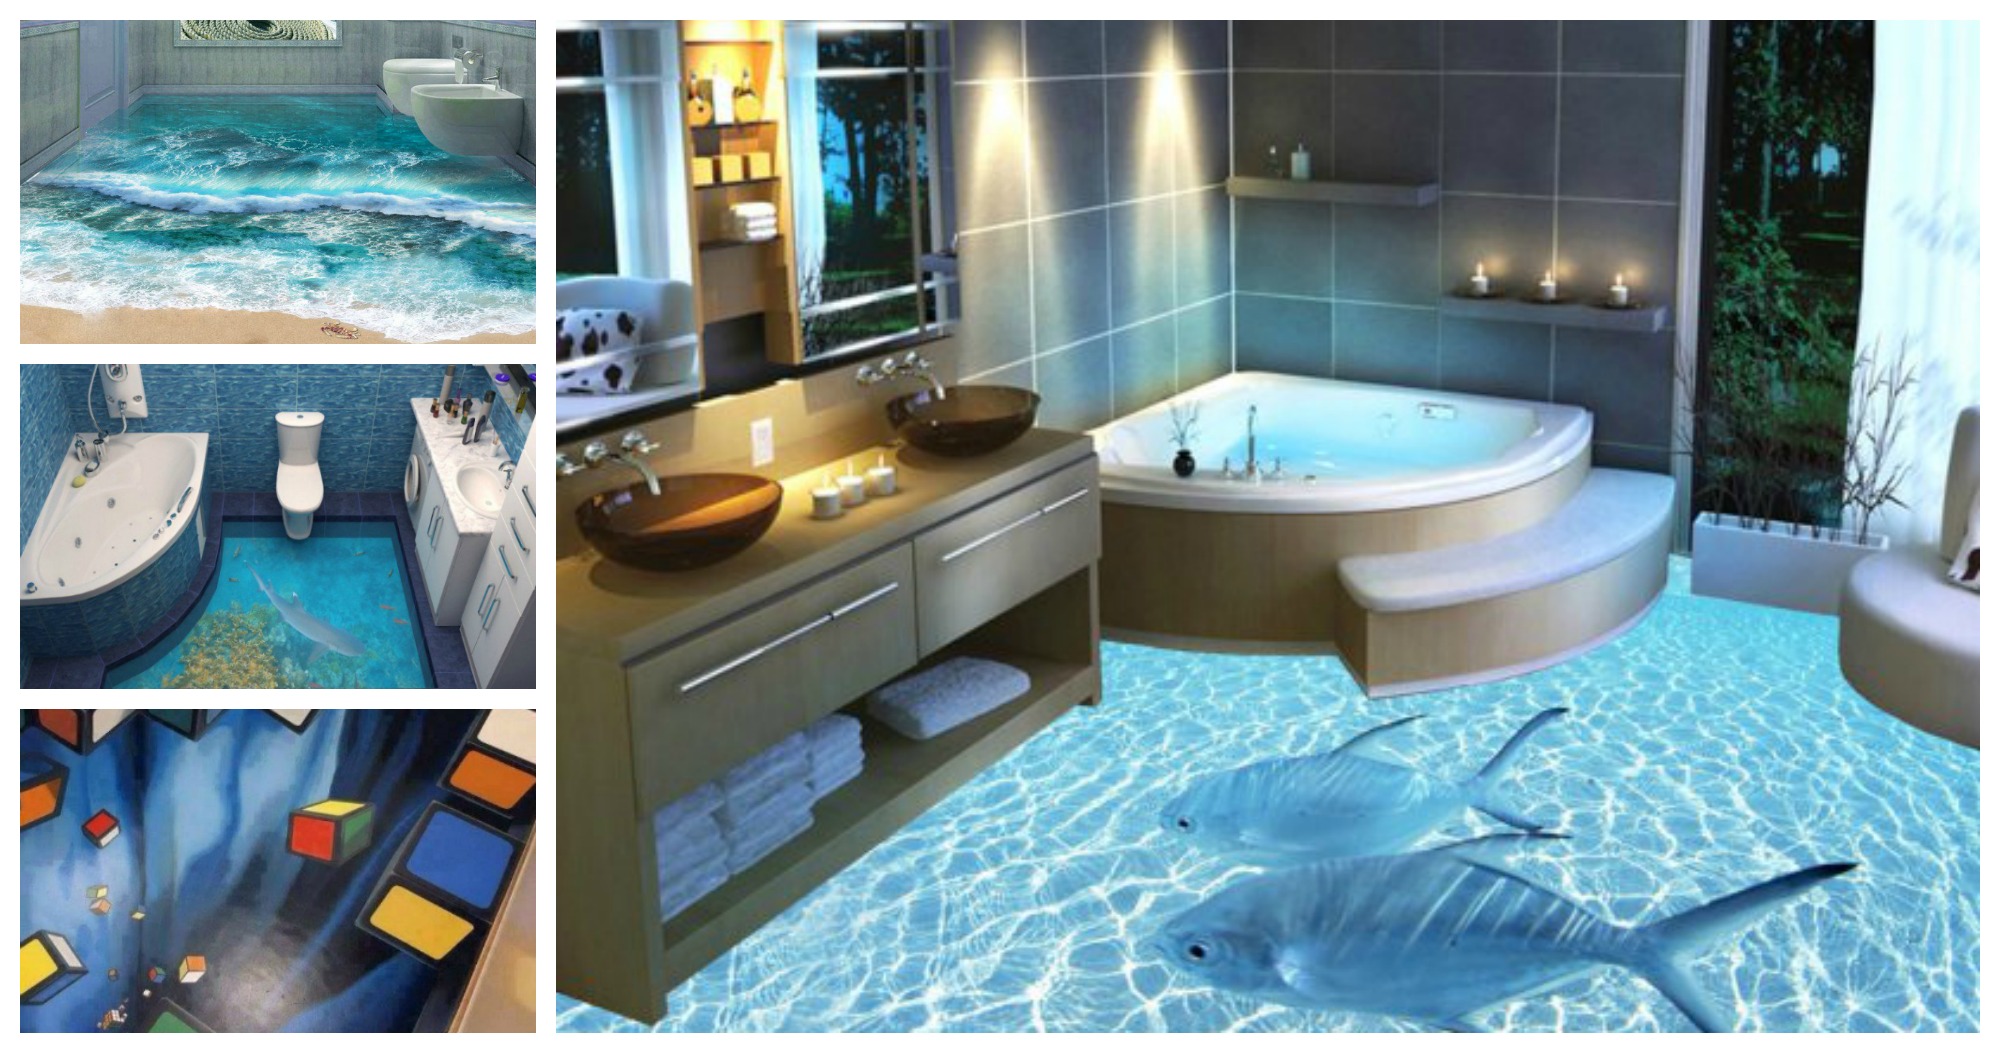
3D bathroom floors offer endless design possibilities. You can choose from a wide range of images, including nature scenes, abstract patterns, or even custom designs that reflect your personality and style. Whether you prefer the tranquility of an underwater scene or the dynamic energy of a bustling cityscape, there is a 3D floor design that will meet your aesthetic desires.
One of the major benefits of 3D bathroom floors is their ability to create a sense of space. Bathrooms, particularly in urban apartments, can be small and confined. A well-chosen 3D floor can visually enlarge the space, making it feel more open and inviting. This can be especially beneficial in homes where the bathroom is one of the smaller rooms.
Moreover, 3D floors are not just about aesthetics; they are also practical. The epoxy resin used in these floors is water-resistant, making it ideal for the wet environment of a bathroom. It also provides a seamless surface with no grout lines, which makes cleaning easier and reduces the risk of mold and mildew growth. Additionally, the resin coating adds a layer of protection, making the floor resistant to scratches and stains.
Finally, installing a 3D floor can significantly increase the value of your home. Potential buyers are often looking for unique and stylish features, and a 3D bathroom floor can be a major selling point. It demonstrates that attention to detail and a commitment to high-quality design have been invested in the home, which can make it more appealing to prospective buyers.

The Installation Process
Installing a 3D bathroom floor involves several meticulous steps to ensure a flawless finish. The process begins with preparing the existing floor, which typically includes cleaning and leveling the surface. Any imperfections, such as cracks or holes, need to be repaired to create a smooth and even base for the 3D image.
Once the floor is prepared, the next step is to apply a primer. The primer helps the subsequent layers adhere properly to the surface, ensuring durability and longevity. It also prevents any moisture from seeping through the layers, which is crucial in a bathroom setting. The primer is allowed to dry completely before moving on to the next step.
The printed image is then carefully laid out on the primed surface. This step requires precision to ensure that the image is positioned correctly and free of any wrinkles or bubbles. Depending on the design, the image may be a single large print or several smaller sections that fit together seamlessly. Once the image is in place, it is pressed down to remove any air pockets and ensure a smooth application.
After the image is secured, the first layer of epoxy resin is applied. This layer is usually thin and serves to encapsulate the image, protecting it from damage. The resin is poured over the image and spread evenly using a specialized tool. It is important to work quickly and efficiently, as the resin begins to harden soon after it is mixed. This layer is allowed to cure, or harden, for a specified amount of time before adding additional layers.
Subsequent layers of resin are added to build up the depth and create the three-dimensional effect. Each layer must be allowed to cure completely before the next one is applied. This can take several days, depending on the specific products used and the environmental conditions. The final layer is a topcoat that adds extra protection and gives the floor its glossy finish.
The installation process concludes with a thorough inspection to ensure that the floor is flawless. Any imperfections, such as bubbles or uneven areas, are addressed before the floor is considered complete. The result is a stunning, three-dimensional floor that is both beautiful and durable. While the installation process can be time-consuming and requires professional expertise, the end result is well worth the effort.
Design Inspirations for 3D Bathroom Floors
When it comes to choosing a design for your 3D bathroom floor, the possibilities are virtually endless. Nature-inspired themes are among the most popular choices, as they bring a sense of tranquility and beauty to the space. Imagine stepping onto a sandy beach with gentle waves lapping at your feet, or walking through a lush forest floor covered in fallen leaves. These designs can create a calming and rejuvenating atmosphere in your bathroom.
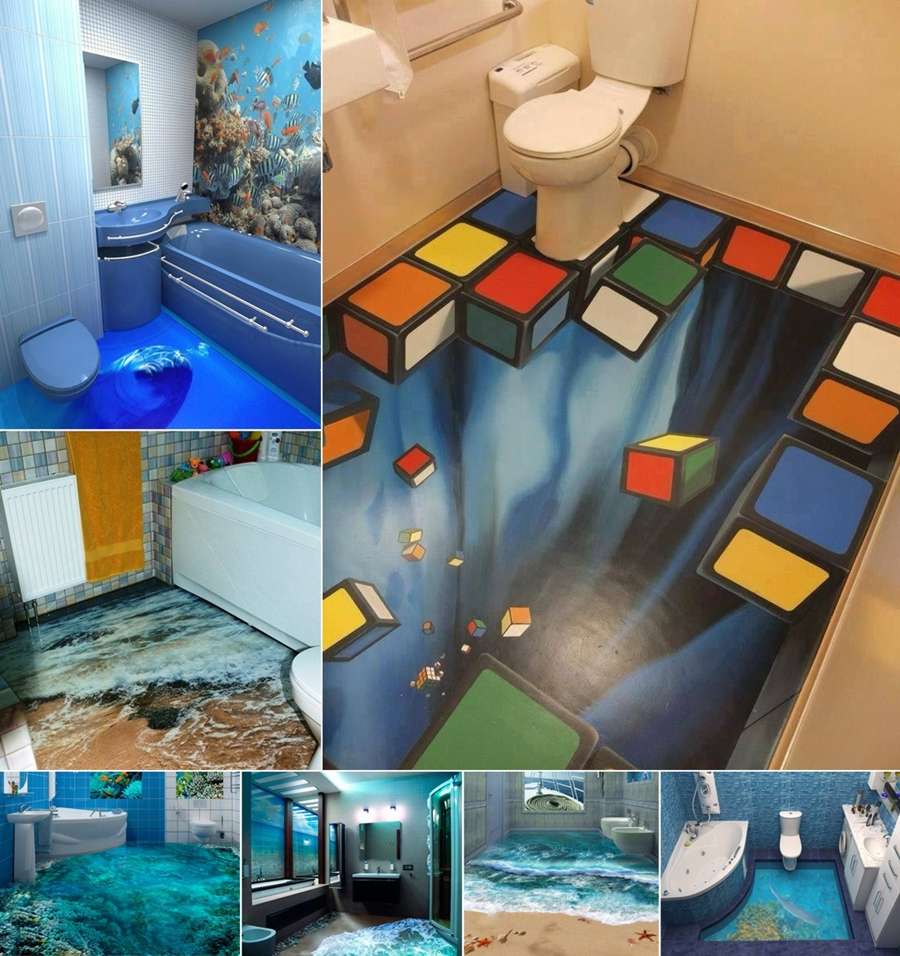
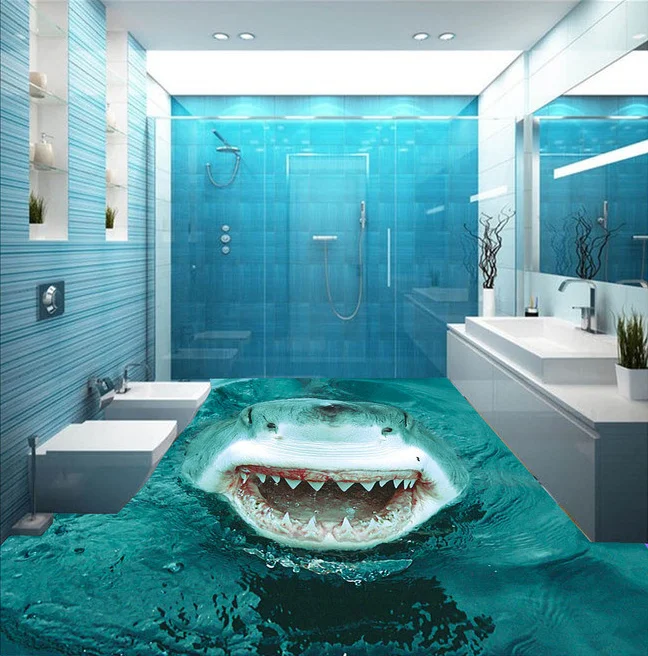
Marine life scenes are another popular choice for 3D bathroom floors. An underwater theme featuring vibrant coral reefs, colorful fish, and other sea creatures can transform your bathroom into a mesmerizing underwater world. This type of design is particularly appealing for those who love the ocean and want to bring a piece of it into their home. The vivid colors and intricate details of the marine life can make your bathroom a true visual masterpiece.
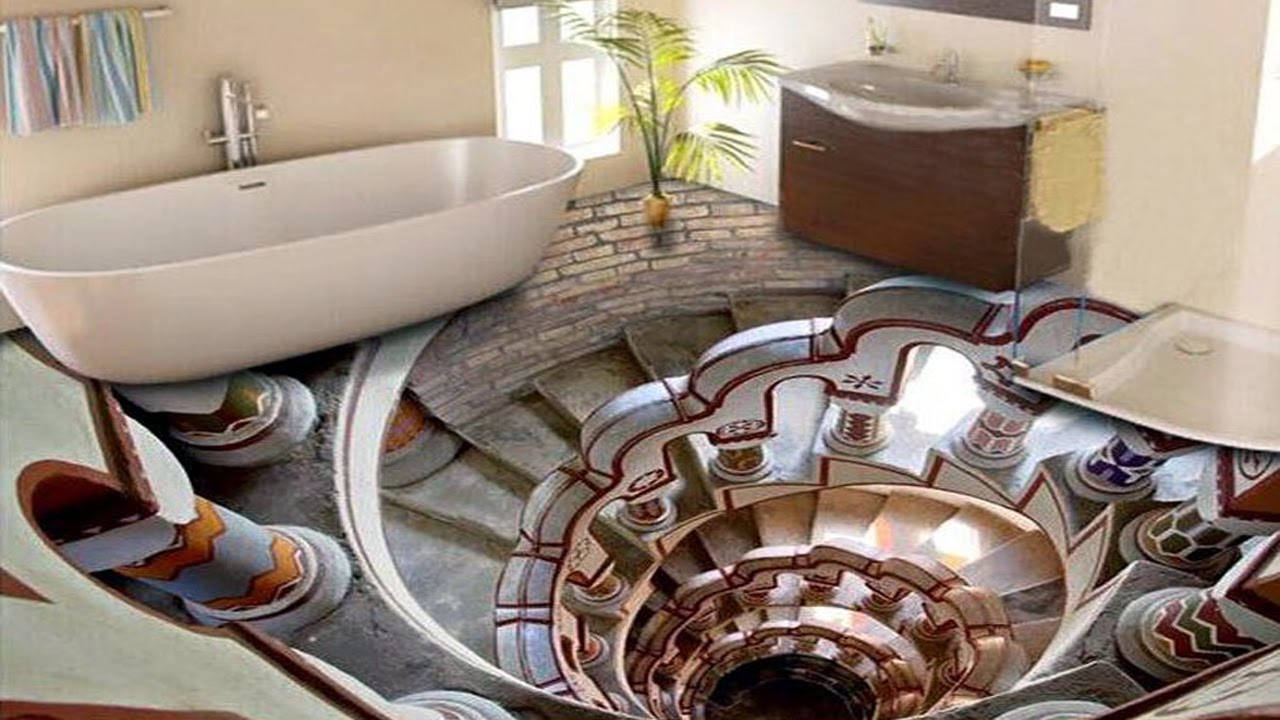
For those who prefer a more modern and abstract look, geometric patterns and optical illusions can be a great choice. These designs can create a sense of movement and energy, making your bathroom feel dynamic and contemporary. Whether it’s a pattern that seems to twist and turn under your feet or an optical illusion that makes the floor appear to be three-dimensional, these designs can add a unique and artistic touch to your space.

Custom designs are also an option for 3D bathroom floors. If you have a specific image or theme in mind, you can work with a designer to create a floor that reflects your personal style and taste. This could be anything from a favorite photograph to a piece of art that you love. Custom designs allow you to create a truly one-of-a-kind floor that is tailored to your individual preferences.
In addition to these thematic choices, there are also practical considerations to keep in mind when selecting a design for your 3D bathroom floor. The colors and patterns should complement the overall decor of the bathroom, including the walls, fixtures, and furnishings. It’s also important to consider the size of the bathroom, as certain designs may work better in larger or smaller spaces. For example, a large-scale image may be overwhelming in a small bathroom, while a more subtle pattern might be more appropriate.
Ultimately, the design you choose for your 3D bathroom floor should reflect your personality and style. Whether you prefer the serenity of nature, the excitement of marine life, the modernity of abstract patterns, or the uniqueness of a custom design, there is a 3D floor that will make your bathroom a stunning and unique space.
Benefits of 3D Bathroom Floors
One of the most significant benefits of 3D bathroom floors is their aesthetic appeal. These floors can transform an ordinary bathroom into a visually stunning space that feels luxurious and unique. The three-dimensional effect creates a sense of depth and realism that is unmatched by traditional flooring options. This can make your bathroom a focal point in your home and a place where you can enjoy a little extra beauty and inspiration each day.
Durability is another major advantage of 3D bathroom floors. The epoxy resin used in these floors is highly resistant to water, stains, and scratches. This makes it an ideal choice for a bathroom, where moisture and heavy foot traffic are common. The resin also provides a seamless surface with no grout lines, which reduces the risk of mold and mildew growth and makes cleaning easier. With proper care, a 3D bathroom floor can last for many years without showing signs of wear and tear.
3D bathroom floors are also highly customizable. Whether you prefer a nature-inspired design, a marine life scene, an abstract pattern, or a custom image, there is a 3D floor that will meet your aesthetic desires. This level of customization allows you to create a bathroom that reflects your personal style and taste. It also means that your bathroom can be a unique and personalized space that stands out from the rest.

Another benefit of 3D bathroom floors is their ability to create a sense of space. The depth and realism of the images can make a small bathroom feel larger and more open. This is particularly beneficial in urban apartments or homes where space is limited. A well-chosen 3D floor can visually enlarge the space, making it feel more comfortable and inviting.
In addition to their aesthetic and practical benefits, 3D bathroom floors can also increase the value of your home. Potential buyers are often looking for unique and stylish features, and a 3D bathroom floor can be a major selling point. It demonstrates that attention to detail and a commitment to high-quality design have been invested in the home, which can make it more appealing to prospective buyers. This can be especially advantageous if you are planning to sell your home in the future.
Finally, 3D bathroom floors are relatively easy to maintain. The seamless surface is easy to clean, and the resin coating provides protection against stains and scratches. Regular cleaning with a mild detergent and a soft cloth is usually all that is needed to keep the floor looking its best. Unlike traditional flooring options, there is no need to worry about grout lines or other areas where dirt and grime can accumulate. This makes 3D bathroom floors a practical and low-maintenance choice for any home.
Regular inspections are important to identify any potential issues early on. Check the floor periodically for signs of wear, such as scratches, dull areas, or discoloration. If you notice any damage, address it promptly to prevent it from worsening. Small scratches can often be buffed out with a polishing compound, while more significant damage may require professional repair.
Maintaining the glossy finish of a 3D bathroom floor is another aspect of care. Over time, the surface may lose some of its shine due to normal wear and tear. To restore the gloss, you can use a specialized floor polish designed for epoxy surfaces. Apply the polish according to the manufacturer’s instructions, usually with a soft cloth or sponge, and buff the floor to a high shine. Avoid using abrasive polishes or harsh chemicals, as these can damage the resin and affect the appearance of the 3D image.
Lastly, it’s essential to maintain proper ventilation in the bathroom. Good ventilation helps prevent moisture buildup, which can lead to mold and mildew growth. Use an exhaust fan or open a window after showers and baths to keep the air circulating. This simple step can significantly extend the life of your 3D floor and maintain its beauty and integrity over the years.
Cost Considerations and Budgeting
When it comes to budgeting for a 3D bathroom floor, there are several factors to consider. The cost of installation can vary widely depending on the size of the bathroom, the complexity of the design, and the materials used. On average, you can expect to pay anywhere from $50 to $150 per square foot for a professionally installed 3D floor. This price includes the cost of materials, labor, and any necessary preparation work.
Choosing the right design can also impact the overall cost. Simple patterns and images may be more affordable, while custom designs or highly detailed scenes can be more expensive. If you have a specific vision in mind, discuss it with your installer to get an accurate estimate. Custom designs often require additional work, such as creating templates or sourcing unique materials, which can increase the cost.
Materials play a significant role in the pricing of 3D bathroom floors. High-quality epoxy resin, durable prints, and professional-grade primers and sealants are essential for a long-lasting finish. Cheaper materials might save money upfront but can compromise the durability and appearance of the floor in the long run. It’s important to invest in quality materials to ensure your floor remains beautiful and functional for many years.
Installation costs can also vary based on the complexity of the job. Simple designs with minimal preparation may be less expensive, while intricate patterns or designs that require extensive surface preparation can drive up the cost. Professional installers will assess the condition of your existing floor, make any necessary repairs, and ensure that the surface is perfectly smooth before applying the 3D design.
If you’re on a tight budget, consider starting with a smaller area or a less complex design. You can always expand or update the floor later as your budget allows. Some homeowners choose to install 3D floors in just a portion of the bathroom, such as the shower area or around the vanity, to create a striking focal point without breaking the bank.
Finally, don’t forget to account for ongoing maintenance costs. While 3D bathroom floors are relatively easy to care for, using high-quality cleaning products and occasional professional maintenance can help preserve their appearance. Budgeting for these costs will ensure that your investment in a 3D floor continues to pay off in terms of beauty and durability.

Common Mistakes to Avoid
When considering a 3D bathroom floor, there are several pitfalls to watch out for. One of the most common mistakes is opting for cheap materials. While it might be tempting to go for a lower price, using inferior resin or prints can lead to issues like fading, bubbling, or peeling. Always invest in high-quality materials to ensure the longevity and visual appeal of your floor.
Another mistake is neglecting proper surface preparation. The success of a 3D floor installation hinges on the preparation of the existing floor. Skipping steps like cleaning, leveling, or priming can result in a less durable finish. It’s essential to ensure the surface is smooth, clean, and free of any imperfections before applying the 3D image and resin layers.
Choosing the wrong design for your space is also a common error. A design that is too busy or too large can overwhelm a small bathroom, while a subtle design might get lost in a larger space. Take the time to select a design that complements your bathroom’s size, style, and overall decor. Consulting with a professional designer can help you make an informed choice that enhances the space effectively.
Failing to maintain the floor properly is another mistake that can lead to premature wear. Neglecting regular cleaning, using harsh chemicals, or failing to protect the floor from scratches and impacts can diminish its appearance and durability. Establish a maintenance routine using mild detergents and soft cloths, and protect high-traffic areas with rugs or mats.
Overlooking ventilation is also a critical mistake. Bathrooms are prone to high humidity, which can affect the longevity of a 3D floor. Without proper ventilation, moisture can seep into the layers of the resin, leading to mold growth or deterioration of the image. Ensure your bathroom is well-ventilated to maintain the integrity of your 3D floor.
Finally, not budgeting for the entire project can be a significant oversight. It’s important to consider not only the initial installation cost but also the long-term maintenance and potential updates. Make sure you have a clear budget that includes all aspects of the project, from materials and installation to future maintenance and repairs.

How long does a 3D bathroom floor last?
A well-installed 3D bathroom floor can last for many years, typically 10-20 years, depending on the quality of materials and maintenance. The epoxy resin used in these floors is highly durable and resistant to water, stains, and scratches. Regular cleaning and proper maintenance are essential to prolonging the life of the floor. Additionally, choosing high-quality materials and professional installation will enhance its durability.
Can I install a 3D floor over existing tiles?
Yes, it is possible to install a 3D floor over existing tiles, provided the surface is in good condition. The existing tiles must be clean, dry, and free of any loose or uneven areas. Professional installers will typically clean, repair, and level the surface before applying the 3D image and resin. This ensures a smooth and durable finish. However, it’s essential to have a thorough assessment by a professional to determine if your existing floor is suitable for a 3D overlay.
Are 3D bathroom floors slippery?
When properly installed, 3D bathroom floors are not inherently slippery. The epoxy resin surface is usually treated to enhance traction, reducing the risk of slips and falls. Additionally, you can choose textured or anti-slip finishes for added safety, especially in areas prone to water exposure. It’s always a good idea to discuss safety options with your installer to ensure your floor meets your specific needs.
How do I clean and maintain my 3D bathroom floor?
Cleaning and maintaining a 3D bathroom floor is relatively simple. Use a mild detergent and a soft cloth or mop for regular cleaning. Avoid abrasive cleaners, as they can damage the resin surface. Wipe up spills promptly to prevent staining, and consider using rugs or mats in high-traffic areas to protect the floor from scratches. Periodic inspections for any signs of wear or damage are also recommended, addressing any issues promptly to maintain the floor’s appearance and integrity.
Can I customize the design of my 3D bathroom floor?
Absolutely! One of the most exciting aspects of 3D bathroom floors is their customizability. You can choose from a wide range of pre-designed images or work with a designer to create a custom design that reflects your personal style. Whether it’s a favorite photograph, a piece of art, or a unique concept, custom designs allow you to create a truly one-of-a-kind floor that enhances the beauty and personality of your bathroom.
What should I consider when budgeting for a 3D bathroom floor?
When budgeting for a 3D bathroom floor, consider the following factors: the size of the bathroom, the complexity of the design, the quality of materials, and the cost of professional installation. On average, you can expect to pay between $50 to $150 per square foot. Additionally, account for future maintenance costs and any potential updates or repairs. Planning a clear and comprehensive budget will help ensure that your investment in a 3D floor is both affordable and sustainable.

Related Posts: