Wood floors add a touch of elegance and warmth to any home, but over time, they can become scratched and lose their luster. Scratches can be caused by a variety of factors, including pets, furniture movement, or even high foot traffic. Fortunately, many of these scratches can be repaired with some simple do-it-yourself techniques. This guide will walk you through the process of assessing, repairing, and maintaining your wood floors to keep them looking beautiful for years to come.
Understanding Wood Floor Scratches
Types of Scratches
Wood floor scratches can be categorized into three main types: surface scratches, minor scratches, and deep scratches. Surface scratches are the most superficial and only affect the floor’s finish. These are typically caused by dirt and debris that get ground into the floor through foot traffic. Surface scratches are usually easy to repair with minimal effort.
Minor scratches penetrate deeper than surface scratches but do not reach the wood’s core. These scratches can be caused by furniture legs, pet claws, or dropped items. While more noticeable than surface scratches, minor scratches can still be repaired with a bit more effort and the right materials.
Deep scratches are the most severe and penetrate through the wood’s finish and into the actual wood. These can be caused by heavy furniture being dragged across the floor or sharp objects being dropped. Repairing deep scratches requires more advanced techniques and materials, and sometimes professional help may be needed if the damage is extensive.
Understanding the type of scratch you’re dealing with is crucial for determining the appropriate repair method. Properly identifying the severity of the scratch will help you choose the right tools and materials, ensuring a successful repair.

Causes of Scratches
Scratches on wood floors can be caused by a variety of factors, many of which are preventable with proper care. One common cause is dirt and grit that gets tracked into the house. These small particles act like sandpaper when walked on, creating fine scratches on the surface of the floor. Using doormats and regularly sweeping or vacuuming can help minimize this type of damage.
Furniture movement is another leading cause of scratches. Sliding furniture across the floor without proper protection can leave significant marks. Using felt pads under furniture legs and lifting rather than dragging furniture can help prevent these scratches. Additionally, rearranging furniture periodically can distribute wear more evenly across the floor.
Pets, particularly dogs with untrimmed nails, can also cause scratches. Regularly trimming your pet’s nails and using rugs in high-traffic areas can help protect your floors. Additionally, training pets to avoid certain areas or behaviors that lead to scratches can reduce the risk of damage.
Accidents, such as dropping heavy or sharp objects, can cause immediate and often deep scratches. Being mindful of how items are handled and stored in rooms with wood floors can help prevent these types of incidents. Using protective mats or rugs in areas where heavy items are frequently used or moved can also reduce the risk of accidental damage.
Tools and Materials Needed
Repairing wood floor scratches requires specific tools and materials depending on the severity of the damage. For surface scratches, you will need a soft cloth, wood floor cleaner, and a wood floor polish or wax. These items help clean the area and restore the finish, making surface scratches less noticeable.
For minor scratches, additional materials such as wood stain markers, blending pencils, or wax sticks may be required. These items help match the color of the scratched area to the rest of the floor. You will also need fine-grit sandpaper or a sanding sponge to smooth the area before applying the stain or wax.
Deep scratches require more extensive repairs, including the use of wood filler, putty knife, and possibly a small paintbrush for detailed work. After filling the scratch, you will need sandpaper to smooth the surface and wood stain to match the floor’s color. A polyurethane finish may also be needed to protect the repaired area and blend it with the rest of the floor.
Having the right tools and materials on hand before starting the repair process ensures that you can effectively address the scratches and achieve a professional-looking result. Investing in quality products can make a significant difference in the longevity and appearance of your wood floor repairs.

Preparing the Area
Before starting any repair work, it’s important to properly prepare the area. This involves thoroughly cleaning the floor to remove any dirt, dust, or debris that could interfere with the repair process. Using a soft cloth and a wood floor cleaner, gently clean the scratched area and its surroundings. Ensure the floor is completely dry before proceeding with any repairs.
Next, clear the area of any furniture or rugs to give yourself ample workspace. This will also prevent further damage to the floor while you’re working. If you’re working in a high-traffic area, consider placing a barrier or sign to prevent people and pets from walking on the floor during the repair process.
If you’re dealing with deep scratches that require sanding, it’s a good idea to wear a dust mask to protect yourself from inhaling wood dust. Using painter’s tape, you can also mark off the area around the scratch to prevent accidental damage to unaffected parts of the floor. This step is especially important if you’re working in a small or confined area.
Properly preparing the area ensures that you can work efficiently and effectively, minimizing the risk of further damage and achieving the best possible results. Taking the time to set up your workspace and gather all necessary tools and materials will make the repair process smoother and more successful.

Repairing Surface Scratches
Cleaning and Buffing
The first step in repairing surface scratches is to thoroughly clean the area. Use a soft cloth and a wood floor cleaner to remove any dirt and debris from the scratched surface. Cleaning ensures that no particles interfere with the buffing process and helps reveal the true extent of the scratch. Make sure the area is completely dry before moving on to the next step.
Once the area is clean, use a wood floor polish or wax to buff out the surface scratches. Apply a small amount of polish to a soft cloth and rub it into the scratched area using circular motions. The polish helps to fill in the scratch and restore the floor’s shine. Continue buffing until the scratch is less noticeable. If necessary, repeat the process to achieve the desired result.
For light surface scratches, a mixture of olive oil and vinegar can also be effective. Combine equal parts of olive oil and vinegar in a bowl, then dip a soft cloth into the mixture and gently rub it onto the scratch. The vinegar cleans the area, while the olive oil helps to condition the wood and reduce the visibility of the scratch. Wipe away any excess mixture with a clean, dry cloth.
Buffing and polishing are simple yet effective methods for addressing surface scratches on wood floors. These techniques help to restore the floor’s appearance and protect the wood from further damage. Regular maintenance and prompt attention to surface scratches can keep your wood floors looking their best.

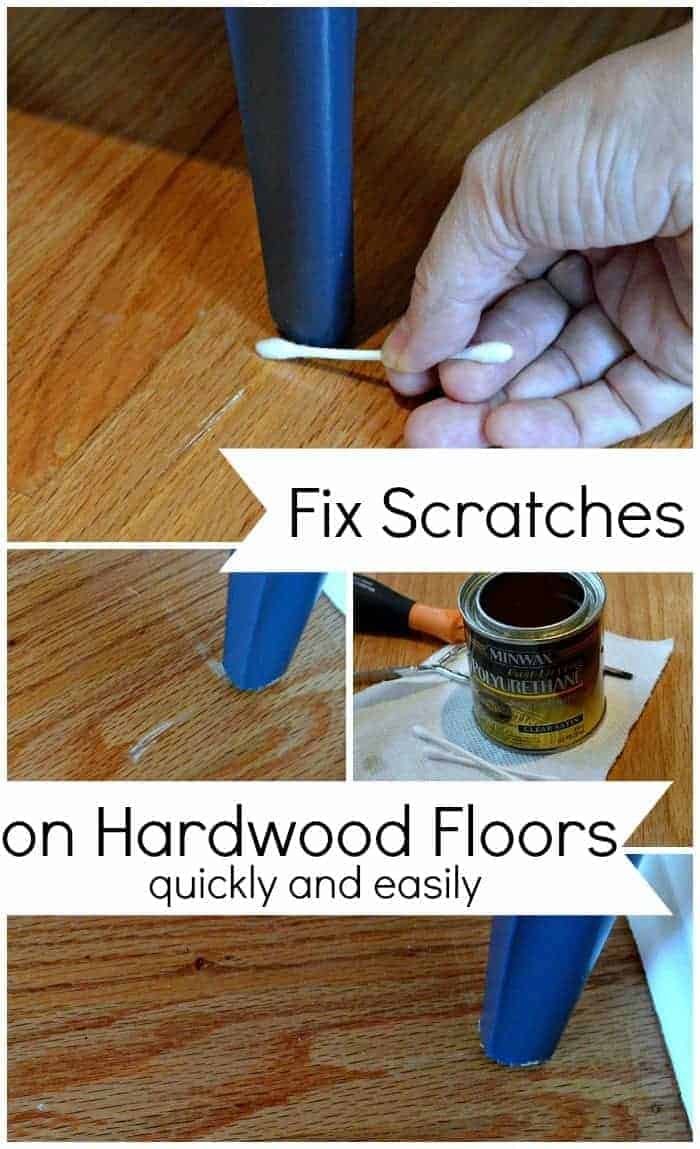
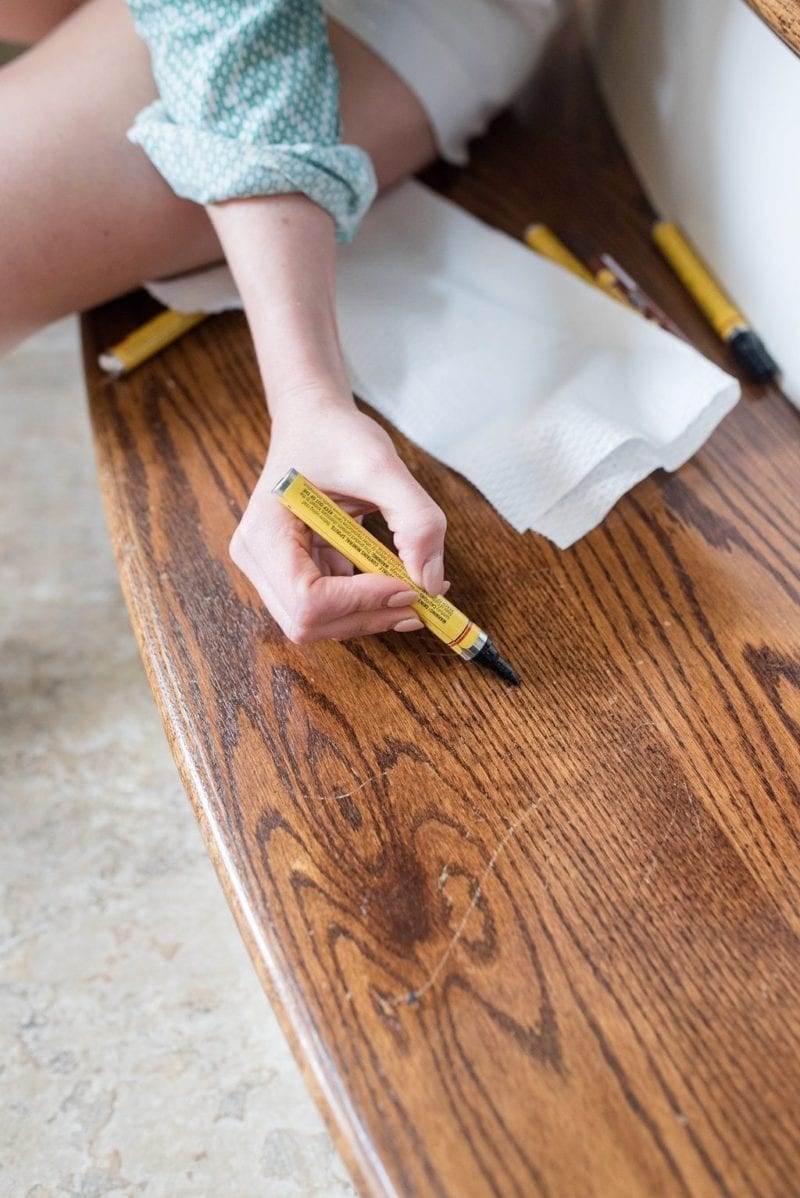
Using a Scratch Repair Kit
Scratch repair kits are convenient and effective solutions for fixing surface scratches on wood floors. These kits typically include a variety of tools and materials, such as wood stain markers, wax sticks, and buffing pads, designed to match different wood finishes and colors. Choosing a kit that closely matches your floor’s color ensures a seamless repair.
To use a scratch repair kit, start by cleaning the scratched area thoroughly with a wood floor cleaner. Once the area is clean and dry, select the wood stain marker or wax stick that best matches your floor’s color. Test the color on a small, inconspicuous area of the floor to ensure a good match before applying it to the scratch.
Apply the stain marker or wax stick directly to the scratch, following the wood grain. For markers, use a gentle back-and-forth motion to evenly distribute the color. For wax sticks, press the stick into the scratch and then smooth it out with a soft cloth or a plastic scraper. Buff the area with a clean, soft cloth to blend the repair with the surrounding floor.
Using a scratch repair kit is a quick and easy way to address surface scratches on wood floors. These kits provide all the necessary tools and materials for a professional-looking repair, making them a valuable addition to your home maintenance toolkit. Regularly checking and touching up surface scratches can help maintain the beauty and longevity of your wood floors.

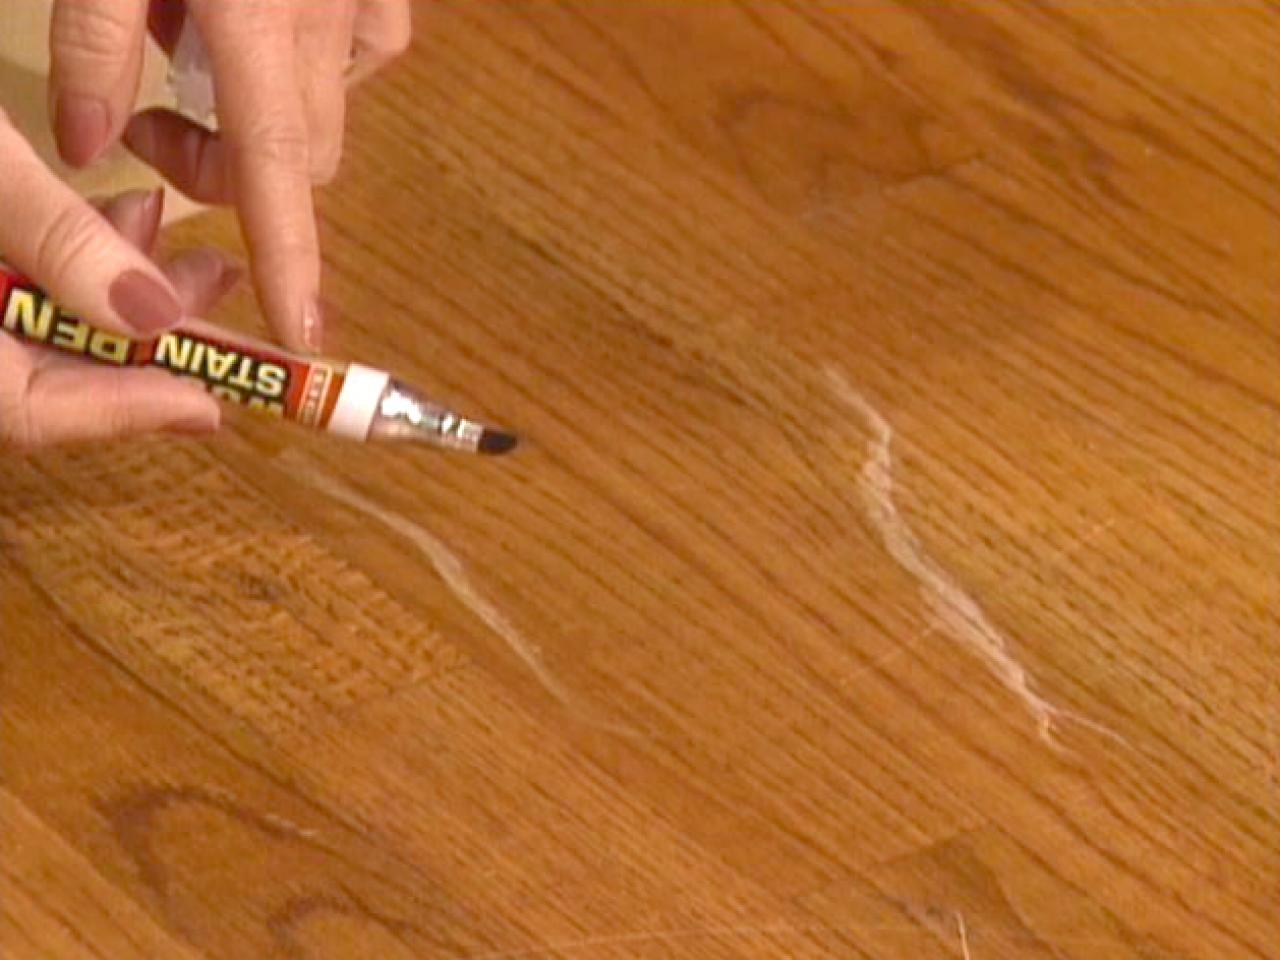
Applying Wood Stain
For deeper surface scratches that penetrate the finish but not the wood itself, applying wood stain can help restore the floor’s appearance. Wood stain not only covers the scratch but also blends it with the surrounding area, making it less noticeable. Choosing a wood stain that matches your floor’s color is crucial for a seamless repair.
Begin by cleaning the scratched area with a wood floor cleaner and allowing it to dry completely. Lightly sand the scratched area with fine-grit sandpaper to smooth the surface and remove any rough edges. Be careful not to sand too deeply, as this can damage the surrounding finish.
Dip a soft cloth or a small brush into the wood stain and apply it to the scratch, following the direction of the wood grain. Use a light touch and apply multiple thin layers if necessary, allowing each layer to dry before applying the next. This technique ensures even coverage and prevents the stain from becoming too dark.
Once the stain has dried, buff the area with a clean, soft cloth to blend the repair with the rest of the floor. Applying a matching wood stain is an effective way to address deeper surface scratches and restore the floor’s uniform appearance. Regular maintenance and touch-ups can keep your wood floors looking beautiful and well-maintained.

Polishing and Sealing
After repairing surface scratches, polishing and sealing the area helps to protect the repair and restore the floor’s shine. Polishing adds a layer of protection and enhances the floor’s appearance, while sealing ensures the repair is durable and long-lasting. Choosing a high-quality polish and sealer is important for achieving the best results.
Start by applying a wood floor polish to the repaired area. Use a soft cloth or a buffing pad to apply the polish in circular motions, working it into the wood. The polish helps to fill in any remaining imperfections and restore the floor’s luster. Allow the polish to dry completely before moving on to the next step.
Next, apply a clear wood sealer to the repaired area. Use a small brush or a clean cloth to apply a thin, even layer of sealer, following the wood grain. The sealer protects the repair from moisture, dirt, and wear, ensuring it remains intact over time. Allow the sealer to dry completely before using the floor.
Polishing and sealing the repaired area helps to protect and enhance the wood floor, ensuring a long-lasting and professional-looking repair. Regularly polishing and sealing your wood floors can maintain their beauty and durability, keeping them looking their best for years to come.

Repairing Minor Scratches
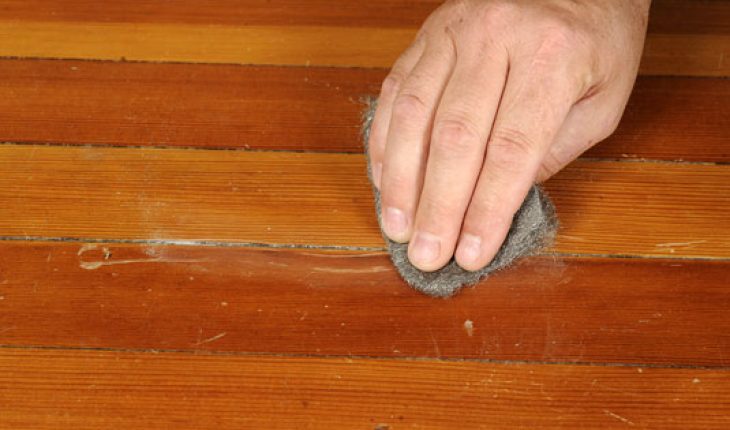
Sanding the Scratch
Minor scratches that penetrate the wood’s finish but do not reach the core can often be repaired by sanding. Sanding smooths out the scratch and prepares the area for further treatment. Using fine-grit sandpaper ensures that you do not damage the surrounding finish while removing the scratch.
Begin by cleaning the scratched area with a wood floor cleaner and allowing it to dry completely. Lightly sand the scratched area with fine-grit sandpaper, following the direction of the wood grain. Use gentle pressure and sand only the scratched area, being careful not to sand too deeply.
After sanding, wipe the area with a clean, damp cloth to remove any dust or debris. This ensures a smooth surface for the next steps. Sanding removes the scratch and prepares the wood for staining and sealing, making it a crucial step in the repair process.
Sanding minor scratches is an effective way to prepare the wood for further treatment and ensure a smooth, even surface. Proper sanding techniques help to remove the scratch without damaging the surrounding finish, setting the stage for a successful repair.
Filling the Scratch
After sanding, filling the scratch helps to restore the wood’s smooth surface and prepare it for staining. Wood filler or putty is typically used for this purpose, as it fills in the scratch and provides a solid base for further treatment. Choosing a filler that matches your floor’s color ensures a seamless repair.
To fill the scratch, apply the wood filler or putty with a putty knife, pressing it into the scratch and smoothing it out. Use the knife to remove any excess filler and create a smooth, even surface. Allow the filler to dry completely, following the manufacturer’s instructions.
Once the filler is dry, lightly sand the area with fine-grit sandpaper to smooth out any rough edges and ensure an even surface. Wipe the area with a clean, damp cloth to remove any dust or debris. Filling the scratch creates a solid base for staining and sealing, ensuring a durable and long-lasting repair.
Filling minor scratches with wood filler or putty helps to restore the wood’s smooth surface and prepare it for further treatment. Proper application and sanding techniques ensure a seamless repair and a professional-looking result.
Staining the Filled Area
After filling the scratch, applying wood stain helps to blend the repaired area with the surrounding floor. Choosing a wood stain that matches your floor’s color is crucial for achieving a seamless repair. Staining not only covers the filler but also restores the wood’s natural appearance.
Begin by dipping a soft cloth or a small brush into the wood stain and applying it to the filled area, following the direction of the wood grain. Use a light touch and apply multiple thin layers if necessary, allowing each layer to dry before applying the next. This technique ensures even coverage and prevents the stain from becoming too dark.
Once the stain has dried, buff the area with a clean, soft cloth to blend the repair with the surrounding floor. Staining the filled area helps to restore the wood’s natural appearance and create a seamless repair. Regular maintenance and touch-ups can keep your wood floors looking beautiful and well-maintained.
Staining the filled area is an effective way to restore the wood’s natural appearance and blend the repair with the surrounding floor. Proper staining techniques ensure even coverage and a professional-looking result, keeping your wood floors looking their best.

Sealing and Finishing
After staining the filled area, sealing and finishing the repair ensures durability and protection. Applying a clear wood sealer helps to protect the repair from moisture, dirt, and wear, while finishing adds a layer of shine and enhances the floor’s appearance. Choosing high-quality products is important for achieving the best results.
Start by applying a clear wood sealer to the repaired area. Use a small brush or a clean cloth to apply a thin, even layer of sealer, following the wood grain. Allow the sealer to dry completely before applying a second coat if necessary. The sealer protects the repair and ensures it remains intact over time.
Next, apply a wood floor finish to the repaired area. Use a soft cloth or a buffing pad to apply the finish in circular motions, working it into the wood. The finish adds a layer of shine and enhances the floor’s appearance, creating a seamless and professional-looking repair. Allow the finish to dry completely before using the floor.
Sealing and finishing the repaired area helps to protect and enhance the wood floor, ensuring a long-lasting and professional-looking repair. Regularly sealing and finishing your wood floors can maintain their beauty and durability, keeping them looking their best for years to come.

Repairing Deep Scratches
Assessing the Damage
Deep scratches penetrate through the wood’s finish and into the actual wood, requiring more extensive repairs. Assessing the damage is the first step in determining the appropriate repair method. Inspect the scratch to determine its depth and length, as well as any underlying issues that may need to be addressed.
If the scratch is deep but confined to a small area, it may be possible to repair it using wood filler and stain. However, if the scratch is extensive or has caused significant damage to the wood, professional help may be needed. Assessing the damage accurately ensures that you choose the right repair method and materials.
In some cases, deep scratches may indicate underlying issues such as water damage or structural problems. If you suspect that the scratch is caused by an underlying issue, it’s important to address the root cause before proceeding with the repair. This may involve fixing a leaky pipe, repairing a damaged subfloor, or addressing other structural concerns.
Assessing the damage accurately is crucial for determining the appropriate repair method and ensuring a successful repair. Taking the time to inspect the scratch and any underlying issues sets the stage for a durable and long-lasting repair.

Filling and Sanding
Filling deep scratches helps to restore the wood’s smooth surface and prepare it for staining. Wood filler or putty is typically used for this purpose, as it fills in the scratch and provides a solid base for further treatment. Choosing a filler that matches your floor’s color ensures a seamless repair.
To fill the scratch, apply the wood filler or putty with a putty knife, pressing it into the scratch and smoothing it out. Use the knife to remove any excess filler and create a smooth, even surface. Allow the filler to dry completely, following the manufacturer’s instructions.
Once the filler is dry, lightly sand the area with fine-grit sandpaper to smooth out any rough edges and ensure an even surface. Wipe the area with a clean, damp cloth to remove any dust or debris. Filling and sanding deep scratches creates a solid base for staining and sealing, ensuring a durable and long-lasting repair.
Filling and sanding deep scratches helps to restore the wood’s smooth surface and prepare it for further treatment. Proper application and sanding techniques ensure a seamless repair and a professional-looking result.

Staining and Sealing
After filling and sanding the deep scratch, applying wood stain helps to blend the repaired area with the surrounding floor. Choosing a wood stain that matches your floor’s color is crucial for achieving a seamless repair. Staining not only covers the filler but also restores the wood’s natural appearance.
Begin by dipping a soft cloth or a small brush into the wood stain and applying it to the filled area, following the direction of the wood grain. Use a light touch and apply multiple thin layers if necessary, allowing each layer to dry before applying the next. This technique ensures even coverage and prevents the stain from becoming too dark.
Once the stain has dried, buff the area with a clean, soft cloth to blend the repair with the surrounding floor. Applying a clear wood sealer helps to protect the repair from moisture, dirt, and wear, ensuring it remains intact over time. The sealer protects the repair and ensures it remains intact over time.
Next, apply a wood floor finish to the repaired area. Use a soft cloth or a buffing pad to apply the finish in circular motions, working it into the wood. The finish adds a layer of shine and enhances the floor’s appearance, creating a seamless and professional-looking repair. Allow the finish to dry completely before using the floor.
Staining and sealing deep scratches is an effective way to restore the wood’s natural appearance and protect the repair. Proper staining and sealing techniques ensure even coverage and a professional-looking result, keeping your wood floors looking their best.
Preventing Future Scratches
Regular Cleaning and Maintenance
Regular cleaning and maintenance are key to preventing future scratches on wood floors. Dirt and debris can act like sandpaper, causing fine scratches on the floor’s surface. Sweeping or vacuuming your floors regularly helps to remove these particles and protect the wood’s finish.
Using a damp mop with a mild wood floor cleaner can also help to maintain the floor’s appearance and prevent scratches. Avoid using excessive water, as this can damage the wood. Instead, use a lightly dampened mop and dry the floor immediately after cleaning to prevent moisture damage.
Placing doormats at entryways helps to reduce the amount of dirt and debris tracked into the house. Encourage family members and guests to wipe their feet before entering, and consider implementing a no-shoes policy indoors. This simple step can significantly reduce the risk of scratches.
Regularly cleaning and maintaining your wood floors helps to prevent future scratches and keep them looking beautiful. Taking the time to care for your floors can extend their lifespan and maintain their appearance for years to come.
Using Protective Pads and Rugs
Using protective pads and rugs is an effective way to prevent scratches on wood floors. Furniture movement is a common cause of scratches, but using felt pads or rubber coasters under furniture legs can help to prevent this damage. These pads create a buffer between the furniture and the floor, reducing the risk of scratches.
Rugs and runners can also help to protect high-traffic areas from wear and tear. Placing rugs in areas such as hallways, entryways, and living rooms can reduce the amount of dirt and debris tracked onto the floor and provide a layer of protection against scratches. Choose rugs with non-slip backings to prevent them from moving and causing additional damage.
In areas where pets frequently play or move, using rugs or pet-specific mats can help to protect the floor from scratches caused by claws. Regularly trimming your pet’s nails can also reduce the risk of damage. Consider using pet-safe nail caps or mats in areas where your pets are most active.
Using protective pads and rugs helps to prevent scratches and maintain the appearance of your wood floors. These simple measures can significantly reduce the risk of damage and keep your floors looking their best.

Proper Furniture Handling
Proper furniture handling is crucial for preventing scratches on wood floors. Lifting rather than dragging furniture helps to prevent deep scratches and damage to the floor’s finish. When moving heavy furniture, use furniture sliders or lifting straps to reduce the risk of damage.
Consider rearranging furniture periodically to distribute wear more evenly across the floor. This can prevent certain areas from becoming overly worn or scratched. When rearranging furniture, use protective pads or blankets to prevent scratches during the move.
Using furniture coasters or rubber stoppers can also help to prevent furniture from sliding and causing scratches. These items provide a stable base for furniture and reduce the risk of movement. Regularly checking and replacing worn-out protective pads ensures ongoing protection for your floors.
Properly handling and caring for your furniture helps to prevent scratches and maintain the appearance of your wood floors. Taking the time to move furniture carefully and using protective measures can significantly reduce the risk of damage.
Regular Inspections and Touch-Ups
Regular inspections and touch-ups are important for maintaining the appearance of your wood floors and preventing future scratches. Periodically inspecting your floors for signs of wear and damage allows you to address issues promptly and prevent them from worsening.
Touching up minor scratches and scuffs as soon as they appear can help to maintain the floor’s appearance and prevent further damage. Using a wood floor cleaner and polish can help to address surface scratches and restore the floor’s shine. For deeper scratches, using a scratch repair kit or wood stain can help to blend the repair with the surrounding floor.
Regularly applying a wood floor polish or wax can also help to protect the floor’s finish and reduce the risk of scratches. These products create a protective layer on the floor’s surface, making it more resistant to wear and damage. Follow the manufacturer’s instructions for application and reapplication to ensure ongoing protection.
Regular inspections and touch-ups help to maintain the appearance of your wood floors and prevent future scratches. Taking the time to care for your floors can extend their lifespan and keep them looking beautiful for years to come.
Related Posts: