Tackling a DIY wood flooring project over a concrete subfloor can seem daunting, but with the right preparation and guidance, it can be a rewarding and transformative experience. Whether you’re aiming to add warmth and elegance to a basement, garage, or any other concrete-floored area, wood flooring is an excellent choice. Let’s discuss the essential steps and considerations for successfully installing wood flooring on concrete.
Understanding Your Wood Flooring Options
When it comes to wood flooring, you have several options to choose from, each with its own set of benefits and drawbacks. Solid hardwood, engineered wood, and laminate are the three main types to consider, each offering different levels of durability, appearance, and ease of installation.
Solid hardwood is the traditional choice, known for its beauty and longevity. Each plank is made from a single piece of wood, which can be sanded and refinished multiple times. However, solid hardwood can be sensitive to moisture and temperature changes, making it less ideal for basements or other areas prone to humidity.
Engineered wood flooring is made from multiple layers of wood bonded together, with a solid wood veneer on top. This construction makes it more stable and less susceptible to changes in humidity and temperature. Engineered wood is a great option for concrete floors as it can be glued down or floated over a moisture barrier.
Laminate flooring, while not real wood, offers a wood-like appearance with a printed image of wood on a high-density fiberboard. It’s durable, easy to install, and more resistant to scratches and dents than real wood. Laminate is typically floated over a moisture barrier and underlayment, making it a popular DIY choice.
When selecting your flooring, consider the specific needs of your space. For high-traffic areas, durability might be a priority, whereas for a home office or bedroom, you might prioritize aesthetic appeal. Budget is also a significant factor, as solid hardwood tends to be more expensive than engineered wood and laminate.
Last, consider the installation method. Floating floors are generally easier for DIY projects, while glue-down and nail-down installations may require more skill and experience. Ensure that the flooring you choose is compatible with the installation method you’re comfortable with.

Preparing the Concrete Subfloor
Proper preparation of the concrete subfloor is crucial to ensure a successful wood flooring installation. The condition of the concrete will affect the longevity and performance of your new floor, so take the time to do it right.
Start by thoroughly cleaning the concrete surface. Remove any existing floor coverings, adhesives, paint, or debris. Use a vacuum or broom to ensure the floor is free of dust and small particles. A clean surface provides better adhesion for any glue or underlayment and prevents bumps under the flooring.
Next, check the concrete for any moisture issues. Concrete can absorb and release moisture, which can damage wood flooring over time. Use a moisture meter to test the concrete. If the moisture levels are too high, you’ll need to address this before proceeding. Installing a moisture barrier, such as a polyethylene sheet, can help mitigate this issue.
Inspect the concrete for cracks or uneven areas. Small cracks can be filled with concrete patching compound, but larger structural issues may require professional repair. For uneven areas, use a self-leveling compound to create a smooth, flat surface. An even subfloor is critical for the proper installation and performance of your wood flooring.
Once the concrete is clean, dry, and level, install an appropriate underlayment if required. Underlayments provide a cushion for the flooring, help with sound absorption, and can act as a moisture barrier. Follow the manufacturer’s recommendations for the best results.
It’s also a good idea to acclimate your wood flooring to the room’s environment before installation. This involves storing the flooring in the room where it will be installed for several days to allow it to adjust to the temperature and humidity levels. This step helps prevent expansion and contraction after installation.
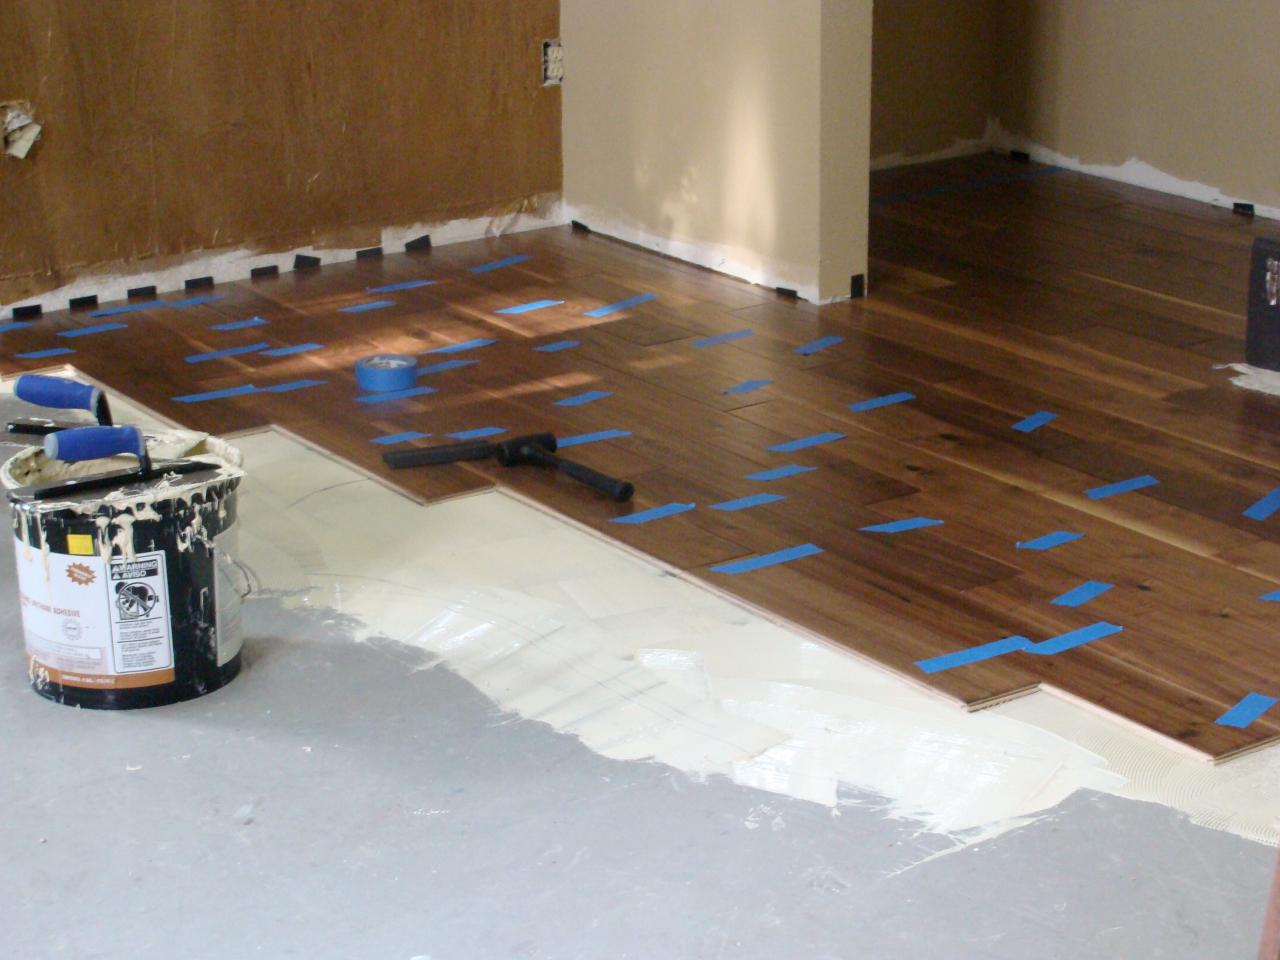
Finally, lay out a vapor barrier if you’re installing engineered wood or laminate flooring. This barrier prevents moisture from the concrete from reaching the wood, which can cause warping and damage. Secure the vapor barrier with tape, ensuring it covers the entire floor with no gaps.
Choosing the Right Installation Method
Selecting the appropriate installation method for your wood flooring depends on the type of flooring you’ve chosen and the specific conditions of your concrete subfloor. The main installation methods are floating, glue-down, and nail-down, each with its advantages and considerations.
Floating installation is one of the most popular methods for DIY projects, especially for engineered wood and laminate flooring. In this method, the planks are not attached to the subfloor but are instead locked together using a tongue-and-groove system. A foam underlayment is placed between the subfloor and the flooring to provide cushioning and sound absorption.
One of the benefits of floating floors is that they can be installed over slightly uneven surfaces without major preparation. They’re also relatively easy to install, making them ideal for DIY enthusiasts. However, floating floors may produce a hollow sound underfoot and can sometimes shift if not installed properly.
Glue-down installation is suitable for both engineered and solid hardwood flooring. This method involves applying a special adhesive to the subfloor and then pressing the wood planks into the glue. Glue-down installations create a very stable and solid floor, with a firm feel underfoot and minimal movement.
The main challenge with glue-down installations is the need for precision and speed, as the adhesive can dry quickly. This method is best for those with some experience in flooring installation or those willing to take the time to learn and prepare thoroughly. Proper subfloor preparation is essential to ensure the adhesive bonds correctly.
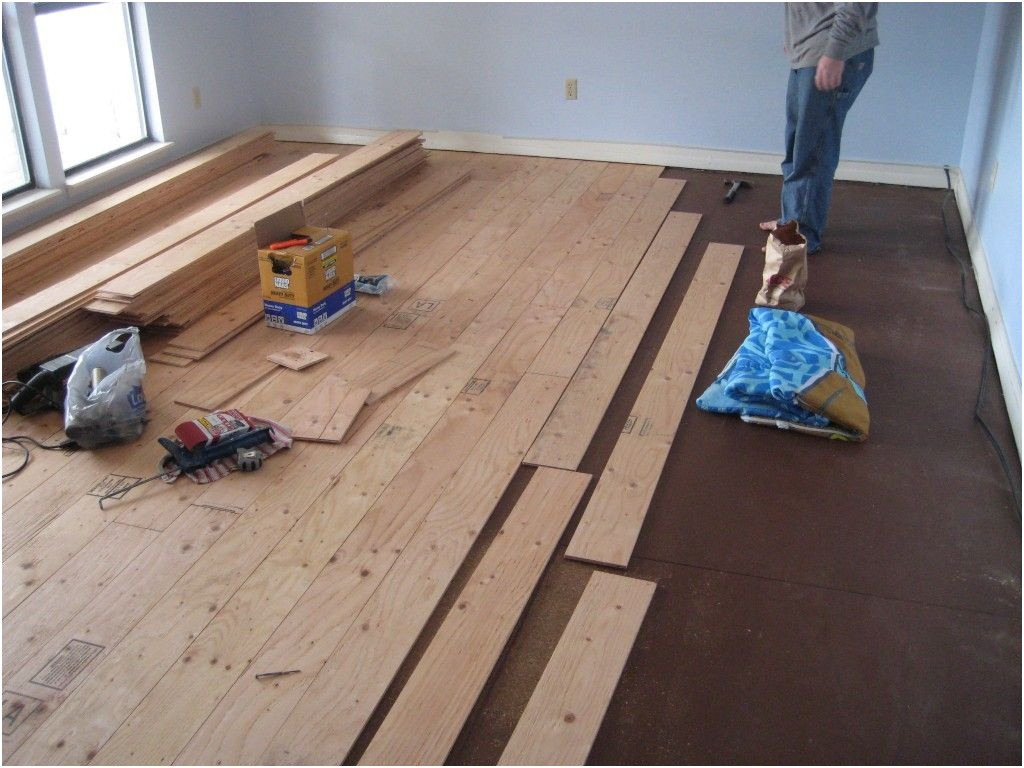
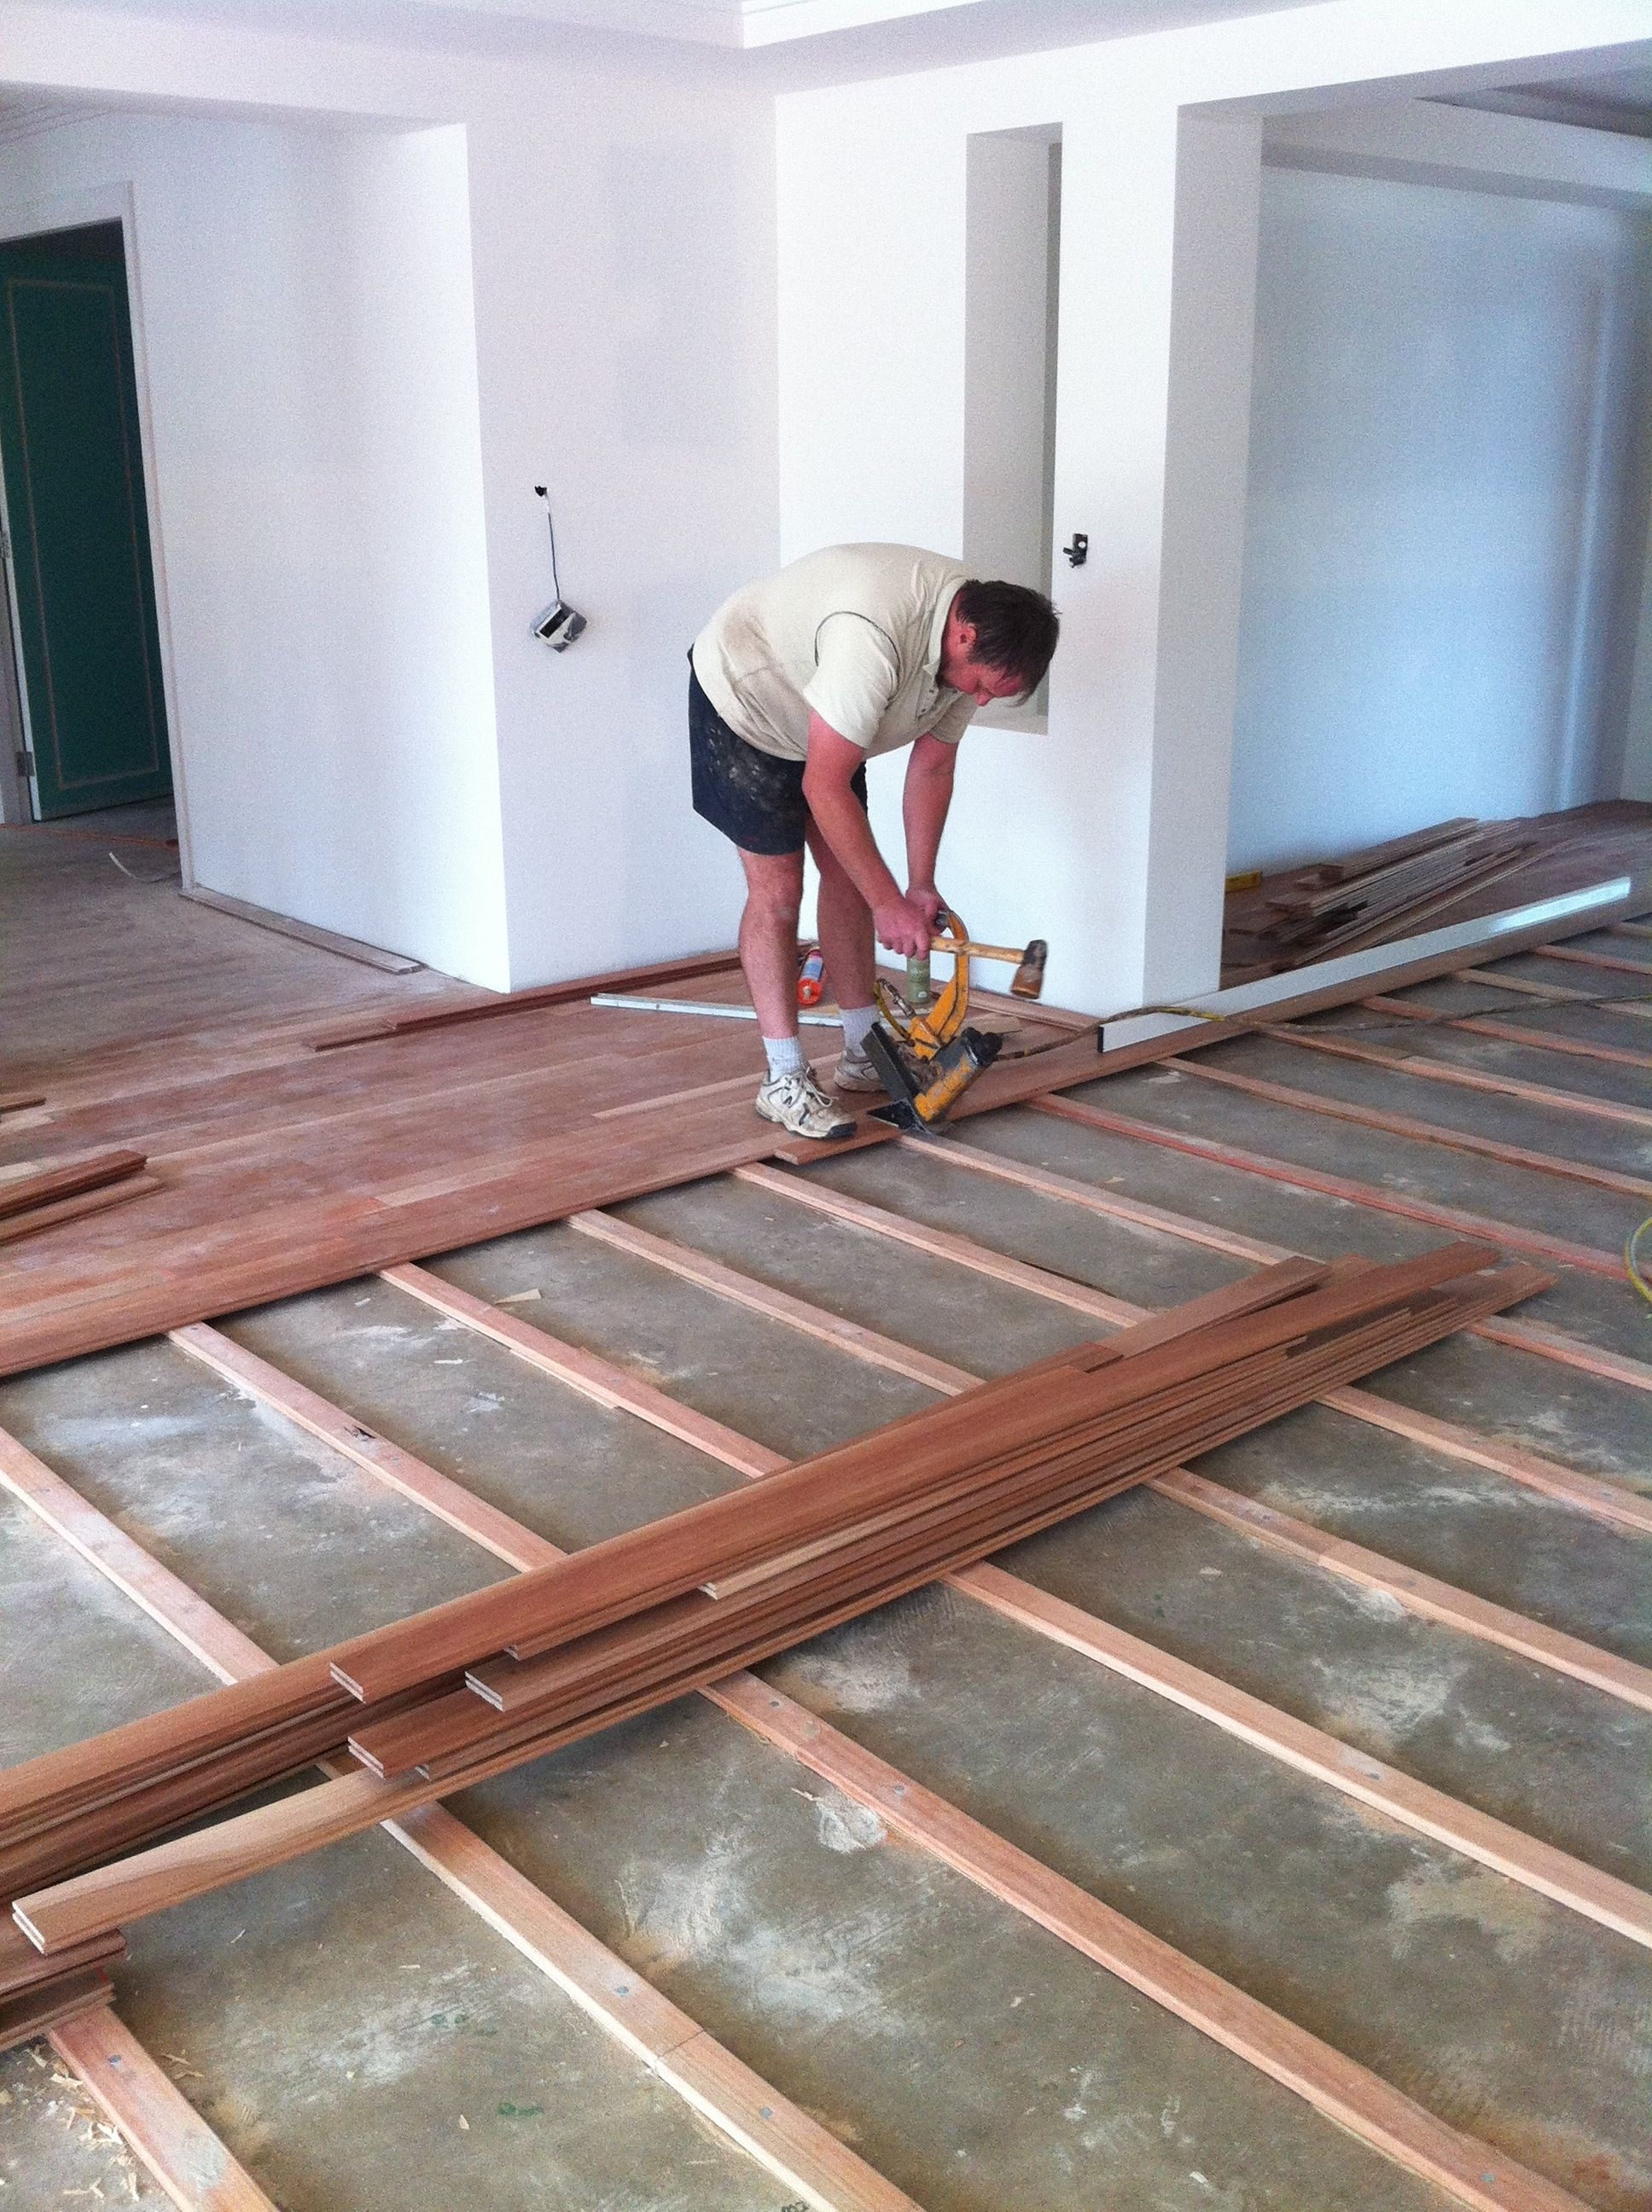
Nail-down installation is typically used for solid hardwood flooring. This method involves nailing the planks directly to a wooden subfloor or plywood underlayment that’s been laid over the concrete. Nail-down installations provide a very secure fit and allow the wood to expand and contract naturally with changes in humidity.
While nail-down installation is a traditional method, it can be more challenging for DIYers due to the need for specialized tools, such as a flooring nailer. Additionally, this method requires the installation of a plywood underlayment over the concrete, which can add to the project’s complexity and cost.
When choosing your installation method, consider your comfort level with DIY projects, the type of wood flooring you’ve selected, and the specific conditions of your subfloor. Floating floors are generally the easiest for beginners, while glue-down and nail-down methods may require more skill and preparation.
Step-by-Step Installation Guide
Installing wood flooring on a concrete subfloor involves several key steps, each critical to achieving a beautiful and durable floor. Here’s a comprehensive step-by-step guide to help you through the process.
Step 1: Acclimate the Flooring Before installation, acclimate the wood flooring to the room’s environment. Stack the planks in the installation area and let them sit for at least 48 hours. This allows the wood to adjust to the temperature and humidity, reducing the risk of expansion or contraction after installation.
Step 2: Prepare the Subfloor Ensure the concrete subfloor is clean, dry, and level. Remove any debris, old adhesive, or paint. Test the moisture levels and address any issues with a moisture barrier if necessary. Fill any cracks and use a self-leveling compound to create a smooth surface.
Step 3: Install the Underlayment and Vapor Barrier Lay down the underlayment according to the manufacturer’s instructions. If you’re installing engineered wood or laminate, place a vapor barrier on top of the underlayment to protect against moisture. Overlap the edges of the barrier and secure with tape to prevent any gaps.
Step 4: Plan the Layout Plan the layout of your flooring to ensure a balanced appearance. Measure the room and mark the starting point, typically along the longest wall. Stagger the end joints of the planks to create a more natural look and increase stability. Avoid starting or ending with very short pieces.

Step 5: Install the First Row Begin installing the first row of planks along the marked starting line. If using a floating floor, click the planks together, ensuring a snug fit. For glue-down installation, apply adhesive to the subfloor and press the planks into place. For nail-down, secure the planks with nails or staples to the underlayment.
Step 6: Continue Installing Rows Continue installing subsequent rows, ensuring each plank is securely connected to the previous one. Use spacers to maintain an expansion gap around the perimeter of the room. This gap allows the flooring to expand and contract with changes in humidity without buckling.
Step 7: Cut Planks to Fit As you reach the edges of the room, you’ll need to cut planks to fit. Measure the space and mark the cut lines on the planks. Use a saw to make precise cuts, ensuring a snug fit against the walls. Remember to leave the expansion gap intact.
Step 8: Install Trim and Moldings Once the flooring is installed, remove the spacers and install trim and moldings to cover the expansion gap. Secure the trim to the walls, not the flooring, to allow for natural movement of the floor. Reinstall baseboards and any other finishing touches.

Benefits of DIY Wood Flooring on Concrete
Opting for DIY wood flooring on a concrete subfloor offers numerous benefits, from cost savings to personal satisfaction. Here are some compelling reasons to take on this project yourself.
Cost Savings One of the most significant advantages is the cost savings. Professional installation can be expensive, often costing as much as the flooring materials themselves. By doing it yourself, you can save a substantial amount of money and allocate those funds to other home improvement projects.
Personal Satisfaction There’s a unique sense of accomplishment that comes with completing a DIY project. Installing wood flooring on your own allows you to take pride in your work and enjoy the results every day. It’s a tangible way to improve your home and see the fruits of your labor.
Customization DIY projects give you full control over the customization of your flooring. You can choose the exact type of wood, finish, and layout that suits your style and preferences. This level of customization ensures that the final product aligns perfectly with your vision for your space.

Learning Experience Taking on a DIY flooring project is an excellent opportunity to learn new skills and gain valuable experience. From using power tools to understanding subfloor preparation, you’ll acquire knowledge that can be applied to future projects. This hands-on learning can boost your confidence and competence in home improvement tasks.
Flexibility When you handle the installation yourself, you have the flexibility to work at your own pace. There’s no need to coordinate with contractors or adhere to their schedules. This allows you to manage your time effectively and make adjustments as needed throughout the project.
Increased Home Value A well-executed wood flooring installation can increase the value of your home. Potential buyers appreciate the warmth and elegance of wood floors, making your property more attractive in the real estate market. This investment can pay off if you decide to sell your home in the future.

Maintenance Tips
Maintaining your wood flooring is essential to preserve its beauty and longevity. Here are some practical tips to keep your floors looking their best and ensure they stand the test of time.
Regular Cleaning Regular cleaning is crucial to prevent dirt and debris from scratching the surface of your wood flooring. Sweep or vacuum the floor frequently to remove dust and particles. Use a soft-bristle broom or a vacuum with a hardwood floor attachment to avoid damaging the finish.
Use Appropriate Cleaning Products When cleaning your wood flooring, use products specifically designed for wood. Avoid harsh chemicals, abrasive cleaners, and excessive water. A damp mop with a mild wood floor cleaner is typically sufficient. Ensure the mop is only slightly damp, as excess moisture can damage the wood.
Protect Against Scratches Prevent scratches by using furniture pads under the legs of chairs, tables, and other heavy furniture. When moving furniture, lift it instead of dragging it across the floor. Place rugs or mats in high-traffic areas, such as entryways and hallways, to minimize wear and tear.

Maintain Humidity Levels Wood flooring can expand and contract with changes in humidity. To prevent issues like warping or gaps between planks, maintain consistent humidity levels in your home. Use a humidifier during dry winter months and a dehumidifier during humid summer months if necessary.
Address Spills and Stains Promptly Spills should be cleaned up immediately to prevent staining and water damage. Use a soft, absorbent cloth to blot up spills and dry the area thoroughly. For stubborn stains, use a cleaner specifically formulated for wood floors, following the manufacturer’s instructions.
Refinish When Necessary Over time, your wood flooring may show signs of wear, such as scratches or a dull finish. Depending on the type of wood and finish, you may be able to sand and refinish the floor to restore its original beauty. Consult with a professional or follow DIY guidelines for refinishing if you feel confident in your skills.

Common Mistakes to Avoid
Skipping Subfloor Preparation
Skipping or inadequately preparing the concrete subfloor can lead to various problems down the line. An uneven or unclean surface can cause the wood flooring to shift, leading to gaps and uneven wear. Always ensure the subfloor is clean, dry, and level before beginning installation.
Using Incorrect Adhesives
Using the wrong type of adhesive for your wood flooring can result in poor adhesion and potential damage. Different types of wood and subfloor conditions require specific adhesives. Make sure to use the adhesive recommended by the flooring manufacturer for the best results.
Not Allowing for Expansion
Wood flooring expands and contracts with changes in temperature and humidity. Failing to leave an appropriate expansion gap around the room’s perimeter can cause the flooring to buckle or warp. Use spacers to ensure a consistent expansion gap during installation.
Ignoring Acclimation
Acclimating your wood flooring to the room’s environment is crucial to prevent expansion and contraction issues after installation. Skipping this step can lead to gaps or buckling as the wood adjusts to the room’s conditions. Allow the flooring to sit in the installation area for at least 48 hours.
Incorrectly Installing Underlayment
The underlayment provides cushioning, sound absorption, and moisture protection. Installing it incorrectly can compromise these benefits. Ensure the underlayment is laid out smoothly, without overlaps or gaps, and follow the manufacturer’s guidelines for installation.
Neglecting Maintenance
Proper maintenance is key to the longevity and appearance of your wood flooring. Neglecting regular cleaning, using inappropriate cleaning products, or failing to address spills and stains promptly can lead to damage over time. Follow recommended maintenance practices to keep your flooring in top condition.

Can I install solid hardwood flooring directly on concrete?
Solid hardwood flooring is not recommended for direct installation on concrete due to its sensitivity to moisture and temperature changes. Instead, consider engineered wood or laminate flooring, which are more stable and suitable for concrete subfloors.
Do I need a moisture barrier for wood flooring on concrete?
Yes, a moisture barrier is essential when installing wood flooring on concrete. Concrete can release moisture, which can damage wood flooring. A moisture barrier, such as a polyethylene sheet, protects the flooring from moisture-related issues.
How do I ensure my concrete subfloor is level?
To ensure your concrete subfloor is level, use a long level or a straightedge to check for high and low spots. Fill any low areas with a self-leveling compound and grind down high spots. A level subfloor is crucial for the proper installation and performance of your wood flooring.
Can I install wood flooring in a basement with a concrete floor?
Yes, you can install wood flooring in a basement with a concrete floor. Engineered wood and laminate flooring are ideal choices for basements due to their stability and moisture resistance. Ensure proper subfloor preparation and use a moisture barrier to protect the flooring.
How long does it take to install wood flooring on concrete?
The installation time for wood flooring on concrete depends on the size of the area, the type of flooring, and your level of experience. Preparing the subfloor, acclimating the flooring, and the actual installation can take several days to a week. Proper planning and preparation can help streamline the process.
Can I install wood flooring over existing concrete tiles?
Yes, you can install wood flooring over existing concrete tiles, provided the tiles are in good condition and securely attached. Ensure the tile surface is clean, dry, and level. You may need to use a leveling compound to fill grout lines and create a smooth surface for the wood flooring.

Related Posts: