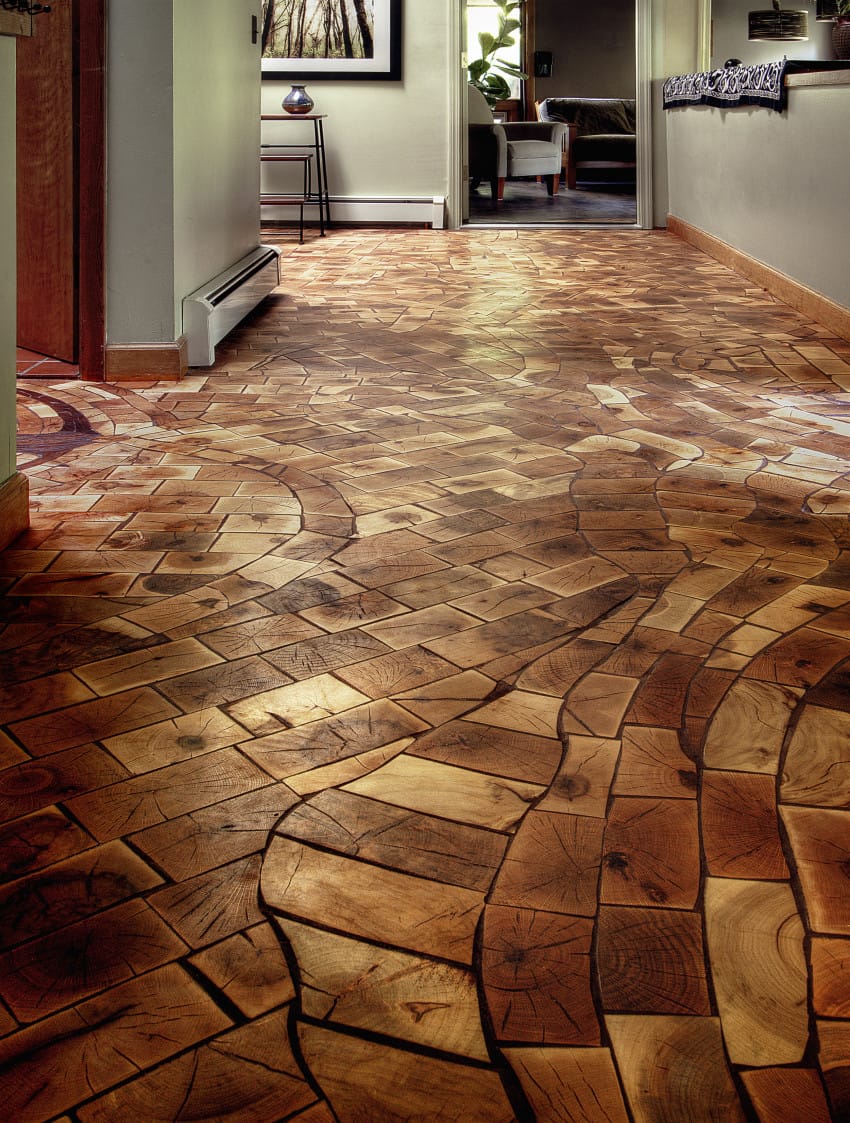
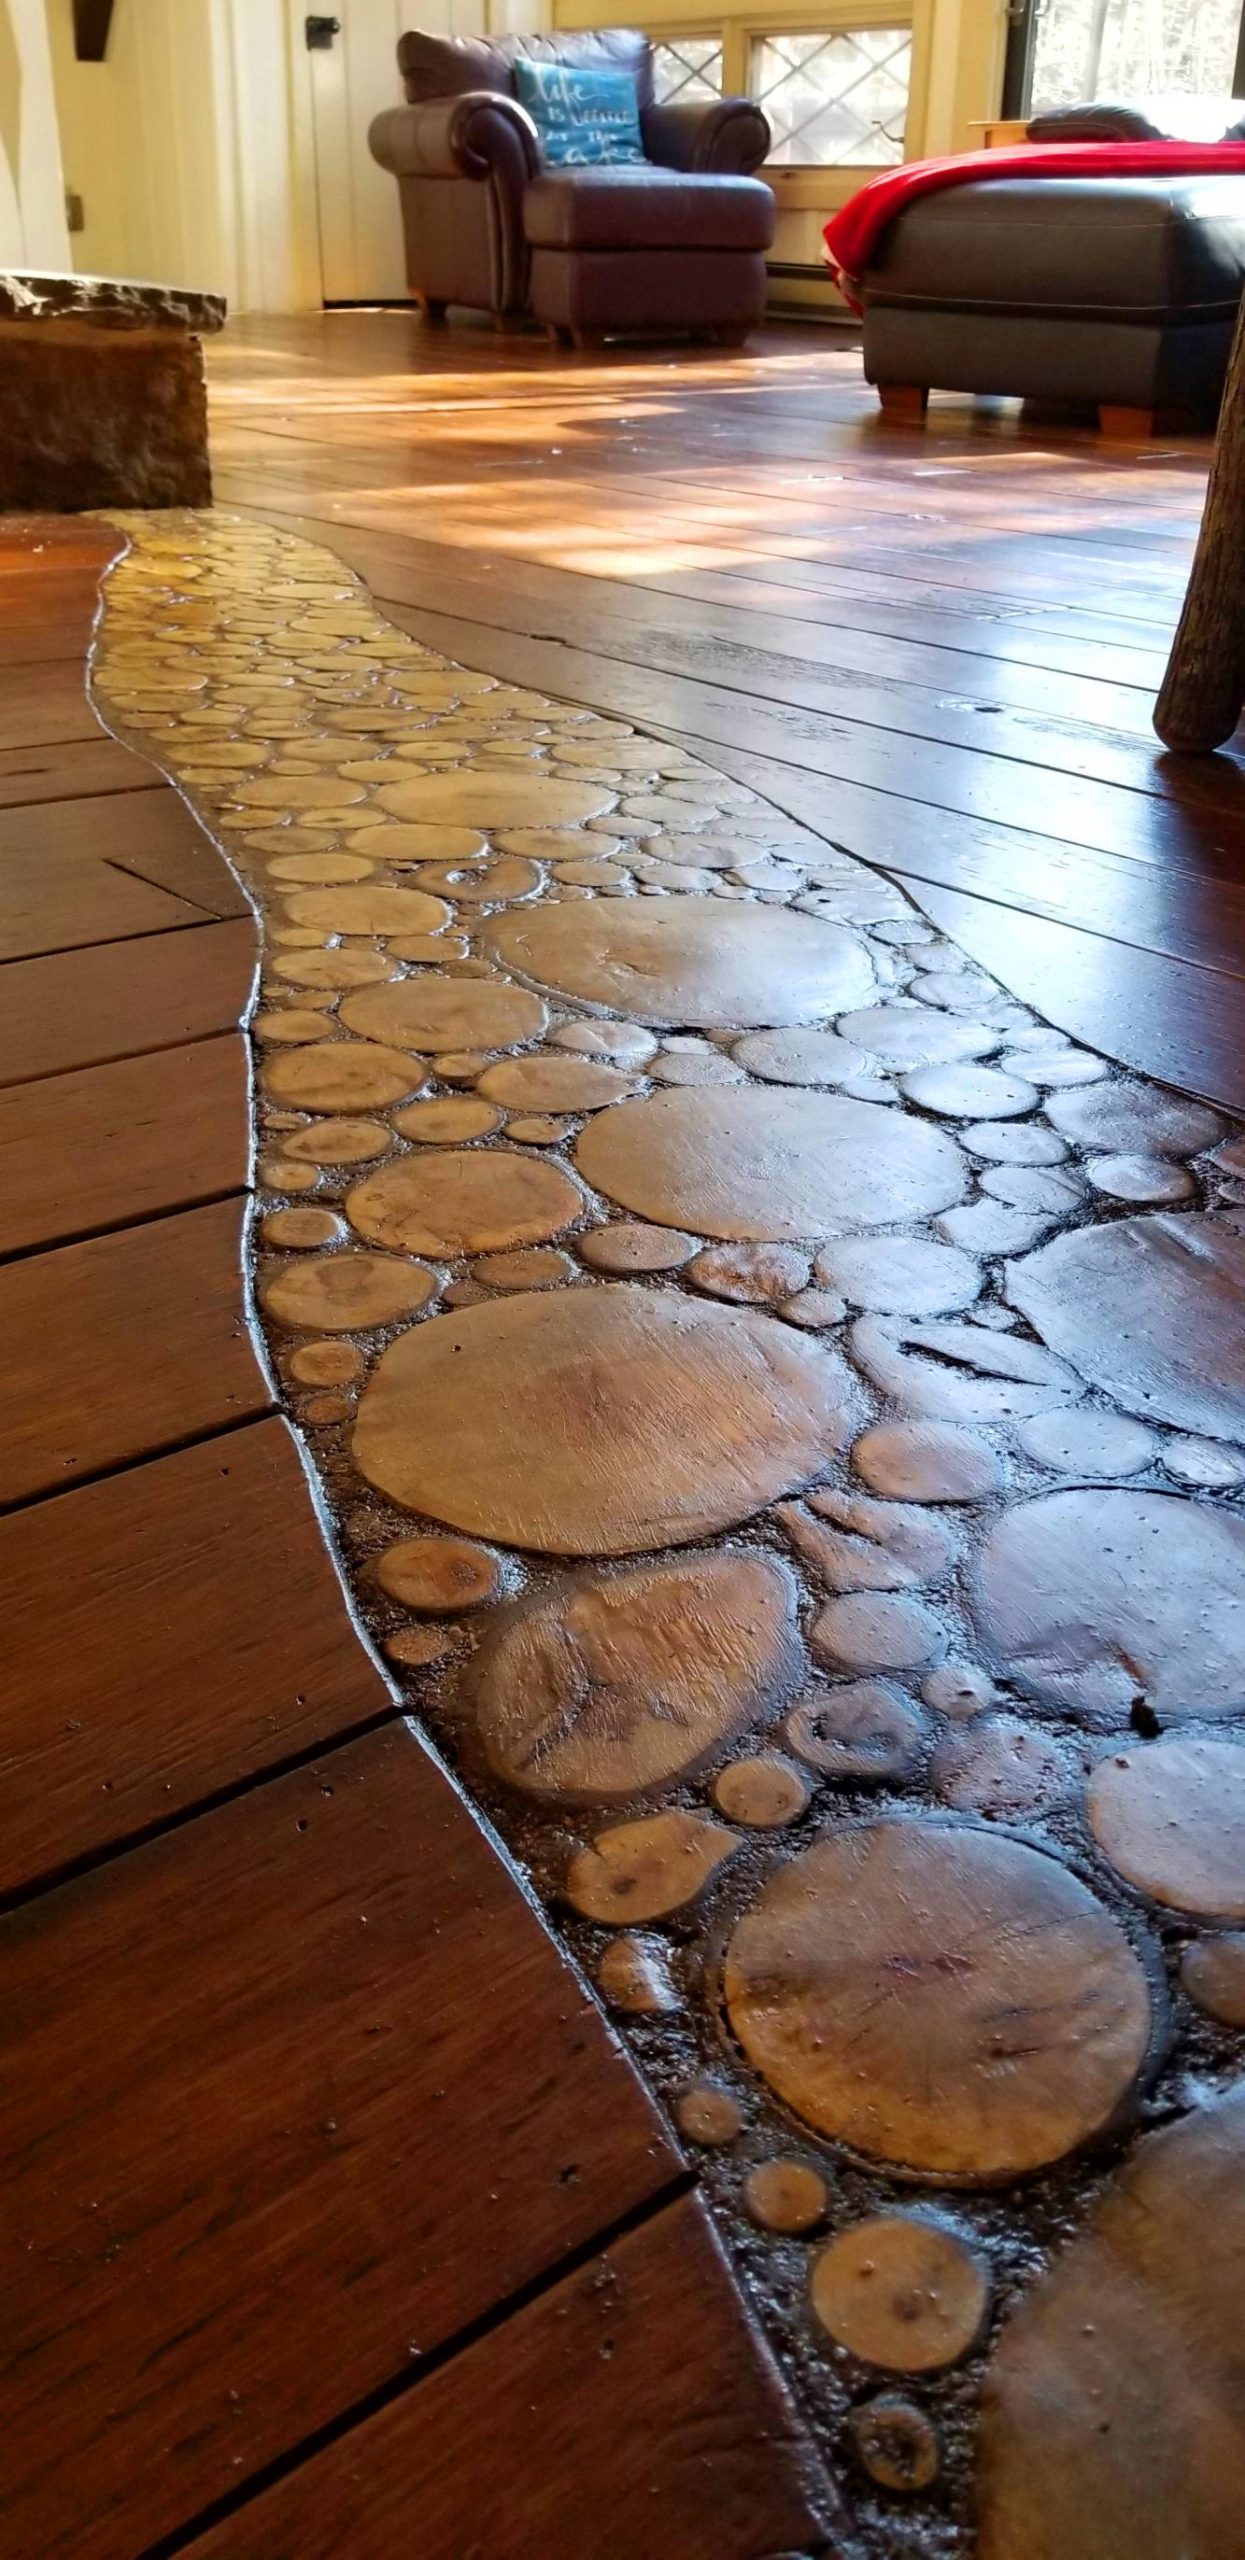
End Grain Wood Flooring DIY

End grain flooring, Wood block flooring, Diy flooring

end grain wood flooring diy – Shayne Beale

Check Out This Totally Unique DIY Wood Flooring. Wow! DIY Cozy Home

End grain wood tile floor, has a nice sense of depth to it. Wood Block Flooring, End Grain

endgrainwebsite.jpg Wood block flooring, Wood floor design, End grain flooring

The Ends Of Your Timber Can Be Used To Create Incredible End Grain Floors – Useful Tips For Home
Installing An End Grain Flooring Inlay – Our Project Ideas
End grain flooring, Woodworking plans, Woodworking

Installing End Grain? Read These Tips for this Unique Product End grain flooring, Wood block

End grain wood flooring End grain flooring, Wood tile floors, Tile floor diy

Related Posts:
- Grey Parquet Wood Flooring
- How To Install Pergo Wood Flooring
- Dark Black Wood Flooring
- Solid Wood Flooring White
- Pallet Wood Flooring Ideas
- Wood Floor Chevron Pattern
- Wood Flooring Home Ideas
- Wood Floor Filler Resin
- Glossy Wood Flooring Ideas
- Pergo Wood Flooring Installation
End Grain Wood Flooring DIY: A Comprehensive Guide
Introduction:
Wood flooring is a timeless and elegant choice when it comes to elevating the appearance and value of your home. Among the various types of wood flooring options available, end grain wood flooring stands out as a unique and visually appealing choice. This article aims to provide a detailed guide on how to install end grain wood flooring through a DIY approach. From understanding the concept of end grain wood to step-by-step installation tips, we have got you covered.
1. Understanding End Grain Wood Flooring:
End grain wood flooring is created by cutting logs into small pieces and arranging them with the grain facing up. Unlike traditional plank wood flooring, which showcases the long edges of the boards, end grain flooring displays the cross-sections of the tree trunk, resulting in a distinctive pattern reminiscent of a butcher block. This type of flooring offers exceptional durability and can withstand heavy foot traffic while adding a rustic and unique touch to any space.
2. Materials and Tools Required:
Before you embark on your DIY project of installing end grain wood flooring, make sure you have the necessary materials and tools at your disposal. Here are some essentials:
– End grain wood tiles or blocks: Choose high-quality hardwood such as oak, maple, or walnut for optimum durability.
– Subflooring: Ensure that the subfloor is even, clean, and dry before installing the end grain wood tiles.
– Adhesive: Use a polyurethane-based adhesive specifically designed for end grain wood.
– Saw or miter saw: To cut the wood tiles to your desired size.
– Rubber mallet: For gently tapping the tiles into place.
– Sandpaper: To smooth any imperfections on the wood surface.
– Finish: Choose an appropriate finish, such as polyurethane or wax, to protect and enhance the natural beauty of the wood.
3. Preparing for Installation:
Before diving into the installation process, it is crucial to prepare the space and the materials properly. Follow these steps:
Step 1: Measure and plan: Measure the area where you want to install the end grain wood flooring and calculate the number of tiles required. Carefully plan the layout to ensure a cohesive and visually appealing pattern.
Step 2: Acclimate the wood: Allow the wood tiles to adjust to the indoor humidity and temperature by leaving them in the installation area for at least 48 hours. This step helps prevent warping or cracking of the tiles once installed.
Step 3: Prepare the subfloor: Ensure that your subfloor is clean, level, and free from any debris or moisture. Repair any cracks or uneven areas before proceeding with the installation.
4. Installation Process:
Now that you have prepared everything, it’s time to start installing your end grain wood flooring. Follow these steps for a successful DIY installation:
Step 1: Apply adhesive: Using a notched trowel, spread a thin, even layer of polyurethane-based adhesive on the subfloor. Work in small sections to avoid the adhesive drying out before laying the tiles.
Step 2: Lay the tiles: Begin laying the end grain wood tiles in your desired pattern, keeping in mind any planned design elements. Press each tile firmly into the adhesive, ensuring proper alignment and spacing between them.
Step 3: Tap into place: Gently tap each tile into place using a rubber mallet or a block of wood to create a flush surface. Be cautious not to damage the edges or surfaces of the tiles while tapping.
Step 4: Continue installation: Repeat Steps 1-3 until you have covered the entire floor area. Take your time to ensure precision and accuracy throughout.
5. Finishing Touches:
Once all the tiles are laid, it’s time to add the finishing touches that will enhance both the aesthetics and longevity of your end grain wood flooring.
Step 1: Sanding: Use sandpaper or a floor sander to smooth out any imperfections or unevenness on the wood surface. Start with a coarser grit and gradually move to a finer grit for a flawless finish.
Step 2: Apply finish: Choose a suitable finish, such as polyurethane or wax, and apply it according to the manufacturer’s instructions. This protective layer will enhance the natural beauty of the wood while safeguarding it from wear and tear.
Step 3: Allow curing time: Give the finish ample time to dry and cure before allowing foot traffic on the newly installed end grain wood flooring. Follow The manufacturer’s instructions for the recommended curing time. This step is crucial to ensure the longevity and durability of your flooring.
Step 4: Regular maintenance: To keep your end grain wood flooring looking its best, regularly sweep or vacuum to remove dirt and debris. Avoid using harsh chemicals or abrasive cleaners that can damage the finish. Instead, use a damp mop and a mild wood floor cleaner specifically designed for hardwood floors.
Step 5: Enjoy your new end grain wood flooring: Once the finish has fully cured and you’ve completed the necessary maintenance steps, you can now enjoy the beauty and durability of your DIY-installed end grain wood flooring. Take pride in your work and admire the natural elegance that wood brings to your space.
It’s important to note that while DIY installation can be rewarding, it may not be suitable for everyone. If you’re unsure about your skills or abilities, it’s always a good idea to consult a professional for assistance. They can provide guidance and ensure a successful installation process. Additionally, if you are installing end grain wood flooring in a high-moisture area, such as a bathroom or kitchen, it’s important to take extra precautions to protect the wood. Consider using a moisture barrier or waterproofing membrane to prevent moisture damage.
It’s also worth mentioning that end grain wood flooring requires regular maintenance to keep it looking its best. This may include sanding and refinishing every few years to remove scratches and restore the finish.
Overall, installing end grain wood flooring can be a challenging but rewarding DIY project. By following these steps and taking proper care of your flooring, you can enjoy the natural beauty and durability of this unique flooring option for years to come. Installing end grain wood flooring is a detailed process that requires careful planning and precision. However, with the right tools and materials, it can be a rewarding DIY project. Here is a step-by-step guide to help you through the installation process:
Step 1: Prepare the subfloor:
– Ensure that the subfloor is clean, dry, and level.
– If necessary, remove any existing flooring or carpeting.
– Apply an even layer of polyurethane-based adhesive on the subfloor. Work in small sections to avoid the adhesive drying out before laying the tiles.
Step 2: Lay the tiles:
– Begin laying the end grain wood tiles in your desired pattern, keeping in mind any planned design elements.
– Press each tile firmly into the adhesive, ensuring proper alignment and spacing between them.
Step 3: Tap into place:
– Gently tap each tile into place using a rubber mallet or a block of wood to create a flush surface.
– Be cautious not to damage the edges or surfaces of the tiles while tapping.
Step 4: Continue installation:
– Repeat Steps 1-3 until you have covered the entire floor area.
– Take your time to ensure precision and accuracy throughout.
Step 5: Finishing Touches:
Once all the tiles are laid, it’s time to add the finishing touches that will enhance both the aesthetics and longevity of your end grain wood flooring.
Step 1: Sanding:
– Use sandpaper or a floor sander to smooth out any imperfections or unevenness on the wood surface.
– Start with a coarser grit and gradually move to a finer grit for a flawless finish.
Step 2: Apply finish:
– Choose a suitable finish, such as polyurethane or wax, and apply it according to the manufacturer’s instructions.
– This protective layer will enhance the natural beauty of the wood while safeguarding it from wear and tear.
Step 3: Allow curing time:
– Give the finish ample time to dry and cure before allowing foot traffic on the newly installed end grain wood flooring.
– Follow the manufacturer’s instructions for the recommended curing time.
– This step is crucial to ensure the longevity and durability of your flooring.
Step 4: Regular maintenance:
– To keep your end grain wood flooring looking its best, regularly sweep or vacuum to remove dirt and debris.
– Avoid using harsh chemicals or abrasive cleaners that can damage the finish.
– Instead, use a damp mop and a mild wood floor cleaner specifically designed for hardwood floors.
Step 5: Enjoy your new end grain wood flooring:
– Once the finish has fully cured and you’ve completed the necessary maintenance steps, you can now enjoy the beauty and durability of your DIY-installed end grain wood flooring.
– Take pride in your work and admire the natural elegance that wood brings to your space.
It’s important to note that while DIY installation can be rewarding, it may not be suitable for everyone. If you’re unsure about your skills or abilities, it’s always a good idea to consult a professional for assistance. They can provide guidance and ensure a successful installation process.
Additionally, if you are installing end grain wood flooring in a high-moisture area, such as a bathroom or kitchen, it’s important to take extra precautions to protect the wood. Consider using a moisture barrier or waterproofing membrane to prevent moisture damage.
It’s also worth mentioning that end grain wood flooring requires regular maintenance to keep it looking its best. This may include sanding and refinishing every few years to remove scratches and restore the finish.
Overall, installing end grain wood flooring can be a challenging but rewarding DIY project. By following these steps and taking proper care of your flooring, you can enjoy the natural beauty and durability of this unique flooring option for years to come.