Assessing Damage: When to Repair vs. Replace Hardwood Floors
One of the first things you’ll need to do when considering repairs to your hardwood floors is assess the extent of the damage. Is it something you can fix yourself, or is it time to consider replacing parts or all of the floor? Having faced this dilemma myself, I’ve learned that not all damage requires a complete overhaul. Sometimes, a simple repair can restore your floors to their former glory, but other times, replacement is the smarter choice. Let’s discuss how to make that decision.
- Surface-Level Damage vs. Structural Issues Before you start any DIY repairs, take a good look at the condition of your floors. Surface-level issues like scratches, minor dents, and dull finishes can usually be addressed with straightforward DIY methods. However, if the floorboards are warped, buckling, or showing signs of rot, these are structural problems that may require replacement. I always recommend checking for signs of moisture damage or mold, especially if you’ve had water spills or leaks in the area.
- Extent of the Damage How widespread is the damage? If only a small section of the floor is scratched or gouged, repairing that specific area is often the easiest route. But if the damage is spread across multiple boards or large sections, it might be time to consider a full replacement or refinishing. In my experience, it’s usually not worth doing spot repairs if more than 30-40% of the floor is compromised.
- Age and Condition of the Wood Another factor to consider is the age of your hardwood floors. If they’re several decades old but still structurally sound, refinishing might be a better option than replacing them entirely. However, if the wood is brittle, heavily worn, or too thin for another round of sanding, you may have no choice but to replace the boards. Hardwood floors can last a lifetime if properly cared for, but sometimes age catches up with them.
- Repair Costs vs. Replacement Costs Cost is always a consideration. Small repairs are generally inexpensive, especially if you already have the necessary tools and materials on hand. Replacing an entire section of flooring, however, can get pricey. I recommend weighing the cost of professional help for extensive repairs against the cost of replacing the floor. If the repair costs are close to or exceed the cost of new flooring, it might make more sense to replace it.
- Aesthetic Considerations One thing I always take into account is whether the repaired area will blend in with the rest of the floor. Older hardwood floors may have faded or changed color over time, making it tricky to match new repairs with the existing boards. If blending the repair is difficult, replacing a larger area might give you a more uniform look. On the other hand, minor surface repairs can usually be disguised well enough that they aren’t noticeable unless you know where to look.
- Your Long-Term Plans Finally, consider your long-term plans for the space. If you’re planning to sell your home soon, replacing damaged boards or refinishing the entire floor might be a better investment than patching up small areas. But if you’re staying put for a while, DIY repairs can prolong the life of your floors without the need for costly renovations. Ultimately, I find that making a decision based on both the current condition of the floor and your future goals helps you choose the right path.

Essential Tools and Materials for DIY Hardwood Floor Repair
When it comes to repairing hardwood floors yourself, having the right tools and materials is crucial for success. I’ve learned the hard way that trying to make do with inadequate tools can lead to frustration and poor results. So, before you start any repairs, gather the essentials to ensure you’re well-prepared for the job.
Sanding Tools: Hand Sander or Orbital Sander Whether you’re dealing with surface scratches or preparing a floorboard for replacement, sanding is a key part of the repair process. A hand sander is great for small areas or spot repairs, but if you’re working on a larger section, an orbital sander will save you time and effort. You’ll need sandpaper in different grits (ranging from coarse to fine) to smooth out the surface without damaging the wood.
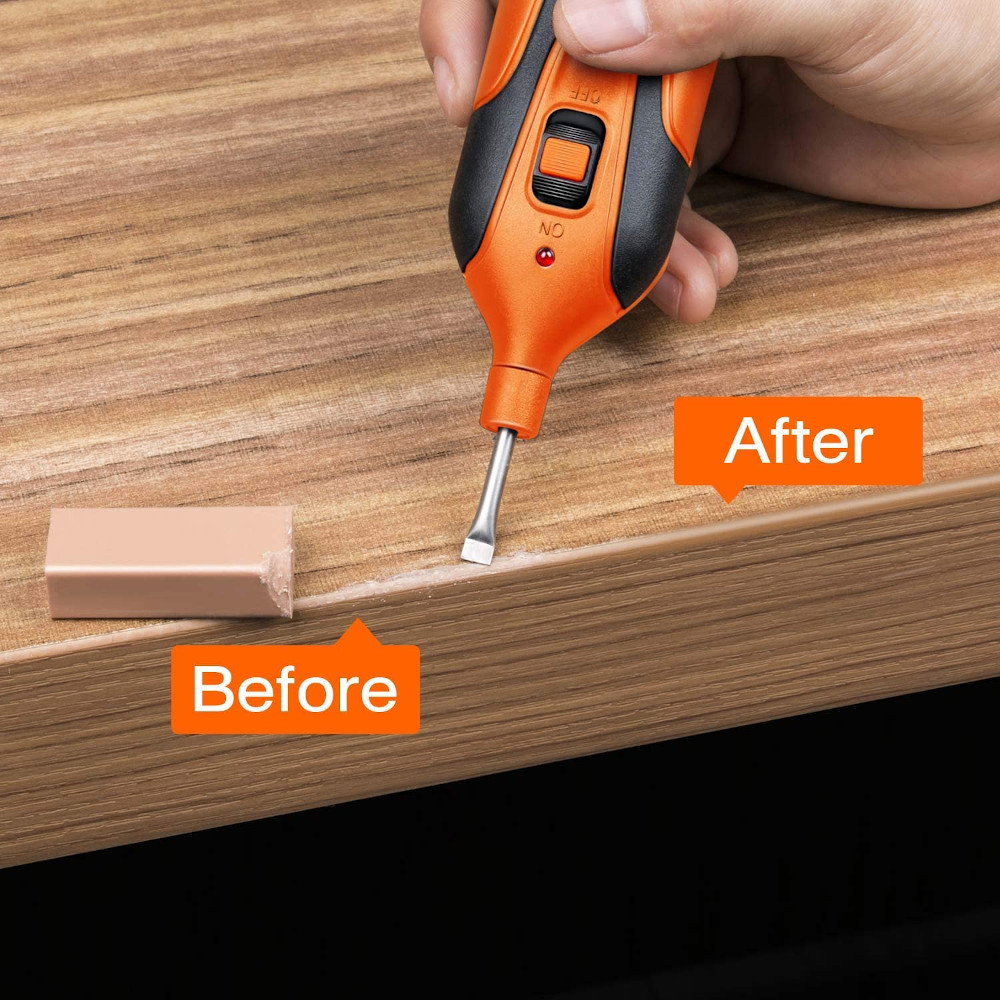
Wood Filler for Deep Scratches and Gouges For deeper scratches or gouges, wood filler is your best friend. Choose a filler that matches the color of your floor, or one that can be stained to match. You’ll apply the filler to the damaged area, smooth it out with a putty knife, and sand it down once it’s dry. This step can make even deep damage practically disappear if done correctly.
Replacement Boards and Nails for Major Repairs If you’re replacing damaged or warped floorboards, you’ll need new hardwood boards that match the species and size of your existing floor. A pry bar will help you remove the old boards, and a hammer and nails (or a nail gun, if you have one) will secure the new ones in place. Be sure to measure carefully so that your replacement boards fit snugly into the space left by the damaged ones.
Stain and Finish for a Seamless Look After you’ve repaired the damage, the next step is to match the color and finish of the rest of the floor. You’ll need a wood stain that matches the existing floor, as well as a finish (like polyurethane) to protect the repaired area. I recommend testing the stain on a scrap piece of wood before applying it to your floor to make sure it’s a good match.
A Dust Mask and Protective Gear Sanding and working with wood filler or stain can kick up dust and fumes, so protective gear is essential. A dust mask will protect your lungs from particles, and safety goggles will shield your eyes from flying debris. If you’re working with strong chemicals like stain or polyurethane, be sure to ventilate the area and wear gloves to protect your skin.
Other Handy Tools: Putty Knife, Pry Bar, and Tape Measure In addition to the main tools, having a putty knife for applying wood filler, a pry bar for removing damaged boards, and a tape measure for ensuring precise cuts will make the job go much more smoothly. It’s these small details that can make a big difference in the quality of your repair work. With the right tools in hand, you’ll be well on your way to tackling your hardwood floor repairs like a pro.

Fixing Scratches: Simple Techniques for Surface-Level Damage
Scratches are probably the most common issue you’ll face with hardwood floors, and thankfully, they’re often the easiest to fix. I’ve had my fair share of surface scratches, and over time I’ve discovered a few simple techniques that can make them virtually disappear. Here’s how you can repair those annoying scratches and keep your floors looking pristine.
Assess the Depth of the Scratch The first step in fixing a scratch is to determine how deep it goes. Surface scratches that don’t penetrate the wood can usually be fixed with light sanding and a touch-up. Deeper scratches, however, may require wood filler or more intensive repair. I always run my fingers over the scratch to see if it catches; if it’s smooth, it’s likely just a surface issue.
Buffing Out Light Scratches For light scratches, buffing the area with a fine steel wool pad or a microfiber cloth can sometimes do the trick. Gently rub the scratched area in the direction of the grain until the scratch fades. You might need to apply a hardwood floor cleaner or a bit of mineral oil to help lubricate the surface. After buffing, clean the area to remove any residue.
Using a DIY Scratch Repair Kit There are plenty of hardwood floor scratch repair kits available that come with everything you need to fix minor damage. These kits typically include a blendable wax stick or marker that matches your floor’s color. I’ve used these on small scratches with great results. Simply fill the scratch with the wax, smooth it out, and buff the area with a cloth. It’s a quick fix that makes a big difference.
Applying Wood Stain for Deeper Scratches If the scratch is more noticeable and has removed the finish or stain, you’ll need to touch it up with wood stain. Choose a stain that matches your floor, and use a cotton swab or a small brush to apply it to the scratched area. Wipe off any excess and let it dry before applying a protective finish. This method works well for medium-depth scratches that don’t penetrate too far into the wood.
Sanding and Refinishing the Area For more stubborn scratches that don’t respond to the above methods, light sanding might be necessary. Use fine-grit sandpaper to gently sand the scratched area, being careful not to remove too much wood. After sanding, apply a matching stain and finish to restore the floor’s original appearance. In my experience, this method works best for scratches that are deeper but still isolated to a small area.
Preventing Future Scratches Once you’ve repaired the scratches, you’ll want to take steps to prevent future damage. Using area rugs in high-traffic areas, placing felt pads under furniture legs, and regularly cleaning your floors can help keep them scratch-free. Hardwood floors are durable, but a little extra care goes a long way in preserving their beauty over time.

Repairing Gouges and Deep Scratches in Hardwood Floors
While surface-level scratches can be easy to fix, gouges and deep scratches present a more significant challenge. I’ve had to deal with deep damage in my hardwood floors before, and while it takes a bit more effort, it’s something you can tackle on your own. Here’s how to repair those deeper blemishes and get your floors back to looking like new.
Assess the Depth and Size of the Damage Before you start any repair work, it’s important to assess the depth and size of the gouge or deep scratch. If the damage is severe and involves multiple boards, you may need to replace those boards entirely. For isolated gouges or deep scratches, you can often repair them with wood filler and refinishing techniques.
Clean the Area Thoroughly Before applying any repair materials, make sure the area is clean and free of dust or debris. Use a vacuum or a damp cloth to remove any loose particles from the gouge or scratch. This ensures that the filler adheres properly and provides a smooth finish. I always make sure the surface is completely dry before moving on to the next step.
Applying Wood Filler For deep gouges, wood filler is your best bet. Choose a high-quality wood filler that matches the color of your floor. Using a putty knife, apply the filler to the damaged area, pressing it in to fill the gouge. Smooth the filler with the knife and remove any excess. Allow it to dry according to the manufacturer’s instructions before sanding.
Sanding the Repaired Area Once the wood filler is dry, sand the area to make it level with the surrounding floor. Use fine-grit sandpaper and be gentle to avoid scratching the rest of the floor. I find that sanding in the direction of the wood grain helps achieve a smoother finish. After sanding, vacuum up any dust and clean the area thoroughly.
Staining and Finishing After sanding, you’ll need to apply a stain that matches your floor to the repaired area. Use a small brush or cotton swab to carefully apply the stain, blending it with the surrounding wood. Once the stain has dried, apply a coat of finish to protect the area and match the sheen of the rest of the floor. Allow the finish to dry completely before walking to the repaired area.
Final Touches and Prevention Inspect the repaired area to make sure it blends well with the rest of the floor. If needed, apply additional coats of finish to achieve a perfect match. To prevent future gouges and scratches, consider using area rugs or mats in high-traffic areas and keeping pets’ nails trimmed. Taking these precautions will help keep your hardwood floors looking pristine for years to come.

Replacing Damaged or Warped Floorboards: A Step-by-Step Guide
Replacing damaged or warped hardwood floorboards can seem like a daunting task, but with the right approach, it’s manageable as a DIY project. I’ve done this a few times, and having a clear plan can make the process smoother and more efficient. Here’s a step-by-step guide to help you replace those problematic boards and restore the look of your floor.
Identify and Remove the Damaged Boards Start by identifying the boards that need to be replaced. Use a pry bar to gently lift the damaged boards from the floor. If the boards are nailed down, you may need to remove the nails with a hammer or pry them out with the pry bar. Be careful not to damage the surrounding boards during this process. I’ve found it helpful to use a utility knife to cut any adhesive or sealant before prying up the boards.
Prepare the Replacement Boards Once the damaged boards are removed, measure the space to ensure you get the right size replacement boards. If you’re replacing a board in the middle of a room, you might need to cut the replacement board to fit. Be sure to match the species, width, and finish of the existing floorboards. If you can’t find an exact match, consider sanding and staining the new board to blend it with the existing floor.
Install the Replacement Boards Fit the replacement boards into the space, ensuring they align with the existing floorboards. Use a nail gun or finishing nails to secure the new boards in place. If you’re using nails, countersink them slightly so that they don’t stick out. For a tight fit, you might need to use a hammer and a block of wood to tap the boards into place. Make sure the new boards are level with the surrounding floor.
Fill Gaps and Nail Holes Once the new boards are installed, fill any gaps or nail holes with wood filler. Choose a filler that matches the color of your floor, and use a putty knife to apply it. Smooth the filler and let it dry according to the manufacturer’s instructions. After it’s dry, sand the area lightly to ensure a smooth surface that blends with the rest of the floor.
Stain and Finish the Repaired Area After filling and sanding, you’ll need to stain and finish the replacement boards to match the rest of the floor. Apply the stain with a brush or cloth, blending it with the surrounding wood. Once the stain has dried, apply a protective finish to seal the boards and match the sheen of the existing floor. Let the finish dry completely before walking on the area.
Inspect and Maintain After completing the replacement, inspect the area to ensure that the new boards blend seamlessly with the existing floor. Regular maintenance is key to keeping your floors looking great. Use area rugs in high-traffic areas, keep the floors clean, and promptly address any issues to prevent future damage. By staying on top of maintenance, you’ll prolong the life of your hardwood floors and keep them looking beautiful.
Sanding and Refinishing for a Smooth, Like-New Finish
Sanding and refinishing your hardwood floors can be a game-changer, transforming worn or damaged floors into a smooth, like-new surface. I’ve tackled this project a few times, and while it can be labor-intensive, the results are well worth the effort. Here’s a detailed guide to help you achieve a professional-looking finish with a DIY approach.
Preparation: Clearing the Area Before you start sanding, you’ll need to clear the room of all furniture and cover any vents or fixtures to protect them from dust. I also recommend using a drop cloth to protect baseboards and walls from damage. Proper preparation is crucial to ensure a clean, efficient sanding and refinishing process.
Sanding: Choosing the Right Equipment Sanding is a critical step in the refinishing process. You’ll need either a drum sander or an orbital sander, depending on the size of the area. Drum sanders are ideal for large spaces and can remove old finishes and heavy damage, while orbital sanders are better for smaller areas and detail work. Make sure to use coarse-grit sandpaper for the initial pass and progressively finer grits for a smooth finish.
Sanding Technique and Dust Control When sanding, start with coarse-grit sandpaper and work your way up to finer grits. Sand with the grain of the wood to avoid scratches and achieve a uniform finish. I’ve found that using a shop vac or dust extractor with your sander helps keep the dust to a minimum. Be thorough, but avoid over-sanding, as this can damage the wood.
Cleaning Up After Sanding After sanding, vacuum the entire floor to remove all dust and debris. Use a tack cloth or a damp mop to ensure that no dust remains on the surface. It’s important to have a completely clean surface before applying the stain or finish to ensure a smooth, even application.
Staining and Finishing Once the floor is clean and dry, it’s time to apply the stain and finish. Apply the stain with a brush or rag, working in small sections and blending the color as you go. After the stain has dried, apply a finish, such as polyurethane, to protect the wood and give it a shiny appearance. I recommend applying multiple coats of finish for durability, allowing each coat to dry fully before applying the next.
Final Touches and Drying Time Once the final coat of finish has been applied, let the floor dry completely before walking on it or replacing furniture. Drying times can vary depending on the type of finish used, so be sure to follow the manufacturer’s recommendations. After the finish has fully cured, inspect the floor for any imperfections and address them as needed.

Maintaining Repaired Hardwood Floors for Long-Term Durability
Once you’ve put in the time and effort to repair and refinish your hardwood floors, the key to keeping them looking great is regular maintenance. I’ve found that a little bit of ongoing care can go a long way in preserving the beauty and longevity of hardwood floors. Here’s how to maintain your repaired floors for lasting durability.
Regular Cleaning Keeping your hardwood floors clean is essential to maintaining their appearance. Use a vacuum or a broom to remove dust and debris regularly. For a deeper clean, use a hardwood floor cleaner that’s designed for your type of finish. Avoid using water or harsh chemicals, as they can damage the finish and the wood over time.
Protecting the Finish To protect the finish, place area rugs or mats in high-traffic areas and under furniture. Felt pads on the legs of chairs and tables can also prevent scratches and dents. I’ve found that these simple precautions make a big difference in keeping the floor looking like new.
Addressing Spills and Stains Promptly Accidents happen, and when spills occur, it’s important to clean them up as soon as possible. Use a soft cloth or paper towel to blot the spill, and then clean the area with a hardwood floor cleaner. For stubborn stains, you might need a specialized cleaner or a professional’s help, but most can be managed with a quick response.
Maintaining Humidity Levels Wood floors are sensitive to changes in humidity, which can cause them to expand or contract. To prevent this, try to maintain a consistent humidity level in your home. A humidifier in the winter and a dehumidifier in the summer can help keep your floors stable and prevent issues like warping or gapping.
Reapplying Finish as Needed Depending on the level of traffic and wear, you may need to reapply the finish to your floors periodically. This helps protect the wood and maintain its shine. I usually check my floors every few years to see if they need a touch-up or a fresh coat of finish.
Professional Inspections and Repairs Finally, even with the best care, your floors may need occasional professional inspection or repairs. If you notice any significant issues or signs of wear, don’t hesitate to call a professional. Regular inspections can help catch problems early and ensure that your floors continue to look and perform their best.

Related Posts: