Concrete floor tiles offer a blend of durability, versatility, and modern aesthetic appeal, making them an excellent choice for various spaces in your home or commercial property. From choosing the right tiles to installation and maintenance, this guide will walk you through everything you need to know about concrete floor tile installation.
Choosing the Right Concrete Tiles
Understanding Concrete Tile Types
Concrete tiles come in various types, including traditional concrete tiles, encaustic tiles, and concrete-look porcelain tiles. Traditional concrete tiles are typically thicker and have a rougher texture, providing a more industrial look. Encaustic tiles, on the other hand, are decorative and often feature intricate patterns and designs. Concrete-look porcelain tiles offer the aesthetic of concrete with the benefits of porcelain, such as increased durability and water resistance.
Considering Tile Size and Shape
The size and shape of your concrete tiles can significantly impact the overall look of your space. Larger tiles can make a room appear more spacious and create a seamless look with fewer grout lines. Smaller tiles, including hexagonal or mosaic shapes, can add a unique and detailed aesthetic. Consider the scale of your space and the desired visual effect when selecting tile size and shape.
Color and Finish Options
Concrete tiles are available in a wide range of colors and finishes. Natural gray is a popular choice for a minimalist and industrial look, but you can also find tiles in various hues, from muted earth tones to vibrant colors. The finish of the tile can be matte, polished, or textured, each providing a different feel and appearance. Choose a color and finish that complements your overall design theme.
Evaluating Tile Quality
When selecting concrete tiles, it’s essential to evaluate their quality. Look for tiles with a uniform thickness and surface texture to ensure even installation. Check for any cracks or imperfections that could affect durability. High-quality concrete tiles should be dense and have a low porosity to resist moisture and staining.
Matching Tiles to Your Space
Consider the function of the space where you plan to install concrete tiles. For high-traffic areas like kitchens and hallways, choose tiles that are highly durable and easy to clean. For areas exposed to moisture, such as bathrooms or outdoor spaces, select tiles with slip-resistant properties and appropriate sealing to prevent water damage.
Budget Considerations
Concrete tiles vary in price depending on their type, size, and quality. Establish a budget for your project and consider both the cost of the tiles and the installation expenses. While high-quality tiles may have a higher upfront cost, they can offer better longevity and reduce the need for frequent replacements or repairs.

Preparing for Installation
Assessing the Subfloor
Before installing concrete tiles, it’s crucial to assess the condition of the subfloor. The subfloor should be clean, dry, and level to ensure proper adhesion and prevent tile cracking. Remove any old flooring materials and repair any cracks or uneven areas. A well-prepared subfloor provides a solid foundation for your tile installation.
Gathering Necessary Tools and Materials
Having the right tools and materials on hand is essential for a smooth installation process. Key tools include a tile cutter or wet saw, notched trowel, rubber mallet, level, and tile spacers. You’ll also need materials such as tile adhesive, grout, and a sealant. Preparing all necessary items in advance can help avoid delays during the installation.
Planning the Layout
Planning the layout of your tiles is a critical step that ensures a balanced and aesthetically pleasing result. Measure the space and create a detailed plan that includes the placement of full tiles and cuts. Start from the center of the room and work outward to avoid awkward cuts at the edges. Dry-lay the tiles to visualize the final layout and make any necessary adjustments.
:max_bytes(150000):strip_icc()/can-you-install-tile-directly-on-concrete-1822600-04-458f7bb6c78348c1835cf8054ef36553.jpg)
Cutting Tiles to Fit
Cutting tiles to fit around edges, corners, and obstacles is often required. Use a tile cutter or wet saw to make precise cuts, ensuring that the edges are smooth and even. Measure carefully before cutting to avoid wasting materials. Properly cut tiles contribute to a professional and polished appearance.
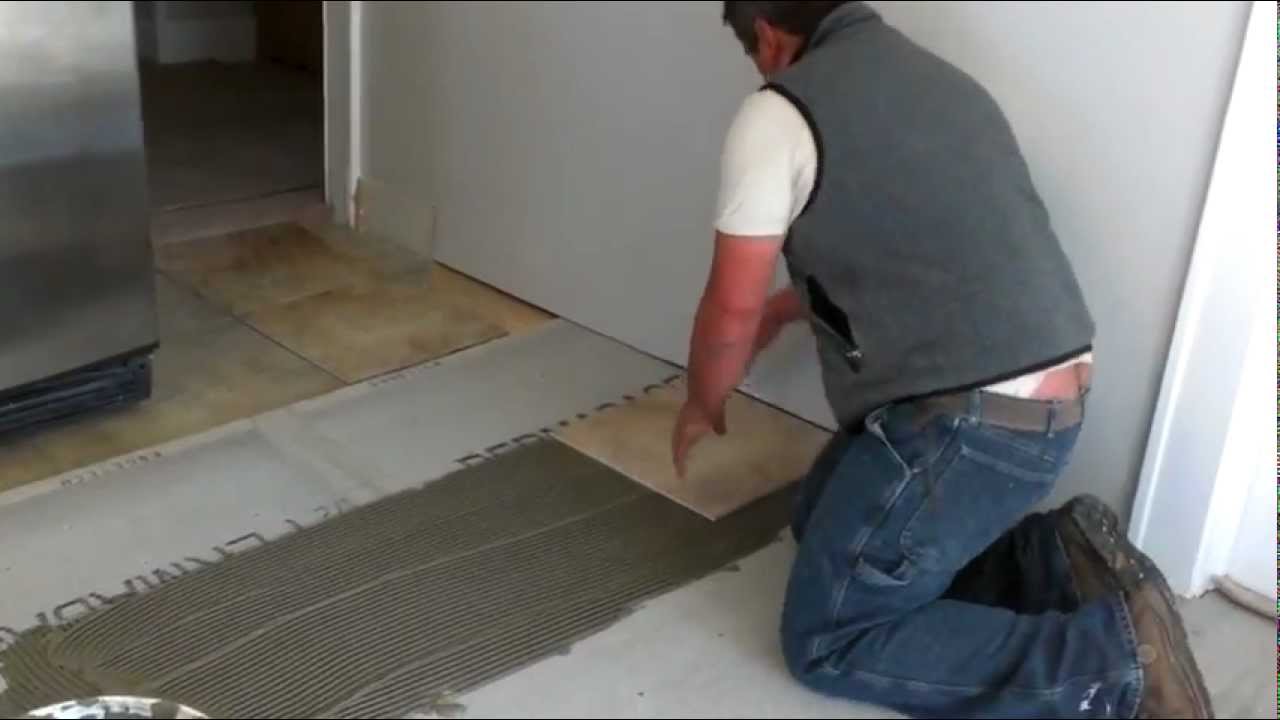
Applying Tile Adhesive
Choosing the right tile adhesive is crucial for a successful installation. Use a high-quality, thin-set mortar that is suitable for concrete tiles and the subfloor material. Apply the adhesive with a notched trowel, spreading it evenly over a small section of the floor. Press the tiles firmly into the adhesive, using spacers to maintain even gaps for grouting.
Setting the Tiles
Once the adhesive is applied, begin setting the tiles according to your planned layout. Start from the center and work outward, ensuring each tile is level and properly aligned. Use a rubber mallet to tap the tiles gently into place, ensuring full contact with the adhesive. Allow the adhesive to set for the recommended time before proceeding with grouting.
/LayingCeramicFloorTile-5b75cedc46e0fb00507045bd.jpg)
Grouting and Sealing
Choosing the Right Grout
Selecting the right grout is important for both the appearance and durability of your tile installation. Grout comes in various colors, so choose one that complements your tile color. For areas exposed to moisture, such as bathrooms, use a grout with water-resistant properties. Epoxy grout is a durable option that resists staining and is easy to clean.
Applying the Grout
Once the tile adhesive has set, you can begin grouting. Mix the grout according to the manufacturer’s instructions, ensuring a smooth consistency. Use a grout float to apply the grout, pressing it into the gaps between the tiles. Work in small sections and remove excess grout with a damp sponge, wiping diagonally across the tiles to avoid removing grout from the joints.
Cleaning the Tiles
After grouting, it’s essential to clean the tiles thoroughly to remove any grout residue. Use a damp sponge to wipe away excess grout, rinsing the sponge frequently. Allow the grout to dry for the recommended time, and then polish the tiles with a dry cloth to remove any remaining haze. Proper cleaning ensures a pristine and professional finish.

Sealing the Grout and Tiles
Sealing the grout and tiles is an important step to protect against stains, moisture, and dirt. Apply a high-quality sealer designed for concrete tiles and grout, following the manufacturer’s instructions. Sealing helps to maintain the appearance of your tiles and makes them easier to clean. Reapply the sealer periodically to ensure ongoing protection.
Final Touches
Once the grout and sealer have dried, inspect the entire installation for any imperfections or areas that need touch-ups. Replace any damaged tiles and ensure all grout lines are smooth and even. Clean the tiles thoroughly and apply a final coat of sealer if necessary. Add finishing touches such as baseboards or trim to complete the look.
Allowing Proper Curing Time
After completing the installation, it’s crucial to allow proper curing time for the adhesive, grout, and sealer. Avoid heavy traffic on the newly installed floor for at least 24 to 48 hours to ensure everything sets correctly. Follow the manufacturer’s guidelines for curing times to achieve the best results.

Maintenance and Care
Regular Cleaning
Regular cleaning is essential to maintain the appearance and longevity of your concrete floor tiles. Sweep or vacuum the floor regularly to remove dirt and debris that can scratch the surface. Use a pH-neutral cleaner and a damp mop to clean the tiles, avoiding harsh chemicals that can damage the sealer.
Stain Removal
Concrete tiles are susceptible to staining, so it’s important to clean up spills promptly. Use a mild detergent and a soft cloth to blot the stain, avoiding scrubbing that can damage the tile surface. For stubborn stains, use a cleaner specifically designed for concrete tiles. Sealed tiles are more resistant to stains, so ensure your tiles are properly sealed.
Protecting the Surface
Protect your concrete tiles from scratches and damage by using furniture pads under heavy objects and placing rugs or mats in high-traffic areas. Avoid dragging heavy items across the floor and be mindful of sharp objects that can scratch the surface. Regularly check for signs of wear and address any issues promptly.

Reapplying Sealant
To keep your concrete tiles looking their best, reapply sealant periodically. The frequency of reapplication depends on the level of traffic and wear. Typically, reapplying sealer every 1 to 2 years helps maintain the protective barrier against stains and moisture. Follow the manufacturer’s instructions for the best results.
Addressing Grout Maintenance
Keeping the grout lines clean and in good condition is important for the overall appearance and durability of your floor. Clean the grout regularly with a mild cleaner and a soft brush. If the grout becomes stained or discolored, consider using a grout cleaner or a mixture of baking soda and water. Re-seal the grout periodically to protect it from moisture and stains.
Handling Repairs
Over time, your concrete floor tiles may require repairs due to wear and tear. For minor scratches or chips, use a repair kit designed for concrete tiles. For more significant damage, consider consulting a professional to ensure the repair is done correctly. Regular maintenance and prompt attention to any issues can help extend the life of your floor.

Design Ideas
Modern Industrial Look
Concrete floor tiles are perfect for achieving a modern industrial look. Pair them with exposed brick walls, metal fixtures, and minimalist furniture. Use neutral colors and simple lines to create a sleek and sophisticated space. Add a few statement pieces, such as a large industrial-style light fixture, to enhance the design.
Rustic Charm
For a rustic charm, combine concrete tiles with natural materials like wood and stone. Choose tiles with a textured finish to add warmth and character. Incorporate rustic elements such as reclaimed wood furniture, woven baskets, and vintage accessories. Use earthy tones and soft lighting to create a cozy and inviting atmosphere.
Contemporary Elegance
Concrete tiles can also create a contemporary and elegant look. Opt for large-format tiles in a polished finish for a sleek and luxurious appearance. Pair them with modern fixtures, clean lines, and a monochromatic color scheme. Add touches of metallic accents and glass to enhance the contemporary feel.
Outdoor Spaces
Concrete floor tiles are an excellent choice for outdoor spaces due to their durability and weather resistance. Use them for patios, walkways, and pool areas to create a cohesive and stylish outdoor environment. Choose slip-resistant tiles to ensure safety and consider incorporating outdoor rugs and furniture to add comfort and style.
Artistic Patterns
Concrete tiles offer the opportunity to get creative with patterns and designs. Encaustic tiles, in particular, are available in a wide range of patterns and colors. Create a focal point with a patterned tile rug or use geometric patterns to add visual interest. Mix and match different tile designs to create a unique and personalized space.
Transitional Spaces
Concrete floor tiles can seamlessly blend different design styles, making them ideal for transitional spaces. Use them to connect different areas of your home, such as the kitchen and living room, creating a cohesive flow. Choose a neutral color and finish that complements the surrounding decor and adds a touch of sophistication.
Common Mistakes to Avoid
Skipping Subfloor Preparation
One of the most common mistakes is skipping the subfloor preparation. Failing to clean, level, and repair the subfloor can result in uneven tiles and poor adhesion. Take the time to properly prepare the subfloor to ensure a smooth and successful installation.
Incorrect Adhesive Application
Using the wrong adhesive or applying it incorrectly can lead to tiles not adhering properly. Choose a high-quality adhesive suitable for concrete tiles and follow the manufacturer’s instructions for application. Ensure even coverage and avoid using too much or too little adhesive.
Inadequate Grout Cleaning
Not cleaning the grout properly during installation can leave a haze on the tiles and affect the final appearance. Wipe away excess grout with a damp sponge immediately after application and polish the tiles with a dry cloth once the grout has dried. Proper cleaning ensures a professional finish.
Not Sealing Tiles and Grout
Failing to seal the tiles and grout can lead to stains, moisture damage, and discoloration. Always apply a high-quality sealer designed for concrete tiles and grout. Follow the manufacturer’s instructions for application and reapply periodically to maintain protection.
Poor Planning and Layout
Inaccurate measurements and poor planning can result in an unbalanced and uneven tile layout. Take the time to measure your space carefully and plan the layout, starting from the center and working outward. Dry-lay the tiles to visualize the final arrangement and make any necessary adjustments.
Neglecting Maintenance
Regular maintenance is essential for keeping your concrete floor tiles in good condition. Neglecting cleaning, sealing, and repairs can lead to a worn and damaged floor. Incorporate regular maintenance tasks into your routine to ensure the longevity and appearance of your tiles.

How do I choose the right concrete tiles for my space?
Choosing the right concrete tiles involves considering factors such as the type of tiles, size, shape, color, and finish. Assess the function of your space and select tiles that are durable, water-resistant, and easy to maintain. Evaluate the quality of the tiles and ensure they complement your overall design theme.
Can I install concrete tiles over an existing floor?
Yes, you can install concrete tiles over an existing floor if the subfloor is in good condition. Ensure the existing floor is clean, dry, and level before installation. Use a high-quality adhesive suitable for the subfloor material and follow the manufacturer’s instructions for proper adhesion.
How do I maintain concrete floor tiles?
Maintaining concrete floor tiles involves regular cleaning, prompt spill cleanup, and periodic sealing. Sweep or vacuum regularly to remove dirt and debris, use a pH-neutral cleaner for cleaning, and avoid harsh chemicals. Reapply sealant periodically to protect against stains and moisture, and address any repairs promptly.
Are concrete floor tiles suitable for outdoor use?
Yes, concrete floor tiles are suitable for outdoor use due to their durability and weather resistance. Choose slip-resistant tiles to ensure safety, and consider the environmental conditions when selecting tiles. Proper installation and sealing are essential to protect the tiles from moisture and weather damage.
How long does it take to install concrete floor tiles?
The installation time for concrete floor tiles depends on the size of the area, the complexity of the layout, and the drying times for adhesive and grout. On average, the process can take several days to a week. Allow proper curing time for adhesive, grout, and sealer before heavy traffic or use.
What should I do if a tile gets damaged?
If a concrete floor tile gets damaged, you can replace it by carefully removing the damaged tile and cleaning the area. Apply new adhesive and set the replacement tile, ensuring it is level with the surrounding tiles. Grout and seal the new tile to match the existing installation. For significant damage, consult a professional for proper repair.

Related Posts:
- Outdoor Concrete Flooring Ideas
- Concrete Floor Polishing
- Interior Concrete Floor Paint Ideas
- Concrete Floor Epoxy Crack Filler
- Concrete Floor Basement Ideas
- Painting Concrete Floor With Epoxy
- Outdoor Concrete Floor Paint Ideas
- Concrete Floor Painting Tips
- Outdoor Concrete Floor Finishes
- Non Slip Concrete Floor