How To Lower Basement Floor

Lowering a Basement Floor Basement Masters Waterproofing

Basement Lowering/Underpinning – Basements Love Us
Lowering a Basement Floor JLC Online

Can I lower the floor of the basement?

Lowering Basement Floor : A Helpful Guide

How Much Does Lowering a Basement Floor Cost in 2023? Checkatrade
Lowering the basement

Lowering the basement floor and sewer lines

Cost of Underpinning: RCC Waterproofing Blog

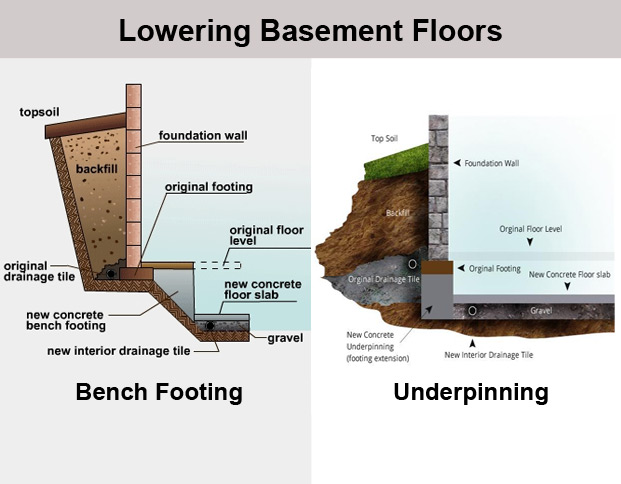
Basement Lowering Techniques (Underpinning or Benching) City

Related Posts:
- Basement Flooring Ideas
- Basement Floor Heaving Repair
- Basement Flooring Options DIY
- Fixing Basement Floor
- Repainting Basement Floor
- Walkout Basement Flooring
- Brick Basement Flooring
- Budget Basement Flooring
- Waterproofing Your Basement Floor
- Laminate Basement Flooring
Basements are a great addition to any home. They provide extra living space, storage, and can even be used as an entertainment space. But with all these benefits come the dreaded task of lowering basement floors. Lowering basement floors can be a daunting task, but with the right preparation and materials, it doesn’t have to be.
In this guide, we’ll walk you through the steps for how to lower basement floors in your own home. We’ll cover everything from choosing the right materials to installing them properly for the best results. So let’s get started!
## Step 1: Choose the Right Materials
The first step in lowering basement floors is choosing the right materials. The type of material you choose will depend on a few factors, including the size of your basement, your budget, and the existing flooring materials.
For instance, if you have a larger basement and want to use it as an entertainment space, you may want to consider tile or stone flooring. These types of materials are more expensive but can handle high levels of foot traffic and are easy to clean.
If you’re on a tighter budget, laminate flooring may be a better option. Laminate is cheaper than tile or stone and can still give you the look of hardwood floors without the expense.
## Step 2: Prepare the Area
Once you’ve chosen the right materials for your basement floor, it’s time to prepare the area for installation. This step is arguably just as important as choosing the right materials because if you don’t properly prepare your basement, you could end up with an uneven or unstable floor.
Start by making sure that your basement is free from any debris or water damage and that it is level. Once this is done, you can lay down a vapor barrier and insulation to help protect your floor against moisture damage.
## Step 3: Install Your Flooring
Now that your basement is prepared, it’s time to install your flooring. Depending on what type of material you chose, installation may vary slightly but should follow similar steps regardless of type.
Tile and stone flooring should be laid out in a grid-like pattern with adhesive and grout applied between each piece to prevent shifting or cracking over time. Laminate flooring should also have adhesive applied but will not require grout. Once all pieces are laid out, use a straight edge to ensure that all edges are even before allowing the adhesive to dry completely.
## Step 4: Finish Up
Once your flooring is installed and dry, there may still be some steps to take before you can enjoy your new basement floor. If you used tile or stone flooring, it may require sealing before use to protect it from wear and tear over time. Additionally, you may need to add trim around the edges of your flooring to give it a more polished look.
Finally, once all these steps are complete, you’re ready to enjoy your new lower basement floor! With proper preparation and installation, your new floor should last for years with minimal maintenance required.
Lowering basement floors can seem like a daunting task but with the right preparation and materials it doesn’t have to be difficult. By following these simple steps, you can have a beautiful lower basement floor that adds value and comfort to your home in no time!