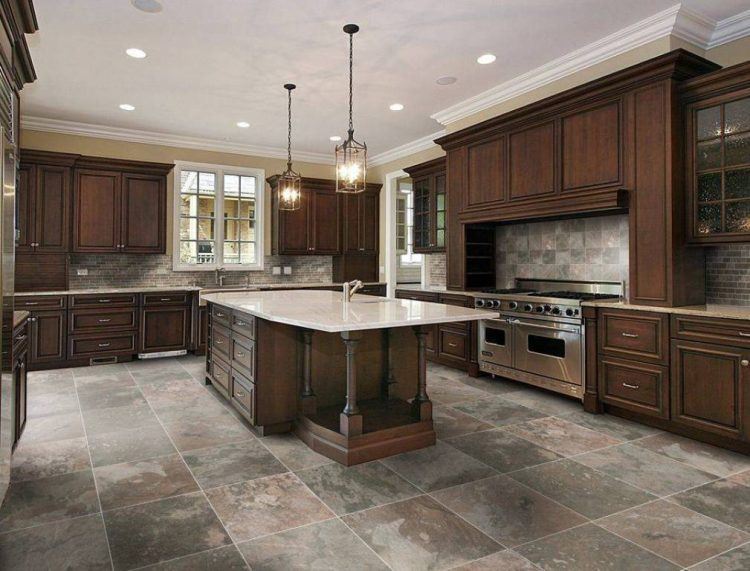
Benefits of Ceramic Tile Floors in the Kitchen
When I first considered flooring options for my kitchen, ceramic tile quickly stood out as a top contender. It’s durable, versatile, and adds a certain charm to the space that’s hard to beat. If you’re on the fence about what type of flooring to choose for your kitchen, let me share the many benefits of ceramic tile floors.
- Durability
Ceramic tiles are known for their toughness, making them an excellent choice for high-traffic areas like the kitchen. I love how they withstand heavy foot traffic, sharp utensils, and even the occasional dropped dish. Unlike some other flooring materials, ceramic tiles won’t easily scratch, chip, or wear out over time, giving you peace of mind that your floors will last for years. - Water and Stain Resistance
One of the main reasons I chose ceramic tile is because of its resistance to water and stains. In a kitchen, spills are inevitable, and having a floor that can handle moisture is crucial. Ceramic tiles don’t absorb water like some materials, which means they’re less likely to warp or grow mold in damp conditions. Plus, cleaning up spills is a breeze! - Easy to Maintain
Maintaining ceramic tile floors is easy. All it takes is a quick sweep and a mop, and they’re good as new. I also appreciate that they’re resistant to most household cleaning products, so you don’t have to worry about using special cleaners. This low-maintenance quality makes ceramic tiles perfect for busy kitchens. - Temperature and Fire Resistant
Ceramic tiles have natural fire-resistant properties, which adds an extra layer of safety in the kitchen. Since they can handle high temperatures, I never have to worry about damage from hot pots or pans being set on the floor. In the summer, ceramic tiles also help keep the room cool, which is a nice bonus. - Hypoallergenic and Eco-Friendly
For those of us who suffer from allergies, ceramic tiles are a great option. They don’t trap dust, pollen, or pet hair the way some other flooring materials do. Additionally, ceramic tiles are made from natural materials and don’t emit volatile organic compounds (VOCs), making them an environmentally friendly choice for your kitchen. - Wide Range of Design Options
One of the things I love most about ceramic tiles is the variety of design options available. Whether you prefer sleek modern styles or rustic, earthy tones, there’s a ceramic tile out there that fits your kitchen’s aesthetic. From bold patterns to classic neutrals, you can truly customize the look of your kitchen with ceramic tiles.

Choosing the Right Ceramic Tile: Styles, Sizes, and Colors
When it comes to selecting the perfect ceramic tile for your kitchen, the sheer number of options can feel overwhelming. I remember spending hours browsing through samples, trying to decide on the best style, size, and color. To make the process easier for you, here’s what I learned along the way about choosing the right ceramic tile.
Deciding on Tile Style
The first decision you’ll need to make is the style of ceramic tile that fits your kitchen’s overall look. If you’re going for a modern kitchen design, glossy tiles with a sleek finish might be the best choice. On the other hand, if you prefer a more rustic or traditional vibe, textured or matte tiles can add warmth and character to the space.
Tile Sizes Matter
Size is another key factor when choosing ceramic tiles. Larger tiles can make a small kitchen appear bigger by reducing the number of grout lines, creating a more seamless look. Smaller tiles, like mosaics, can be used for intricate designs or as accents in specific areas, like a kitchen backsplash. I ended up mixing sizes to create a more dynamic look in my kitchen.
Color Considerations
The color of your ceramic tiles plays a big role in the overall feel of your kitchen. Lighter tiles can make a space feel open and airy, while darker tiles add a dramatic touch. Neutral shades like beige, gray, and white are versatile and timeless, while bold colors or patterns can serve as a statement piece. I opted for neutral tiles with a pop of color in the backsplash to keep things balanced.
Think About Grout Color
When choosing ceramic tiles, it’s also important to think about the grout color. A matching grout will create a more cohesive look, while a contrasting grout can emphasize the pattern of the tiles. Grout color can also affect how easy the floor is to maintain, as lighter grout may show stains more easily.
Consider Tile Texture
Texture is another important element to consider. Glossy tiles have a smooth, shiny finish that reflects light and adds brightness to the room. However, they can also be slippery, especially in a kitchen where spills are common. Textured or matte tiles provide more grip, making them a safer choice if you’re concerned about slipping.
Tile Material and Thickness
Not all ceramic tiles are created equal, so pay attention to the material and thickness of the tile. Thicker tiles are more durable and better suited for flooring, while thinner tiles are often used for walls or backsplashes. Make sure you choose tiles that are rated for floor use to ensure they can handle the wear and tear of a busy kitchen.

Installation Process: What to Expect When Installing Ceramic Tiles
Installing ceramic tiles in the kitchen can be a transformative experience, but it’s important to understand the process before diving in. I remember feeling a bit overwhelmed by all the steps involved, but once you know what to expect, the installation can go smoothly. Here’s a breakdown of the key steps in the ceramic tile installation process.
Prepping the Subfloor
Before you can install ceramic tiles, the subfloor needs to be properly prepared. This involves cleaning the surface and making sure it’s level and free of cracks or damage. If the subfloor isn’t in good condition, you might need to add an underlayment, such as cement backer board, to create a stable surface for the tiles. Skipping this step can lead to issues down the road, like cracked tiles or uneven flooring.
Laying Out the Tile Design
Once the subfloor is ready, the next step is planning your tile layout. I found it helpful to do a dry run by laying out the tiles without adhesive to ensure the design looked right and there were no awkward cuts. This also helps you determine where to start tiling so that you can avoid having small, uneven tiles along the edges of the room.
Applying Adhesive
The actual installation begins with applying tile adhesive or thin-set mortar to the subfloor. It’s important to work in small sections so the adhesive doesn’t dry before you have a chance to lay the tiles. Using a notched trowel, spread the adhesive evenly on the floor and then press each tile into place. Be sure to use spacers between tiles to ensure consistent grout lines.
Cutting Tiles to Fit
Chances are, you’ll need to cut some tiles to fit around edges, corners, or appliances. A tile cutter or wet saw is essential for making clean, precise cuts. It’s a bit of a learning curve, but once you get the hang of it, cutting tiles becomes much easier. I recommend measuring twice before making any cuts to avoid wasting tiles.
Grouting the Tiles
After the tiles are set and the adhesive has dried, it’s time to apply the grout. Grout fills the spaces between the tiles, sealing them and giving the floor a finished look. Using a rubber float, spread the grout over the tiles, pressing it into the gaps. Once the grout is applied, wipe away the excess with a damp sponge to prevent it from drying on the surface of the tiles.
Sealing the Grout
After the grout has cured, usually within a day or two, it’s a good idea to seal it to protect it from stains and moisture. Grout sealer creates a barrier that prevents liquids from penetrating the grout lines, keeping your kitchen floor looking fresh and clean. This final step ensures the longevity of your ceramic tile floor and makes it easier to maintain over time.

Maintaining Your Ceramic Tile Floor: Tips for Longevity and Shine
Once your ceramic tile floor is installed, you’ll want to keep it looking its best for years to come. I’ve found that with a little regular care, ceramic tiles can stay beautiful and functional without too much effort. Here are some tried-and-true tips for maintaining your ceramic tile floor.
Regular Sweeping and Vacuuming
One of the easiest ways to maintain your ceramic tile floor is by sweeping or vacuuming regularly. Dirt and debris can accumulate in the grout lines and on the surface of the tiles, causing scratches over time. I recommend using a soft-bristle broom or a vacuum with a hard floor setting to remove dirt without damaging the tiles.
Mopping with Mild Cleaners
When it’s time to mop, stick to mild, non-abrasive cleaners to avoid dulling the finish of the tiles. I like to use a mixture of warm water and a small amount of dish soap for regular cleaning. For tougher spots, a solution of vinegar and water works wonders. Be sure to avoid harsh chemicals like bleach, which can damage both the tiles and the grout.
Spot Cleaning Spills Immediately
Although ceramic tiles are resistant to stains, it’s always a good idea to clean up spills right away. Liquids like coffee, wine, or tomato sauce can leave behind stubborn stains if left to sit for too long, especially in the grout. I keep a microfiber cloth handy in the kitchen to quickly wipe up any messes before they become an issue.
Sealing the Grout Regularly
One of the most important maintenance tasks for a ceramic tile floor is sealing the grout. Grout is porous and can absorb moisture and stains over time. I recommend sealing the grout once or twice a year, depending on how much traffic your kitchen sees. This will keep the grout looking fresh and prevent it from becoming discolored.
Using Rugs and Mats in High-Traffic Areas
Placing rugs or mats in high-traffic areas, such as in front of the sink or stove, can help protect your ceramic tile floor from wear and tear. These mats catch dirt, moisture, and food spills before they have a chance to damage the floor. Plus, they add a bit of comfort underfoot, which is always a bonus when spending long hours in the kitchen.
Dealing with Scratches and Chips
Although ceramic tiles are durable, they’re not completely immune to damage. If you notice small scratches or chips, you can often repair them yourself with a ceramic tile repair kit. These kits are easy to use and can restore the appearance of your tiles without the need for a professional. For larger cracks or extensive damage, it may be necessary to replace the affected tiles.
Ceramic Tile vs. Other Kitchen Flooring Options: A Comparison
When I was deciding on a kitchen floor, I spent a lot of time comparing ceramic tile to other popular flooring options. It turns out, that ceramic tile has some distinct advantages, but it’s also important to weigh the pros and cons of each option. Let’s take a look at how ceramic tile stacks up against other common kitchen flooring materials.
Ceramic Tile vs. Hardwood
Hardwood floors are beautiful and add a lot of warmth to a kitchen, but they’re not as durable as ceramic tiles in high-moisture environments. While hardwood can warp or stain if exposed to water for too long, ceramic tile is highly water-resistant. I love the classic look of hardwood, but in the end, ceramic tile won out for its practicality in the kitchen.
Ceramic Tile vs. Vinyl
Vinyl flooring is another popular option for kitchens because it’s affordable and easy to install. However, I found that vinyl doesn’t have the same durability as ceramic tile. Vinyl can be prone to scratches and dents, especially in a busy kitchen. Ceramic tiles, on the other hand, hold up well under heavy use and won’t scratch as easily.
Ceramic Tile vs. Laminate
Laminate flooring is known for mimicking the look of wood at a fraction of the cost, but it doesn’t offer the same longevity as ceramic tile. Laminate can swell or peel if exposed to water, making it less ideal for kitchens. Ceramic tile is a more durable and water-resistant option, although laminate may be easier to install if you’re doing a DIY project.
Ceramic Tile vs. Stone
Stone flooring, such as marble or slate, can add a luxurious feel to your kitchen, but it comes at a higher cost than ceramic tile. Stone also requires more maintenance, as it needs to be sealed regularly to prevent staining. While stone floors are undeniably beautiful, I found that ceramic tile offered a similar aesthetic at a more affordable price point.
Ceramic Tile vs. Cork
Cork flooring is an eco-friendly option that provides a soft, cushioned surface underfoot, which can be nice if you spend a lot of time standing in the kitchen. However, cork is not as durable as ceramic tile and can be prone to dents and scratches. If you’re looking for a long-lasting option that can handle heavy traffic, ceramic tile is the better choice.
Ceramic Tile vs. Porcelain Tile
While porcelain tile is often grouped with ceramic tile, there are some differences between the two. Porcelain is denser and less porous than ceramic, making it slightly more durable and water-resistant. However, both materials are excellent choices for kitchen flooring. In my case, I went with ceramic tiles because they were more affordable and offered a wider range of design options.

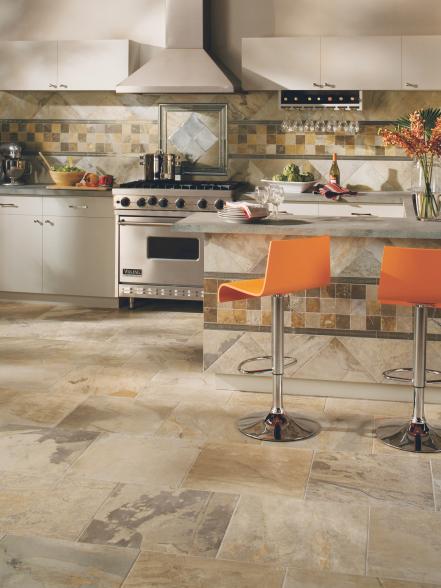
Design Ideas: How to Enhance Your Kitchen with Ceramic Tiles
Ceramic tiles aren’t just functional—they can also serve as a major design feature in your kitchen. When I was designing my kitchen, I realized that the right tile choice could completely transform the look and feel of the space. Here are some design ideas to help you enhance your kitchen with ceramic tiles.
Go Bold with Patterns
If you want to make a statement, consider using patterned ceramic tiles on your kitchen floor. Bold geometric designs or intricate motifs can add visual interest and make the floor the focal point of the room. I love how patterned tiles can give a kitchen a unique and personalized touch without overwhelming the space.
Create a Two-Tone Look
Another design idea is to use two different tile colors to create a striking contrast. For example, you can pair light-colored tiles with darker ones to create a checkerboard pattern or a border around the room. This two-tone approach adds depth and dimension to the floor while maintaining a cohesive look.
Incorporate Accent Tiles
Accent tiles can be used to add a pop of color or texture to your kitchen. You can place them randomly throughout the floor or use them to create a border or focal point in the room. I like the idea of using accent tiles in a complementary color to tie the whole room together without overpowering the design.
Use Large Tiles for a Seamless Look
Large ceramic tiles are perfect for creating a clean and modern look in your kitchen. By reducing the number of grout lines, large tiles create a more seamless appearance that can make the room feel bigger and more open. I opted for large tiles in my kitchen, and I love how sleek and sophisticated the result looks.
Play with Texture
Ceramic tiles come in a variety of textures, from smooth and glossy to rough and matte. Mixing textures can add depth and interest to your kitchen floor. For example, you can use smooth tiles in the main area and textured tiles near the sink or stove for added grip. This creates a visually dynamic space while also being practical.
Coordinate with the Backsplash
For a cohesive design, consider coordinating your floor tiles with the backsplash. You can use the same tiles for both, or choose complementary colors and patterns that tie the room together. In my kitchen, I opted for neutral floor tiles and a colorful backsplash to add a bit of personality without overwhelming the space.

Common Mistakes to Avoid
As much as I love ceramic tile floors, there are some pitfalls to watch out for during the installation process. Having gone through the process myself, I can tell you that avoiding these common mistakes will save you a lot of time and frustration.
Skipping the Subfloor Preparation
One of the biggest mistakes people make when installing ceramic tiles is neglecting to properly prepare the subfloor. If the subfloor is uneven, cracked, or not clean, it can lead to uneven tiles or cracking over time. I made sure to thoroughly inspect and level the subfloor before starting the installation, and it made all the difference.
Using the Wrong Adhesive
Another common mistake is using the wrong adhesive for ceramic tiles. Not all adhesives are created equal, and using the wrong one can result in tiles that don’t stick properly or shift over time. I recommend using a high-quality thin-set mortar that’s specifically designed for ceramic tiles to ensure a strong bond.
Not Allowing Enough Space for Grout
When laying out your tiles, it’s important to leave enough space between them for grout. Some people make the mistake of placing tiles too close together, which can lead to uneven grout lines or tiles that chip easily. I used spacers to ensure consistent grout lines, which not only look better but also help protect the tiles.
Cutting Tiles Incorrectly
Cutting tiles can be tricky, especially if you’re new to tile installation. A common mistake is rushing through the cutting process and ending up with uneven or jagged edges. I took my time and used a wet saw for clean, precise cuts. It’s also important to measure carefully before making any cuts to avoid wasting tiles.
Not Sealing the Grout
Many people skip the step of sealing the grout, but this can lead to issues down the road. Grout is porous and can absorb moisture and stains if it’s not properly sealed. After I finished grouting, I made sure to apply a grout sealer to protect the grout and make it easier to clean in the future.
Ignoring Tile Layout Planning
One of the most common mistakes is not planning the tile layout. Without a clear layout plan, you might end up with awkward tile cuts around the edges or uneven patterns. I spent extra time planning my layout before starting the installation, and it helped me avoid these issues and achieve a more professional-looking result.
Ceramic Tile Floors Ideas

Irresistible Kitchen Tile Floor Design

Related Posts: