Concrete floors provide a solid and durable foundation for tile installation. However, the success of a tile project heavily depends on the preparation of the concrete floor. Proper preparation ensures that the tiles adhere correctly, remain level, and withstand wear and tear over time. This article will discuss all aspects related to concrete floor tile preparation, from assessing the condition of the concrete to finalizing the surface for tile installation.
Assessing the Condition of the Concrete Floor
Inspecting for Cracks and Damage
Before beginning any preparation work, thoroughly inspect the concrete floor for cracks, chips, and other forms of damage. Cracks can indicate underlying structural issues or movement in the concrete slab, which can lead to tile failure if not addressed. Small, hairline cracks may be repairable with appropriate fillers, but larger or numerous cracks may require professional assessment to determine the cause and necessary repairs.
Testing for Moisture
Concrete floors can hold moisture, which can affect tile adhesion and cause long-term damage to the flooring system. Conduct a moisture test using a moisture meter or a simple plastic sheet test. Place a plastic sheet on the concrete floor and tape down the edges. Leave it for 24-48 hours. If moisture collects under the plastic or the concrete appears darker, it indicates excessive moisture. Address moisture issues before proceeding, as tiles may not adhere properly to damp surfaces.
Checking for Levelness
A level surface is crucial for a successful tile installation. Use a long spirit level or a laser level to check the flatness of the concrete floor. Mark any high or low spots. Significant unevenness can cause tiles to crack or pop off over time. For minor unevenness, use a self-leveling compound to create a smooth, level surface. For more pronounced irregularities, grinding or further surface preparation may be necessary.
Assessing the Surface Texture
The texture of the concrete surface affects the adhesion of the tiles. Smooth, polished concrete may need to be roughened to ensure proper bonding with the tile adhesive. Conversely, overly rough surfaces may need to be smoothed out. Conduct a bond test by applying a small amount of tile adhesive to a section of the floor and checking its adhesion after 24 hours. Adjust the surface texture accordingly to ensure optimal adhesion.
Evaluating Previous Coatings
If the concrete floor has been previously coated with paint, sealers, or other finishes, these must be removed before tile installation. Coatings can prevent the tile adhesive from properly bonding to the concrete. Use a scraper, chemical stripper, or mechanical grinder to remove any existing coatings. Ensure the surface is clean and free of residues before proceeding with tile preparation.
Identifying Expansion Joints
Expansion joints in the concrete floor allow for movement and prevent cracking due to temperature changes and structural shifts. Identify and mark these joints before starting the tile installation. Tiles should not be laid over expansion joints; instead, use a flexible joint filler to accommodate movement and prevent tile damage. Proper handling of expansion joints is essential for the longevity and durability of the tiled surface.

Cleaning the Concrete Surface
Removing Debris and Dirt
Before any preparation work can begin, the concrete surface must be free of debris and dirt. Sweep the floor thoroughly with a broom or use a vacuum cleaner to remove loose particles. Pay attention to corners and edges where dirt can accumulate. A clean surface ensures that the tile adhesive bonds effectively to the concrete.
Addressing Stains and Contaminants
Oil, grease, and other stains can hinder the adhesion of tiles to the concrete floor. Use a degreaser or a suitable cleaning agent to remove these contaminants. Apply the cleaner according to the manufacturer’s instructions, scrub the area with a stiff brush, and rinse thoroughly with clean water. Allow the floor to dry completely before proceeding with further preparation steps.
Cleaning with a Concrete Cleaner
For a deep clean, use a concrete cleaner to remove any remaining dirt, dust, and residues. Choose a cleaner that is appropriate for your specific type of concrete floor. Apply the cleaner with a mop or scrub brush, working it into the surface to lift embedded dirt. Rinse the floor thoroughly with clean water to remove any cleaning solution residue. Allow the floor to dry completely before continuing with the preparation process.
Using a Pressure Washer
For heavily soiled or large concrete surfaces, a pressure washer can be an effective cleaning tool. Set the pressure washer to a moderate setting to avoid damaging the concrete. Move the nozzle in a sweeping motion to clean the entire floor evenly. Pay extra attention to stained or heavily soiled areas. After pressure washing, allow the floor to dry thoroughly before moving on to the next preparation steps.
Drying the Surface
Once the concrete floor has been cleaned, it is crucial to ensure it is completely dry before proceeding with tile installation. Residual moisture can compromise the adhesion of the tile adhesive. Use fans, dehumidifiers, or natural ventilation to speed up the drying process. Check the moisture levels with a moisture meter to confirm that the floor is adequately dry before applying any primers or adhesives.
Final Inspection
After cleaning and drying the concrete surface, conduct a final inspection to ensure it is ready for tile installation. Check for any remaining stains, residues, or moisture. Verify that the surface is smooth, level, and free of debris. Address any remaining issues before proceeding to the next steps in the preparation process. A thoroughly prepared surface is key to a successful and long-lasting tile installation.

Repairing and Smoothing the Concrete Floor
Filling Cracks and Holes
Cracks and holes in the concrete floor must be repaired before tile installation. Use a concrete patching compound to fill small cracks and holes. For larger cracks, consider using an epoxy-based filler for added strength and durability. Apply the filler according to the manufacturer’s instructions, ensuring that it is level with the surrounding surface. Allow the filler to cure completely before proceeding with further preparation.
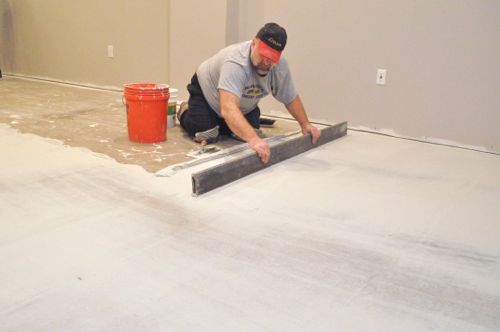
Using a Self-Leveling Compound
If the concrete floor has uneven areas, a self-leveling compound can create a smooth, level surface. Mix the compound according to the manufacturer’s instructions and pour it onto the floor. Use a trowel or spreader to distribute the compound evenly. The compound will flow and settle into low spots, creating a level surface. Allow the self-leveling compound to cure completely before moving on to the next steps.
Grinding High Spots
High spots on the concrete floor can cause tiles to crack or become uneven. Use a concrete grinder to level high spots and create a smooth, even surface. Wear appropriate safety gear, including eye protection and a dust mask, to protect yourself from dust and debris. Grind the high spots down gradually, checking the level frequently to ensure an even surface. Vacuum the floor to remove dust after grinding.
Addressing Surface Imperfections
Surface imperfections, such as rough patches or pitted areas, can be smoothed out with a concrete skim coat. Mix the skim coat material according to the manufacturer’s instructions and apply it to the floor with a trowel. Spread the material evenly, filling in any imperfections and creating a smooth surface. Allow the skim coat to cure completely before proceeding with tile installation.
Ensuring a Smooth Finish
A smooth finish is crucial for tile adhesion. After repairing and leveling the concrete floor, use a finishing trowel to smooth the surface. Check for any remaining rough spots or imperfections and address them as needed. A smooth, even surface ensures that the tile adhesive bonds effectively and that the tiles remain level and secure.
Final Surface Preparation
After all repairs and leveling are complete, conduct a final surface preparation to ensure the floor is ready for tile installation. Sweep or vacuum the floor to remove any dust or debris. Check for any remaining imperfections and address them as needed. Ensure the surface is clean, dry, and free of contaminants before proceeding with the next steps in the tile preparation process.
Applying a Primer
Choosing the Right Primer
A primer helps improve the adhesion of the tile adhesive to the concrete floor. Choose a primer that is compatible with both the concrete surface and the type of tile adhesive you plan to use. Consult the manufacturer’s recommendations to select the appropriate product. The right primer can enhance the bond between the concrete and the tile, ensuring a long-lasting installation.
Applying the Primer
Apply the primer according to the manufacturer’s instructions. Use a roller or brush to spread the primer evenly over the concrete surface. Ensure complete coverage, paying extra attention to edges and corners. Allow the primer to dry according to the manufacturer’s recommended drying time. Proper application of the primer is essential for optimal tile adhesion.
Allowing the Primer to Dry
After applying the primer, allow it to dry completely before proceeding with tile installation. The drying time will vary depending on the product and environmental conditions. Follow the manufacturer’s instructions for the recommended drying time. Ensure that the primer is fully cured to create a strong bond between the concrete and the tile adhesive.

Conducting a Bond Test
Before proceeding with the full tile installation, conduct a bond test to ensure the primer and tile adhesive are compatible. Apply a small amount of tile adhesive to a section of the primed floor and press a tile into place. Allow the adhesive to cure according to the manufacturer’s instructions. After curing, check the bond strength by attempting to remove the tile. A strong bond indicates that the primer and adhesive are working well together.
Addressing Primer Issues
If the bond test reveals issues with the primer or tile adhesive, address them before proceeding with the full installation. Check that the primer was applied correctly and that it is compatible with the tile adhesive. If necessary, consult the manufacturer or a professional for guidance. Resolving any issues at this stage ensures a successful and long-lasting tile installation.
Preparing for Tile Installation
With the primer applied and dried, the concrete floor is now ready for tile installation. Ensure that all necessary tools and materials are on hand, including tile adhesive, spacers, and a tile cutter. Plan the layout of the tiles to ensure a balanced and aesthetically pleasing arrangement. Proper preparation sets the stage for a successful tile installation and a durable, attractive finished floor.

Choosing and Mixing Tile Adhesive
Selecting the Appropriate Adhesive
Choosing the right tile adhesive is crucial for a successful installation. Consider the type of tiles you are using and the conditions of the installation area. For concrete floors, cement-based adhesives are often the best choice due to their strong bonding properties. Consult the tile manufacturer’s recommendations to ensure you select the appropriate adhesive for your specific tiles and installation environment.
Mixing the Adhesive
Proper mixing of the tile adhesive is essential for optimal performance. Follow the manufacturer’s instructions for the correct ratio of water to adhesive powder. Use a mixing paddle attached to a drill to achieve a smooth, lump-free consistency. Mix only as much adhesive as you can use within the recommended working time to prevent it from setting before application.
Achieving the Right Consistency
The consistency of the tile adhesive is crucial for proper application and tile adhesion. The adhesive should be thick enough to hold the tiles in place without sagging but pliable enough to spread easily. Adjust the water-to-powder ratio as needed to achieve the right consistency. Properly mixed adhesive ensures a strong bond between the tiles and the concrete floor.

Allowing for Slake Time
After mixing the tile adhesive, allow it to slake for the recommended time, usually around 5-10 minutes. Slaking allows the chemicals in the adhesive to fully activate, improving its bonding properties. After slaking, remix the adhesive briefly before applying it to the floor. Following this step ensures optimal performance of the tile adhesive.
Conducting a Bond Test
Before applying the adhesive to the entire floor, conduct a bond test similar to the primer test. Apply a small amount of adhesive to a section of the primed floor and press a tile into place. Allow the adhesive to cure and test the bond strength. This step ensures that the adhesive is properly mixed and compatible with the primer and tiles.
Preparing for Application
With the tile adhesive mixed and tested, you are ready to begin applying it to the concrete floor. Ensure that all necessary tools and materials are within reach, including notched trowels, tile spacers, and a tile cutter. Proper preparation and organization streamline the installation process and contribute to a successful outcome.

Setting the Tiles
Planning the Layout
Before setting the tiles, plan the layout to ensure a balanced and aesthetically pleasing design. Start by marking the center of the room and dry-lay the tiles to determine the best arrangement. Adjust the layout as needed to avoid small, awkward cuts at the edges. Planning the layout helps achieve a professional-looking finished floor.
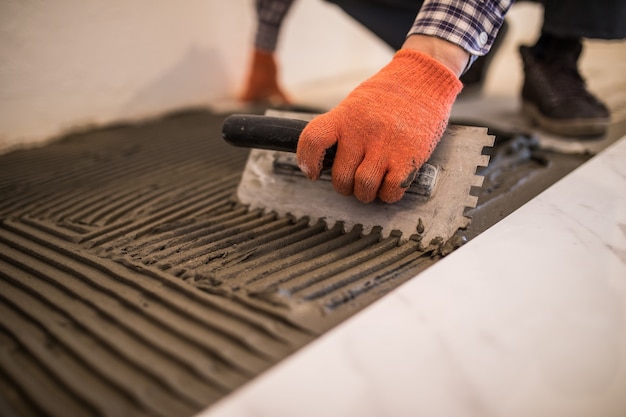
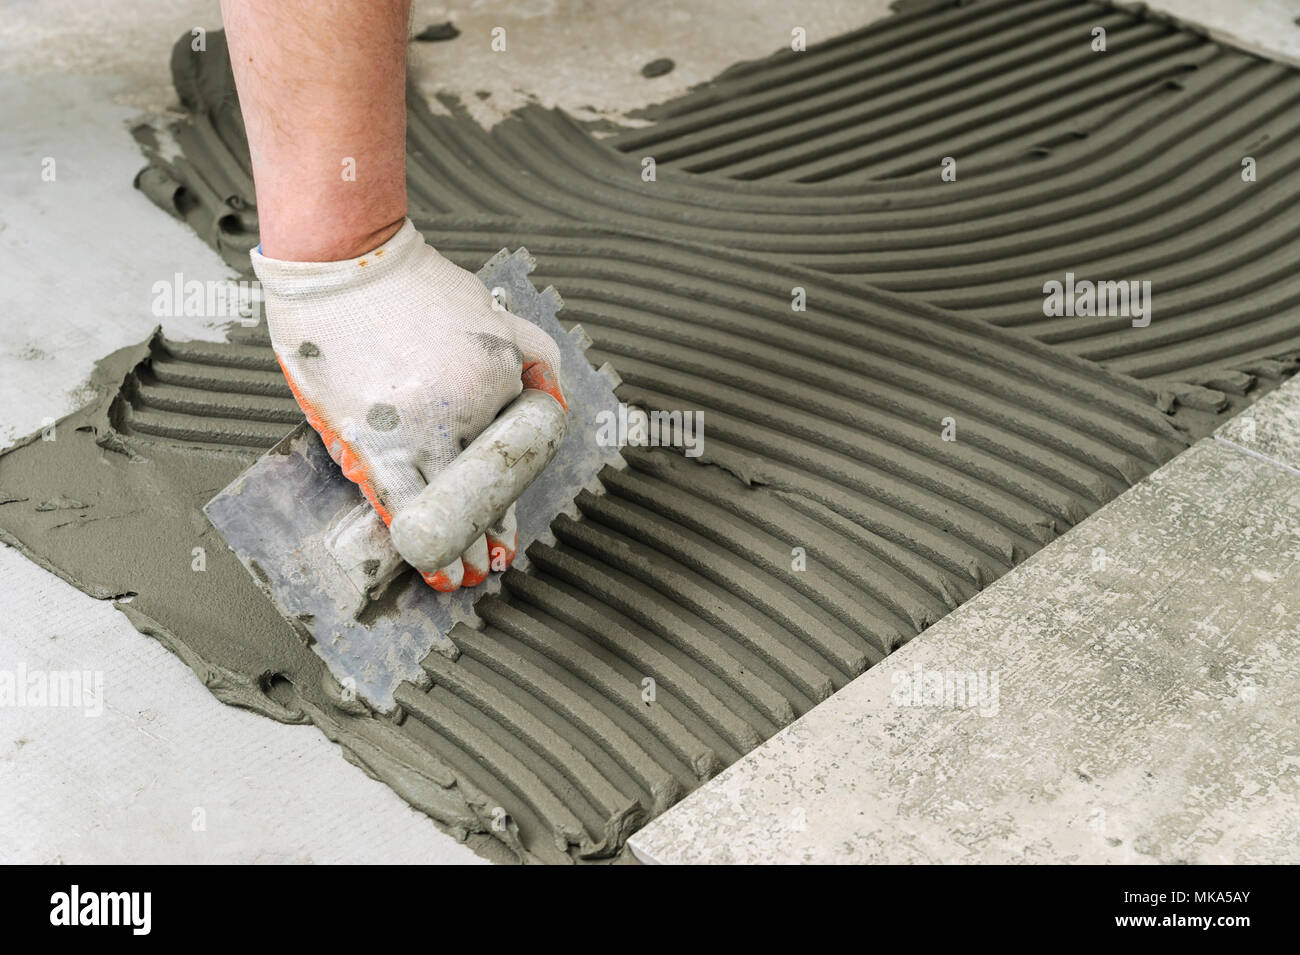
Applying the Adhesive
Using a notched trowel, spread the tile adhesive onto a small section of the floor, working in manageable areas to prevent the adhesive from drying out before the tiles are set. Hold the trowel at a consistent angle to create uniform ridges in the adhesive. The ridges help ensure full coverage and strong adhesion between the tiles and the concrete floor.
Setting the Tiles in Place
Press the tiles firmly into the adhesive, using a slight twisting motion to ensure full contact with the adhesive. Place tile spacers between each tile to maintain consistent spacing and alignment. Continue setting the tiles in sections, checking for levelness and alignment as you go. Adjust the tiles as needed to ensure a uniform, professional appearance.
Cutting Tiles to Fit
As you approach the edges of the room or obstacles such as pipes or fixtures, you will need to cut tiles to fit. Use a tile cutter or wet saw to make precise cuts. Measure and mark the tiles carefully before cutting to ensure a perfect fit. Properly cut tiles contribute to a seamless and polished finished floor.
Checking for Levelness
As you set the tiles, regularly check for levelness using a spirit level. Adjust the tiles as needed to ensure a flat, even surface. Properly leveled tiles prevent trip hazards and create a more attractive finished floor. Take your time during this step to achieve the best results.
Allowing the Adhesive to Cure
After setting the tiles, allow the adhesive to cure for the recommended time, usually 24-48 hours. Avoid walking on the tiles during this time to prevent shifting and ensure a strong bond. Once the adhesive has fully cured, you can proceed with grouting the tiles and completing the installation.
Grouting and Finishing
Choosing the Right Grout
Select a grout that is compatible with your tiles and suitable for the conditions of the installation area. Consider factors such as color, sanded vs. unsanded, and resistance to moisture and stains. Consult the tile manufacturer’s recommendations to choose the appropriate grout for your specific tiles and installation environment.
Mixing the Grout
Mix the grout according to the manufacturer’s instructions, achieving a smooth, lump-free consistency. Use a grout float to apply the grout, pressing it into the joints between the tiles. Work in small sections to prevent the grout from drying out before it is fully applied. Properly mixed and applied grout ensures strong, durable joints.
Applying the Grout
Using the grout float, spread the grout diagonally across the tile joints, pressing it firmly to fill the gaps completely. Remove excess grout from the surface of the tiles with the edge of the float, holding it at a 45-degree angle. Continue applying and cleaning the grout in sections until all joints are filled.
Cleaning Excess Grout
After applying the grout, clean the surface of the tiles with a damp sponge to remove excess grout and prevent haze. Rinse the sponge frequently and work carefully to avoid disturbing the grout joints. Allow the grout to set for the recommended time, usually 15-30 minutes, before conducting a final clean-up.
Sealing the Grout
Once the grout has cured, apply a grout sealer to protect it from moisture, stains, and dirt. Follow the manufacturer’s instructions for application and drying times. Sealing the grout helps maintain its appearance and durability, ensuring a long-lasting tiled floor.
Final Inspection and Cleanup
Conduct a final inspection of the tiled floor, checking for any imperfections, loose tiles, or grout issues. Address any problems promptly to ensure a flawless finished floor. Clean the entire surface thoroughly to remove any remaining grout haze or debris. Proper cleanup and inspection complete the tile installation process, resulting in a beautiful and durable floor.

Common Mistakes to Avoid
Skipping Surface Preparation
Skipping or inadequately performing surface preparation is a common mistake that can lead to tile failure. Ensure the concrete floor is clean, level, and free of contaminants before starting the tile installation. Proper preparation is essential for a successful and long-lasting tile floor.
Using the Wrong Adhesive
Using an inappropriate adhesive can result in poor tile adhesion and potential failure. Choose a tile adhesive that is compatible with both the concrete floor and the type of tiles you are using. Follow the manufacturer’s recommendations to ensure optimal performance and durability.
Ignoring Moisture Issues
Moisture in the concrete floor can compromise the adhesion of the tiles and cause long-term damage. Conduct a moisture test before starting the tile installation and address any issues. Properly addressing moisture ensures a successful and durable tile floor.
Failing to Use Expansion Joints
Ignoring expansion joints or filling them with rigid materials can lead to tile damage due to movement and temperature changes. Identify and properly handle expansion joints, using flexible joint fillers to accommodate movement and prevent damage.
Inconsistent Tile Spacing
Inconsistent tile spacing can result in an uneven and unattractive finished floor. Use tile spacers to maintain consistent gaps between tiles and regularly check for alignment. Proper spacing ensures a professional-looking and durable tile floor.
Rushing the Curing Process
Rushing the curing process for tile adhesive and grout can compromise the strength and durability of the tiled floor. Allow adequate curing time as recommended by the manufacturer before walking on the tiles or applying grout. Proper curing is essential for a strong and long-lasting tile floor.

How do I test for moisture on a concrete floor?
Testing for moisture in a concrete floor can be done using a moisture meter or a simple plastic sheet test. To perform the plastic sheet test, tape a plastic sheet to the floor and leave it for 24-48 hours. If moisture collects under the plastic or the concrete appears darker, it indicates excessive moisture. Address any moisture issues before proceeding with tile installation to ensure proper adhesion and longevity.
What type of tile adhesive should I use for a concrete floor?
For concrete floors, cement-based tile adhesives are often the best choice due to their strong bonding properties. The specific type of adhesive may vary depending on the type of tiles you are using and the conditions of the installation area. Consult the tile manufacturer’s recommendations and choose an adhesive that is compatible with both the concrete surface and your tiles. Proper adhesive selection is crucial for a successful tile installation.
How do I level an uneven concrete floor?
Leveling an uneven concrete floor can be achieved using a self-leveling compound. First, clean the floor and fill any cracks or holes with a concrete patching compound. Mix the self-leveling compound according to the manufacturer’s instructions and pour it onto the floor, spreading it evenly with a trowel or spreader. The compound will flow into low spots, creating a smooth, level surface. Allow the compound to cure completely before proceeding with tile installation.
Why is a primer necessary for tile installation on concrete?
A primer is necessary for tile installation on concrete to improve the adhesion of the tile adhesive. Primers create a bonding layer between the concrete surface and the tile adhesive, ensuring a strong and durable bond. They also help seal the concrete, reducing the risk of moisture-related issues. Choosing the right primer and applying it correctly is essential for a successful tile installation.
How long should I wait before grouting the tiles?
After setting the tiles, wait for the tile adhesive to cure for the recommended time, usually 24-48 hours, before applying grout. The exact curing time may vary depending on the adhesive used and environmental conditions. Allowing adequate curing time ensures that the tiles are firmly set and the adhesive has achieved its full strength. Rushing this process can compromise the durability and appearance of the tiled floor.
Can I install tiles over an existing concrete coating?
Tiles should not be installed over existing concrete coatings such as paint or sealers. These coatings can prevent the tile adhesive from properly bonding to the concrete surface. Before tile installation, remove any existing coatings using a scraper, chemical stripper, or mechanical grinder. Ensure the concrete surface is clean, dry, and free of residues before proceeding with tile preparation and installation. Proper surface preparation is crucial for a successful and long-lasting tile floor.
Related Posts: