
How to Lay a Vinyl Tile Floor in 2020 Vinyl tile flooring, Vinyl tile, Laying vinyl flooring

Floor Tiles Self Adhesive Vinyl Flooring Kitchen Bathroom Brown Mosaic Grey eBay

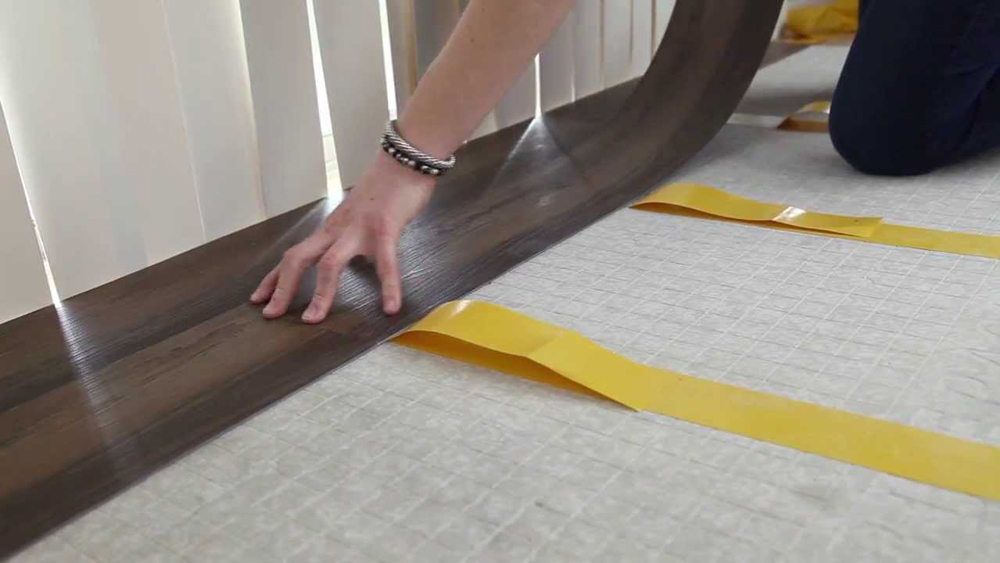
Installing Peel And Stick Vinyl Tile – sclubutorrent

Lay Subfloor Bathroom / Replacing Floor Around Toilet – Vintalicious.net – Mitchell Frimilt

How to Lay Self-Adhesive Vinyl Tiles : Working on Flooring – YouTube

How to Easily Install Self-Adhesive Vinyl Tile Self adhesive vinyl tiles, Self adhesive floor

Floating Vinyl Plank Flooring In Bathroom – Flooring Blog
30 amazing ideas and pictures of the best vinyl tile for bathroom Vinyl tile flooring

How to lay vinyl floor tiles Ideas & Advice DIY at B&Q Vinyl flooring, Vinyl floor tiles

Self Adhesive Floor Tiles For Garage Self adhesive floor tiles, Adhesive floor tiles, Adhesive

Pin on Trends

Related Posts:
- Pine Vinyl Flooring
- Vinyl Floor Laying DIY
- Cortex Vinyl Flooring
- Grey Slate Effect Vinyl Floor Tiles
- Dark Oak Vinyl Flooring
- Limestone Effect Vinyl Flooring
- Vinyl Floor With Border
- Adhesive For Vinyl Flooring To Concrete
- Teak Wood Vinyl Flooring
- Cheap Vinyl Flooring
Installing self-adhesive vinyl floor tiles in your bathroom is a great way to give it a fresh and modern look. Self-adhesive vinyl floor tiles are easy to install, and can be an inexpensive update to any bathroom. With just a few simple steps, you can lay self-adhesive vinyl floor tiles in your bathroom like a pro.
## Measure The Room
The first step to laying self-adhesive vinyl floor tiles in your bathroom is to measure the room. Take the dimensions of the room and make sure that you have enough tiles to cover the entire area. It’s important to leave yourself a few extra tiles for potential mistakes or for any cuts that you may need to make.
## Prepare The Floor
Before you begin laying the tiles, it’s important to make sure that the floor is properly prepared. Start by cleaning the floor with a damp cloth and removing any dirt, dust, or debris. If there is any paint or adhesive on the floor, make sure to scrape it off with a putty knife. Once the floor is clean, let it dry completely before beginning to lay the tiles.
## Apply The Adhesive
Once the floor is prepared and dry, it’s time to apply the adhesive. Many self-adhesive vinyl floor tiles come with their own adhesive backing, so you don’t need to use additional glue. Simply peel off the backing and press each tile firmly into place on the floor. Make sure that each tile is firmly adhered before moving on to the next one.
## Cut The Tiles
In some cases, you may need to cut some of the tiles to fit around corners or along edges. To do this, simply measure where you need to cut and mark it on the tile with a pencil. Then use a utility knife or straightedge razor blade to cut along the line that you marked. Once all of your cuts are made, press the tiles into place and make sure they are firmly adhered.
## Finishing Touches
Now that all of your tiles are laid, it’s time for some finishing touches. Use a damp cloth to clean off any excess adhesive from around the edges of each tile and then seal them with a clear sealant or grout sealer. This will help protect your new tiles from water damage and keep them looking great for years to come.
Installing self-adhesive vinyl floor tiles in your bathroom can be an easy and affordable way to give it a modern look. With just a few simple steps and some careful preparation, you can lay self-adhesive vinyl floor tiles in your bathroom like a pro!
What tools are needed to lay self-adhesive vinyl floor tiles in a bathroom?
Tools needed to lay self-adhesive vinyl floor tiles in a bathroom include:– Utility knife
– Measuring tape
– Pencil
– Chalk line
– Self-leveling compound
– Putty knife
– Sponge
– Bucket and mop
– Trowel
– Notched trowel
– Spacer
– Grout float
– Grout sealer
– Vinyl adhesive
– Floor roller (optional)