Laying Heated Tile Floor

Laying Heated Flooring Under Tile Heated floors, Under tile heating, Flooring

Installing Heated Floor Tile – Room For Tuesday

Sweet Sewn Stitches: Bath Heated Tile Floor – Part 4

How to Install a Heated Tile Floor (With images) Installing heated floors, Ceramic floor tiles

Heat Existing Tile Floor – Flooring Ideas

Laying Heated Flooring Under Tile in 2020 Heated floors, Flooring, Radiant floor heating

How to install a heated tile floor. and also how NOT to install a heated tile floor The
Sweet Sewn Stitches: Bath Heated Tile Floor – Part 4

Tiling Over Radiant Floor Heating – DIY

We wanted to make the bathrooms a luxurious experience, so we installed Schluter®-DITRA-HEAT

Under Tile Heating Underfloor Heating Tiles EGS Tasmania
Related Posts:
- Cuban Tile Floors
- Easy Way To Grout Tile Floor
- Types Of Marble Tile Flooring
- Slate Tile Floor
- Classic Bathroom Tile Floors
- Tile Floor Color Ideas
- Wet Mops For Tile Floors
- Staining Saltillo Tile Floors
- Terrazzo Tile Floor Outdoor
- Tile Flooring For Screened Porch
If you’re looking to upgrade your home, laying heated tile floor is an excellent way to add both luxury and value. Whether you’re remodeling an existing bathroom or adding a new one, heated floor tiles can provide comfort and efficiency in any space. In this guide, we’ll cover the basics of installing heated tile flooring, from materials to maintenance.
## What is Heated Tile Flooring?
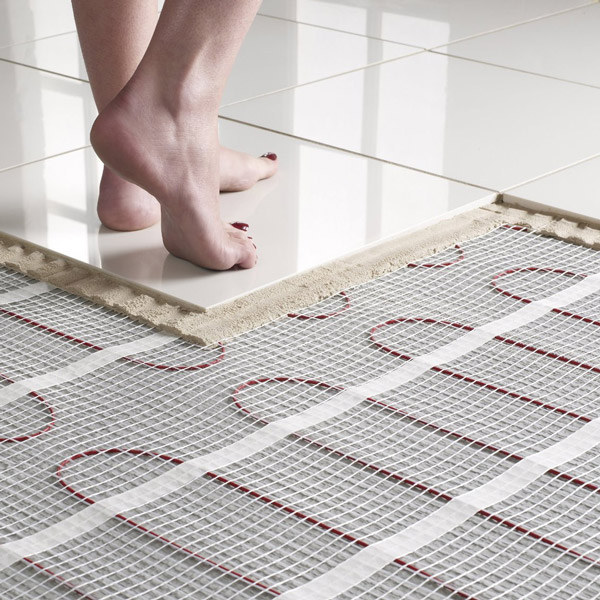
Heated tile flooring is a type of radiant heating system that utilizes electric coils or cables underneath the surface of the tile. When turned on, these coils generate warmth which is then transferred through the tile, providing a comfortable and efficient form of heating. Heated floor tiles are available in a variety of materials, including ceramic, porcelain, and stone.
## Benefits of Heated Tile Flooring
Installing heated tile flooring offers a number of benefits to homeowners. In addition to providing comfortable warmth during cold weather months, heated floors can also help reduce energy costs by evenly distributing heat throughout a room. Heated tile floors are also easier to clean than other types of flooring such as carpet, making them ideal for areas with high levels of traffic like kitchens and bathrooms. Finally, heated floors also help to reduce noise and provide a more luxurious feel.
## Preparing to Install Heated Tile Flooring
Before beginning the installation process, it’s important to make sure your space is properly prepared. This includes removing any existing flooring and making sure the subfloor is level and free from debris. You’ll also need to measure the area you plan on tiling and purchase the necessary materials for your project. Be sure to factor in extra tile for cuts and mistakes when determining how much material you need.
## Materials Needed for Installing Heated Tile Flooring
When preparing for your project, there are several materials you’ll need in order to install your heated tile floor properly:
– **Tile**: Choose your desired type of tile based on your design preferences and budget.
– **Underlayment Pad**: This pad provides insulation between the subfloor and tiles as well as soundproofing benefits.
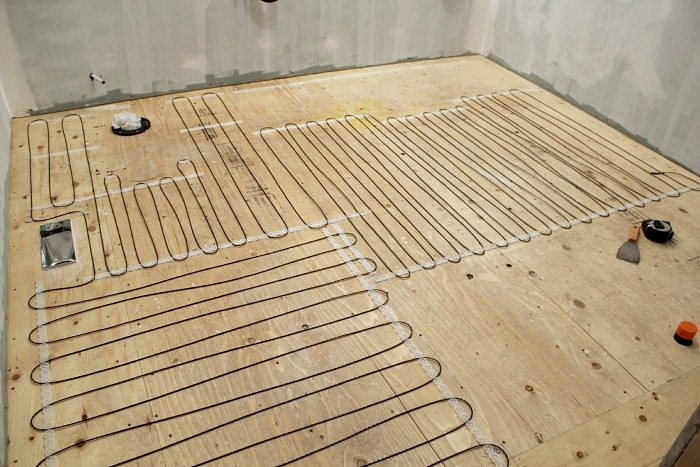
– **Electric Cable or Coils**: Depending on the type of heating system you choose (electric or hydronic), you’ll need either cables or coils to generate heat from beneath the surface of the tiles.
– **Thinset Mortar**: Use thinset mortar to adhere the tiles to the underlayment pad.
– **Grout**: Grout helps fill in any gaps between tiles for a seamless finish.
– **Sealer**: Once the tiles are laid and grouted, use sealer to protect them from moisture damage.
## Installing Heated Tile Flooring
Once you have all of your materials ready, you can begin installing your heated tile floor. Start by laying out the underlayment pad in your desired pattern and cutting it down to size if necessary. Next, lay out your electric cables or coils and attach them to the underlayment pad according to manufacturer’s instructions. Spread thinset mortar over the pad using a notched trowel and begin laying out your tiles one at a time – making sure they fit tightly against each other without any gaps between them. Once all of your tiles are set, spread grout over them using a rubber float and allow it to dry completely before sealing with a sealer.
## Caring for Your Heated Tile Floor
Once your heated tile floor is installed, you’ll need to take special care when cleaning it in order to keep it looking its best. Use only a soft-bristled broom or vacuum on hard surfaces like tile and avoid using harsh cleaners that may damage the surface or scratch the grout lines. Additionally, be sure to check the manufacturer’s instructions for any additional maintenance requirements such as adjusting temperature controls or replacing worn cables/coils when necessary.
Installing heated tile flooring can add both value and comfort to any home space while also helping reduce energy costs. With proper preparation, materials, and care – laying heated floor tiles is an easy way to upgrade any living area with style and luxury.