Garage Floor Finishes DIY

DIY Epoxy Garage Floors Garage floor epoxy, Garage floors diy, Epoxy garage floor coating

First time DIY Epoxy garage floor : r/garageporn
Best Diy Epoxy Garage Floor – Flooring : Home Design Ideas #a5PjrLJzP991088

Why the Best DIY Garage Floor Coating Kits are not Epoxy All Garage Floors
Rust-Oleum Professional Garage Floor Epoxy #Basementfloorpaint Painted concrete floors, Garage

garage floor epoxy coating Epoxy floor, Garage floor epoxy, Garage floor

Epoxy Coated my garage floor – Imgur Garage epoxy, Garage floor, Garage floor paint

Top Choices for a DIY Garage Floor Finish Floorguard

20 Best Simple Floating Garage Floor Ideas – Home Plans & Blueprints

Finished – a Non-Slip Chemically Resistant Concrete Garage Floor Garage floor finishes, Garage

Garage Floor Finishes Diy – DIY Choices

Related Posts:
- Marble Garage Floor
- Cheap Garage Floor Covering
- Garage Floor Coating
- Heavy Duty Garage Flooring
- Checkerboard Garage Floor Tiles
- Garage Floor Sealer Paint
- Epoxyshield Garage Floor Paint
- Benefits Of Epoxy Flooring In Garage
- Garage Floor Preparation For Epoxy
- Garage Workshop Flooring
If you’ve been dreaming of transforming your garage floor, you’ll be pleased to know that you don’t have to hire a professional. With just a few supplies, and a little bit of elbow grease, you can achieve the look of a brand new garage floor in no time.
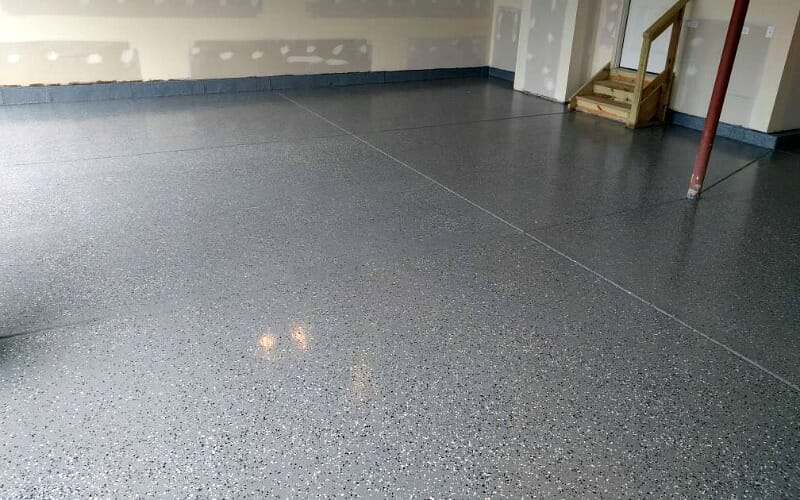
Garage floor finishes come in a variety of materials, and many can be purchased at a local hardware store. The simplest option is painting your floor with epoxy paint, which is easy to apply and resists staining and peeling. If your budget allows, you may want to consider an interlocking tile system that looks like real slate or stone. For a more durable solution, concrete polishing will leave your garage floor with a glossy finish. No matter which finish you choose, you’ll be left with an attractive and long-lasting garage floor that will may be the envy of your neighbors.
Preparing Your Garage Floor for Finishing
Before you start any type of garage floor finishing project, it’s important to make sure the surface is prepared properly. For epoxy paint, use a shop vac to remove dust and particles from the floor. Follow up by scrubbing the floor with a mixture of water and detergent. Rinse thoroughly and allow the floor to dry completely before proceeding with the next step.
If you plan on using an interlocking tile system or concrete polishing, it’s important to check for any cracking or unevenness in your concrete slab. Most manufacturers have self-leveling products designed for creating a smooth surface over cracks or uneven spots.
Painting Your Garage Floor With Epoxy Paint
Epoxy paint is the most popular choice when it comes to do-it-yourself garage floor finishes. This type of paint is resistant to oil stains, gasoline, and salt, and it dries quickly so that you can get back in the garage almost immediately after application. To ensure good adhesion, clean the entire surface of your garage floor with a special degreaser before painting.
When applying epoxy paint, brush or roll it on in even strokes from one wall to another, covering the entire floor in one direction before moving on to the next set of walls. Keep a wet edge by continually brushing back into already completed sections; this will help avoid lap marks and create an even finish. Finally, add a final coat of clear polyurethane sealer for added protection against stains and discoloration.
Using Interlocking Tiles as a Garage Floor Finish
Interlocking tiles are an attractive and economical way to finish your garage floor without having to hire professionals. These tiles are made of durable plastic or polyvinyl chloride (PVC) and lock together easily with tongue-and-groove edges to form an attractive, waterproof surface that’s easy to clean and maintain. They come in a variety of colors and textures that mimic real stones or brick pavers, so they offer great flexibility when it comes to decorating your garage.
Installing interlocking tiles requires very little preparation; simply sweep away any loose debris from the surface before laying each tile flat on the floor. Starting at one corner, work your way along the walls until all the tiles have been installed. For added protection against liquids seeping beneath them, apply a layer of waterproof grout around the edges after all the tiles have been laid down.
Polished Concrete for Durable Garage Floor Finishes
If you’re looking for a look that’s both modern and durable, polished concrete is an excellent option for achieving beautiful finishes that last for many years. This process involves grinding down concrete until it has reached its desired level of shine before applying several coats of sealant for protection from stains and mildew growth. Not only does polished concrete look great; it also offers superior durability compared to other materials such as epoxy paint or tiles.
It’s important to note that polished concrete can be quite costly compared to other do-it-yourself options; however, if you’re willing to invest in this type of finish for your garage floor, you’ll be glad you did when you see how beautiful it looks after completion! To maintain its glossy finish, consider applying light maintenance wax every few months according to manufacturer’s recommendations.
Conclusion :
No matter your budget or aesthetic preferences, there are a variety of garage floor finishes available that can help you achieve the look you want for your garage. Whether you choose epoxy paint, interlocking tiles, or polished concrete, with proper preparation and maintenance, you can transform your space into an attractive and functional room.
What tools are needed for a DIY garage floor finish?
1. Floor grinder2. Vacuum cleaner
3. Dust mask
4. Paint brush
5. Paint roller
6. Roller extension pole
7. Sandpaper
8. Epoxy paint
9. Polyurethane sealer
10. Interlocking tiles
11. Waterproof grout
12. Light maintenance wax
What materials are needed for a DIY garage floor finish?
1. Primer: Oil-based or water-based primer to seal the concrete surface.2. Epoxy Paint: The epoxy paint forms a protective layer on the concrete floor.
3. Clear Protective Coating: A clear top coat of polyurethane or similar material will add a further layer of protection and extra shine.
4. Roller and Brush: A roller and brush are needed to apply the epoxy paint and topcoat.
5. Masking Tape and Drop Cloths: To protect areas that are not being painted.
6. Safety Gear: Gloves, safety glasses, and a respirator are important for safety while working with epoxy paints and other chemicals.
7. Interlocking Tiles: These tiles are available in a variety of colors and textures and can be installed easily with tongue-and-groove edges.
8. Waterproof Grout: This material is used to provide extra protection from liquids seeping beneath the tiles.
9. Maintenance Wax: This wax is used to maintain the glossy finish of polished concrete.
What are the steps involved in finishing a garage floor?
1. Clean and Prep the Surface: Before starting any work, it is important to remove all dirt and debris from the floor. Sweep, vacuum, or use a power washer to make sure you have a clean surface.2. Repair Cracks and Holes: Repair any cracks or holes with an appropriate repair product, such as an epoxy filler or bonding agent.
3. Apply Primer: Apply a concrete primer to ensure your floor coating adheres properly. Follow all instructions on the label of your chosen primer product.
4. Apply Paint: Select a paint product for your garage floor that is designed for use on concrete surfaces. Follow instructions on the label for proper application.
5. Seal with Epoxy: After the paint is fully dry, apply an epoxy sealer for added protection and durability. Allow sealer to dry completely before walking or driving on the surface.