Regrouting Ceramic Tile Floor
/How_to_Regrout_Ceramic_Tile_64434_08-63a0298cea2a47ba985a0a17ed65d278.jpg)
How to Regrout Floor Tiles (Step-By-Step Guide) – The CleanBoot
How to Regrout Ceramic Tile
/hand-spreading-grout-on-tiles-with-grout-spreader-80033352-583c5e073df78c6f6a2f22b6.jpg)
Amazing Amazing Regrouting Floor Tiles Regrouting Bathroom Floor Tile Bathroom Stylish Bathroom

How to Regrout Tiles in 2022 Regrouting tile, Grout repair, Tile floor diy

How to Regrout Ceramic Tile
:max_bytes(150000):strip_icc()/How_to_Regrout_Ceramic_Tile_64434_09-4a88b50ca576408fa6b52012ba5e9c3f.jpg)
How to Regrout Ceramic Tile
:max_bytes(150000):strip_icc()/How_to_Regrout_Ceramic_Tile_64434_010-4ccb584cd935427a92b0880781aaddf7.jpg)
How to Regrout Ceramic Tile
:max_bytes(150000):strip_icc()/How_to_Regrout_Ceramic_Tile_64434_04-7d62a1243b314b628e8125818455cb67.jpg)
How Often To Regrout Tile Floor Review Home Co
/Fillinggrout-GettyImages-487277508-68b01d71ff6e449793cf68396f1c5d86.jpg)
How to Regrout Ceramic Tile
:max_bytes(150000):strip_icc()/How_to_Regrout_Ceramic_Tile_64434_05-2cdada80f2de43bc90f919d8876160d2.jpg)
Photo libre de droit de Grouting Ceramic Tiles banque d’images et plus d’images libres de droit

Worker grouting ceramic tiles Premium Photo
Related Posts:
- Cuban Tile Floors
- Easy Way To Grout Tile Floor
- Types Of Marble Tile Flooring
- Slate Tile Floor
- Classic Bathroom Tile Floors
- Tile Floor Color Ideas
- Wet Mops For Tile Floors
- Staining Saltillo Tile Floors
- Terrazzo Tile Floor Outdoor
- Tile Flooring For Screened Porch
Regrouting Ceramic Tile Floor: A Step-by-Step Guide to Refreshing Your Home
## Article Content:
When the grout on your ceramic tile floor has become cracked or discolored, it can detract from the overall beauty of your home. Regrouting ceramic tile floor can be a great DIY project for homeowners who want to refresh the look of their floors without having to replace them entirely.
In this comprehensive guide, we’ll take you step-by-step through the regrouting ceramic tile process so that you can have beautiful, fresh floors in no time.
### Gather the Necessary Supplies
Before you begin any type of home improvement project, you must gather the necessary supplies. To regrout ceramic tile flooring, you will need:
* A grout removal tool – either an electric grout removal tool or a manual one
* Grout – choose the type and color that best matches your existing grout
* A grout float – for applying the new grout
* A damp sponge – for cleaning up excess grout
* A sealant – for sealing the new grout in place
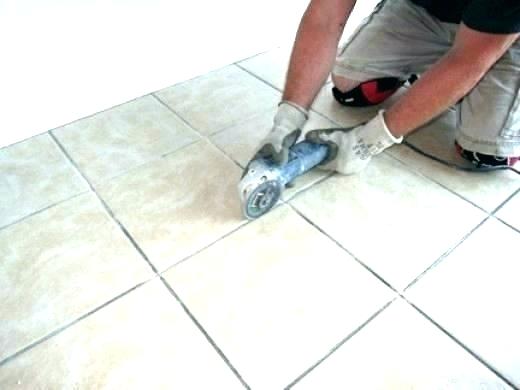
### Step 1: Remove Old Grout
Once you have gathered all of your supplies, you are ready to begin removing the old grout. If you opted for an electric grout removal tool, make sure that it is unplugged before you begin. Then, begin slowly removing the old grout from between the tiles. Make sure to keep the tip of the tool as close to the edge of each tile as possible in order to achieve a smooth surface. This process can be time consuming, so be patient and work slowly to get a consistent result.
Once you have finished removing all of the old grout, use a damp sponge to clean off any remaining dust and debris from between the tiles. Allow the area to dry completely before moving onto Step 2.
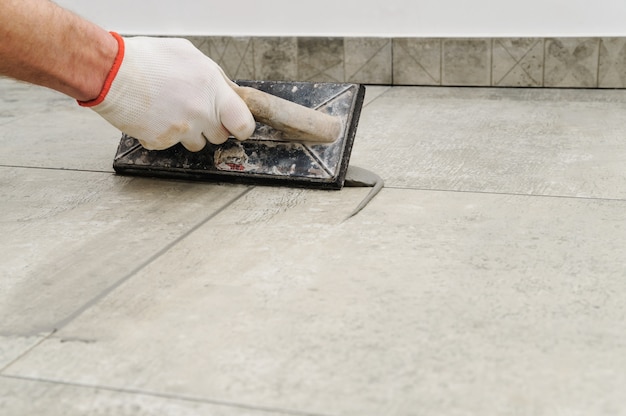
### Step 2: Apply New Grout
Now it’s time to apply fresh grout between your tiles! First, mix your grout according to package instructions. Spread a thin layer of grout over the entire floor using a rubber float or trowel. Apply gentle pressure while spreading to evenly fill in all gaps between the tiles.
Once you’ve finished spreading, allow the grout to dry for approximately 20 minutes before moving onto Step 3.
### Step 3: Clean and Seal Grout
When your grout is almost dry, use a damp sponge to gently clean off any excess from the surface of your tiles. Make sure not to rub too hard or press too deep into the gaps between each tile, as this could cause damage. Finally, apply sealant according to package instructions to protect your new grout against staining and mildew growth.
### Finishing Touches
Once your new grout is sealed in place, stand back and admire your handiwork! Regrouting ceramic tile flooring can be an easy DIY project that can totally transform your home’s interior look and feel. Not only does it look great, but it’s also more hygienic than older, cracked grout lines.
We hope this guide has given you everything you need to know about regrouting ceramic tile flooring! With just a few simple steps and some basic supplies, you can give your home an inexpensive facelift without having to break out of tools or break the bank. Good luck!