How To Repair Epoxy Floor Coating
Assessing the Damage and Preparing for Repair
Before starting any repair work, it’s essential to assess the condition of your epoxy floor and gather the necessary tools and materials. Here’s a step-by-step guide to preparing for the repair:
- Inspect the Floor: Walk around the area and identify all damaged spots, including cracks, chips, peeling sections, or discolored areas. Take note of the extent of the damage to determine the amount of repair material needed.
- Clean the Surface: A clean surface is crucial for proper epoxy adhesion. Sweep or vacuum the floor to remove dirt and debris, then use a degreaser to eliminate any oil or grease stains. Rinse thoroughly and allow the floor to dry completely.
- Gather Tools and Materials: You’ll need a few basic tools and materials, such as a scraper, sandpaper, epoxy repair kit, mixing tools, and a paint roller or brush. Ensure you have protective gear like gloves, goggles, and a mask.
- Test for Moisture: Moisture can prevent epoxy from adhering properly. Perform a moisture test by taping a plastic sheet to the floor and checking for condensation after 24 hours. If moisture is present, address the issue before proceeding.
- Plan the Repair: Determine whether you need to repair small sections or recoat the entire floor. Spot repairs may suffice for minor damage, but extensive damage may require a full recoating.

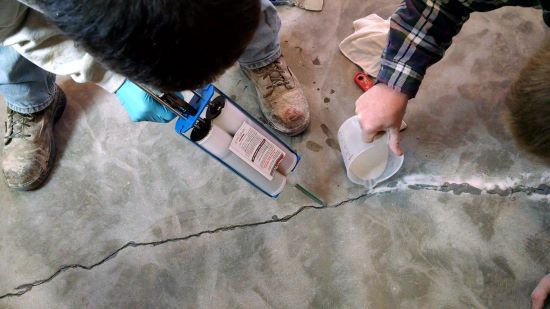
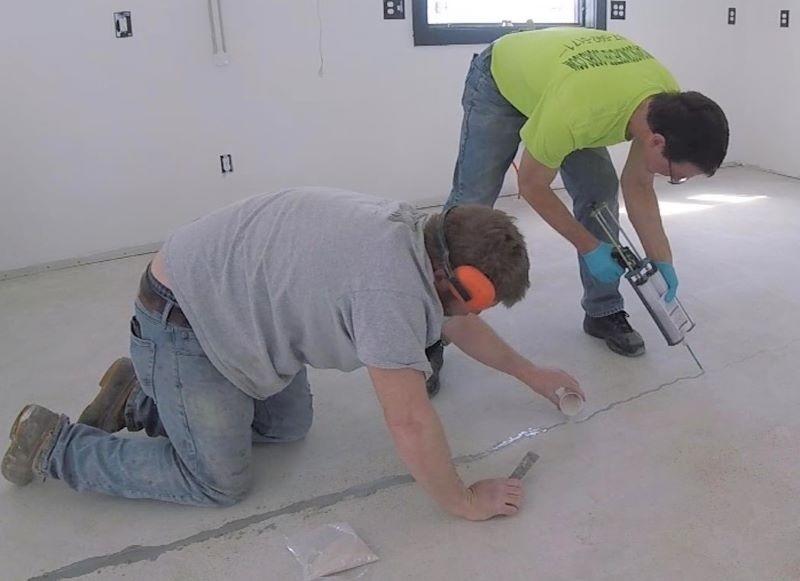
Repairing Cracks and Chips
Cracks and chips are common issues in epoxy floors, but they can be fixed with the right approach. Follow these steps to address these problems:
Clean the Damaged Area: Use a wire brush or scraper to remove loose epoxy and debris from the cracks or chips. Wipe the area with a damp cloth to ensure it’s free of dust.
Sand the Edges: Lightly sand the edges of the damaged area to create a rough surface. This helps the new epoxy adhere better. Be careful not to sand too aggressively, as this can widen the damage.
Fill the Cracks or Chips: Mix the epoxy repair compound according to the manufacturer’s instructions. Use a putty knife or trowel to fill the cracks or chips, ensuring the compound is level with the surrounding floor.
Smooth the Surface: Once the compound is applied, use a scraper or trowel to smooth the surface. This ensures a seamless finish and prevents tripping hazards.
Allow to Cure: Let the repaired area cure for the recommended time, usually 24 to 48 hours. Avoid walking on the floor during this period to ensure a strong bond.

Fixing Peeling or Delaminated Epoxy
Peeling or delaminated epoxy occurs when the coating loses adhesion to the floor. This issue requires careful attention to restore the floor’s integrity. Here’s how to fix it:
Identify the Problem Areas: Mark the sections where the epoxy is peeling or lifting. Use a scraper or putty knife to remove the loose coating, being careful not to damage the surrounding areas.
Sand the Surface: Sand the exposed concrete and the edges of the remaining epoxy to create a rough surface. This step is crucial for ensuring proper adhesion of the new epoxy.
Apply a Bonding Primer: Use a bonding primer designed for epoxy floors to improve adhesion. Apply the primer evenly to the sanded areas and allow it to dry according to the manufacturer’s instructions.
Reapply the Epoxy: Mix the epoxy coating and apply it to the prepared areas using a roller or brush. Feather the edges to blend the new coating with the existing floor.
Allow to Cure: Let the epoxy cure completely before using the floor. This typically takes 24 to 48 hours, depending on the product and environmental conditions.

Recoating the Entire Floor
If your epoxy floor has extensive damage or has lost its luster, recoating the entire surface may be the best solution. Here’s how to do it:
Prepare the Floor: Clean the floor thoroughly, removing all dirt, grease, and debris. Repair any cracks, chips, or peeling areas as described in the previous sections.
Etch the Surface: Use a concrete etcher or grinder to roughen the surface. This step is essential for ensuring the new epoxy coating adheres properly. Rinse the floor and let it dry completely.
Apply a Base Coat: Mix the epoxy base coat and apply it evenly using a roller or squeegee. Work in small sections to ensure consistent coverage. Allow the base coat to cure as directed.
Add a Top Coat: Once the base coat is dry, apply the epoxy top coat for added durability and a glossy finish. You can also add decorative flakes or pigments at this stage for a customized look.
Allow to Cure: Let the floor cure for the recommended time, usually 24 to 72 hours. Avoid heavy traffic or placing furniture on the floor until it’s fully cured.

Diy Epoxy Garage Floors

What’s Cracking? Dealing with Cracks in Epoxy Coatings – Garage Perfect

Epoxy Flooring Installation Process – Garage Floor Coating Install

How to Repair An Uneven Epoxy Application – Epoxy Central

DIY Epoxy Concrete Crack Repair – What I use – How I Repair Concrete
How to install and epoxy floor coating
Related Posts: